Schrodinger-Notes—Target-based Pharmacophore Modeling
Declaration
This note is based on the article, “Structure-Based Virtual Screening Using Phase”1, and created with the Schrödinger Software Release 2023-4.
This note contains only minimal annotations to the original text, along with corrections to formatting errors. It is intended for educational and communicative purposes only, and all rights remain with the original author.
Introduction
This tutorial demonstrates the creation, validation, and application of pharmacophore hypotheses to recognize common protein-ligand interactions and use them in virtual screening. You will learn how to create a pharmacophore hypothesis using a protein-ligand complex, how to modify a pharmacophore hypothesis to bias by experimental observables and to screen against the hypothesis to identify Leukotriene-A4 hydrolase inhibitors.
1 Pharmacophore Modeling Prerequisites
Structure files obtained from the PDB, vendors, and other sources often lack necessary information for performing modeling-related tasks. Typically, these files are missing hydrogens, partial charges, side chains, and/or whole loop regions. In order to make these structures suitable for modeling tasks, we use the Protein Preparation Workflow to resolve issues. Similarly, ligand files can be sourced from numerous places, such as vendors or databases, often in the form of 1D or 2D structures with unstandardized chemistry. LigPrep can convert ligand files to 3D structures, with the chemistry properly standardized and extrapolated, ready for use in virtual screening.
In this tutorial, the protein and ligands have already been prepared in order to save time. Please see the Introduction to Structure Preparation and Visualization tutorial for instructions on using the Protein Preparation Workflow and LigPrep.
2 Creating Projects and Importing Structures
At the start of the session, change the file path to your chosen Working Directory in Maestro to make file navigation easier. Each session in Maestro begins with a default Scratch Project, which is not saved. A Maestro project stores all your data and has a .prj extension. A project may contain numerous entries corresponding to imported structures, as well as the output of modeling-related tasks. Once a project is created, the project is automatically saved each time a change is made.
Structures can be imported from the PDB directly, or from your Working Directory using File > Import Structures, and are automatically added to the Entry List and Project Table. The Entry List is located to the left of the Workspace. The Project Table can be accessed by Ctrl+T (Cmd+T) or Window > Project Table to see an expanded view of your project data.

- Double-click the Maestro icon
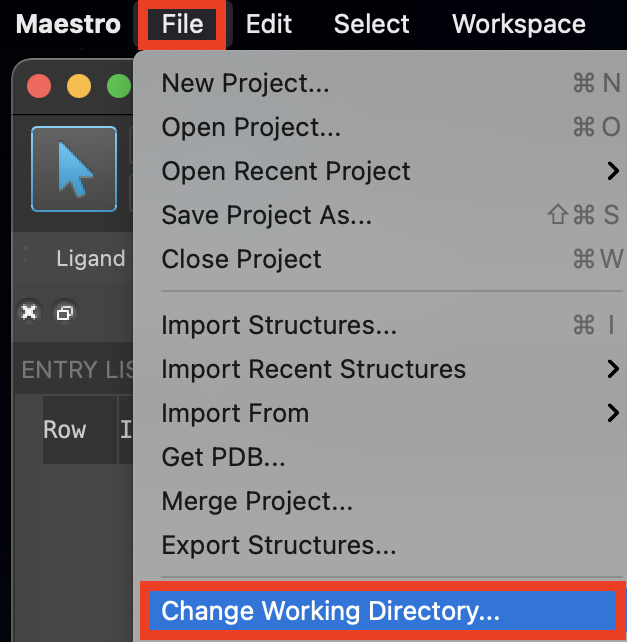
Figure 2-1. Change Working Directory option.
Go to File > Change Working Directory
Find your directory, and click Choose
Pre-generated input and results files are included for running jobs or examining output. Download the zip file here: https://www.schrodinger.com/sites/default/files/s3/release/current/Tutorials/zip/sbvs_phase.zip
After downloading the zip file, unzip the contents in your Working Directory for ease of access throughout the tutorial
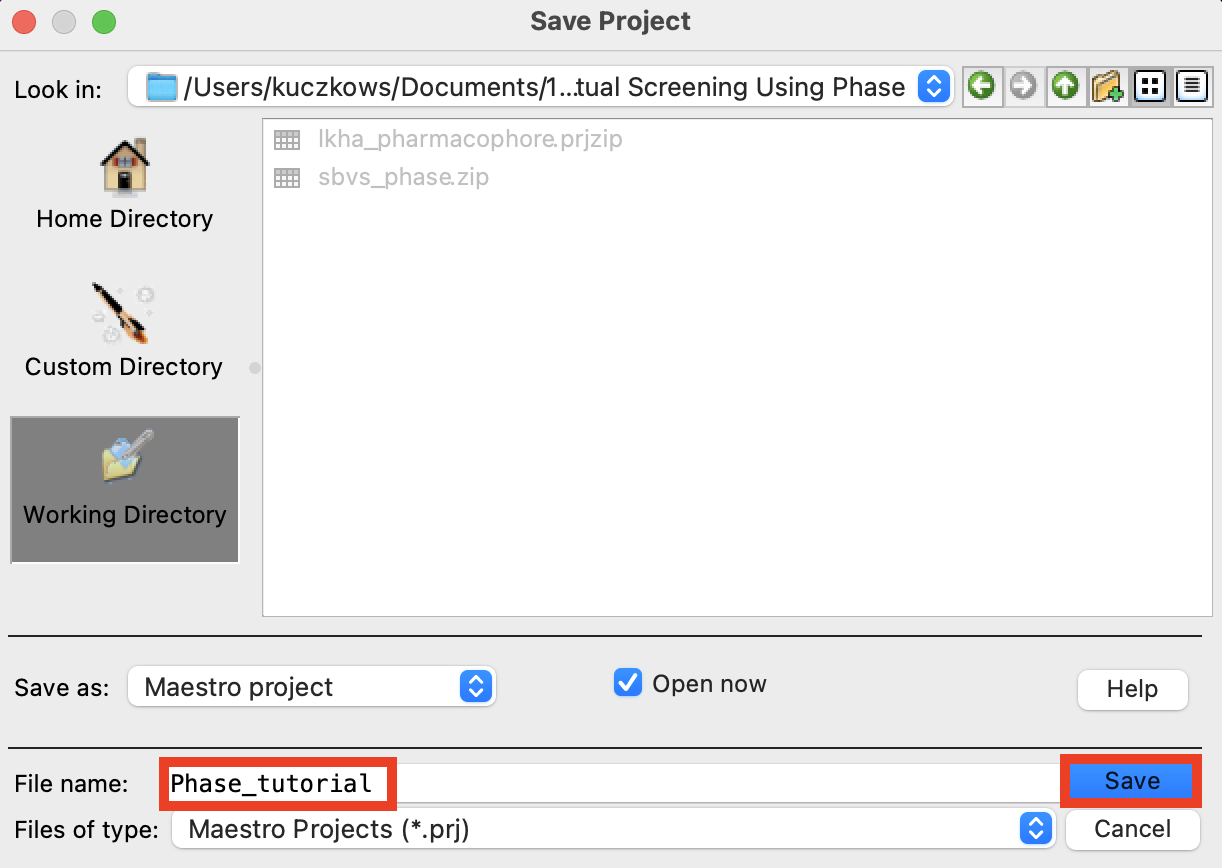
Figure 2-2. Save Project panel.
Go to File > Open Project >
lkha4_pharmacophore.prjzip> OpenIn Save Scratch Project, click OK
Go to File > Save Project As
Change the File name to Phase_tutorial
Click Save
3 Creating, Viewing, and Manipulating Hypotheses
In this section, we will create a pharmacophore hypothesis from a protein-ligand complex. We will learn how to merge hypotheses, add a site to a hypothesis that wasn’t recognized by the feature definitions, as well as generate and manipulate excluded volumes.
3.1 Create a pharmacophore hypothesis from a protein-ligand complex
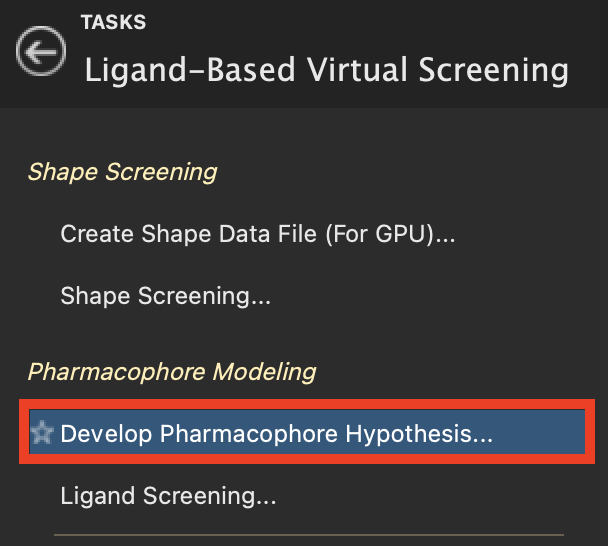
Figure 3-1. Develop Pharmacophore Hypothesis… option in Ligand-Based Virtual Screening.
Includethe entry is represented in the Workspace, the circle in the In column is blue the entry 3chp_prepared
Double-click Presets
Go to Tasks > Browse > Ligand-Based Virtual Screening > Develop Pharmacophore Hypothesis
Note: This can be added to your Favorites Bar by clicking the star to the left of the option
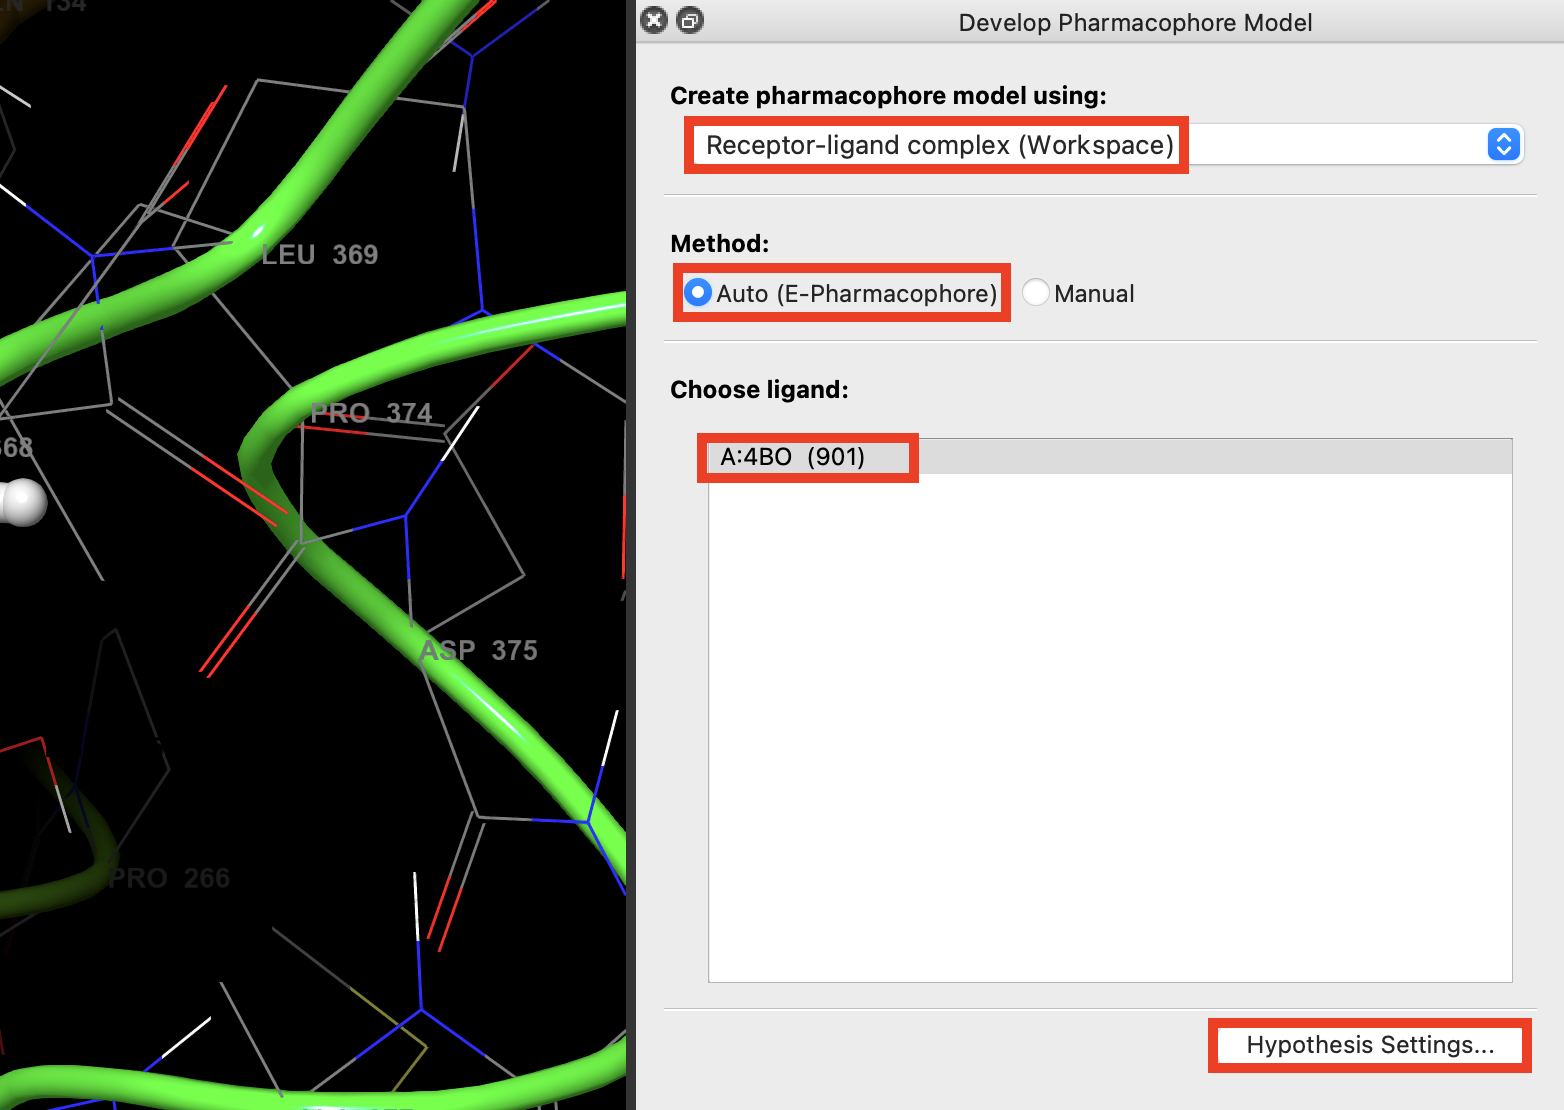
Figure 3-2. Creating a complex hypothesis using e-Pharmacophores.
Under Create pharmacophore model using, choose Receptor-ligand complex (Workspace)
Click Auto (E-Pharmacophore)
Under Choose ligand, click A:4BO (901)
Click Hypothesis Settings
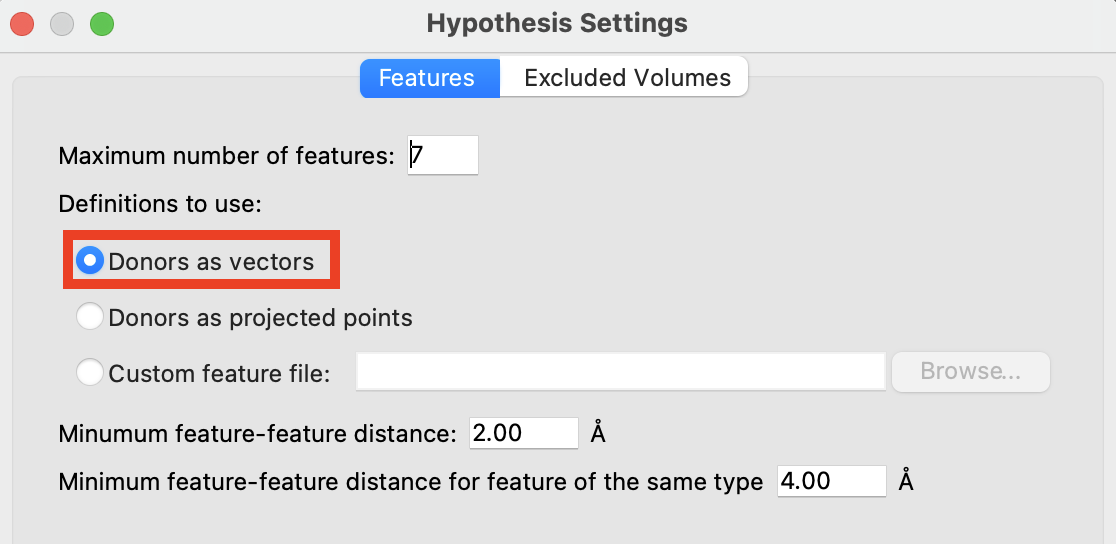
Figure 3-3. The Features tab in Hypothesis Settings.
- In the Features tab, choose Donors as vectors
Donors as vectors—Treat donors as vector features, in which the bond from the donor heavy atom to the hydrogen is treated as a vector along which the acceptor must lie. This implies that the acceptor can only form a hydrogen bond with a donor that lies along this vector.
Donors as projected points—Treat a donor as a point feature, located where the corresponding acceptor would be found in a complex, here set to 1.4 Å from the H atom along the X-H bond. This implies that the acceptor can accept a hydrogen bond with donors from other directions and in other locations. For the purpose of developing a common pharmacophore hypothesis, this choice allows matching of donors as belonging to the same feature even if the donor atoms themselves are not in the same location, because the corresponding acceptor is in the same locaction.
Custom feature file—Specify the pharmacophore feature set to use, by reading a custom feature file. Click Browse to open a file selector, in which you can navigate to the file and open it.
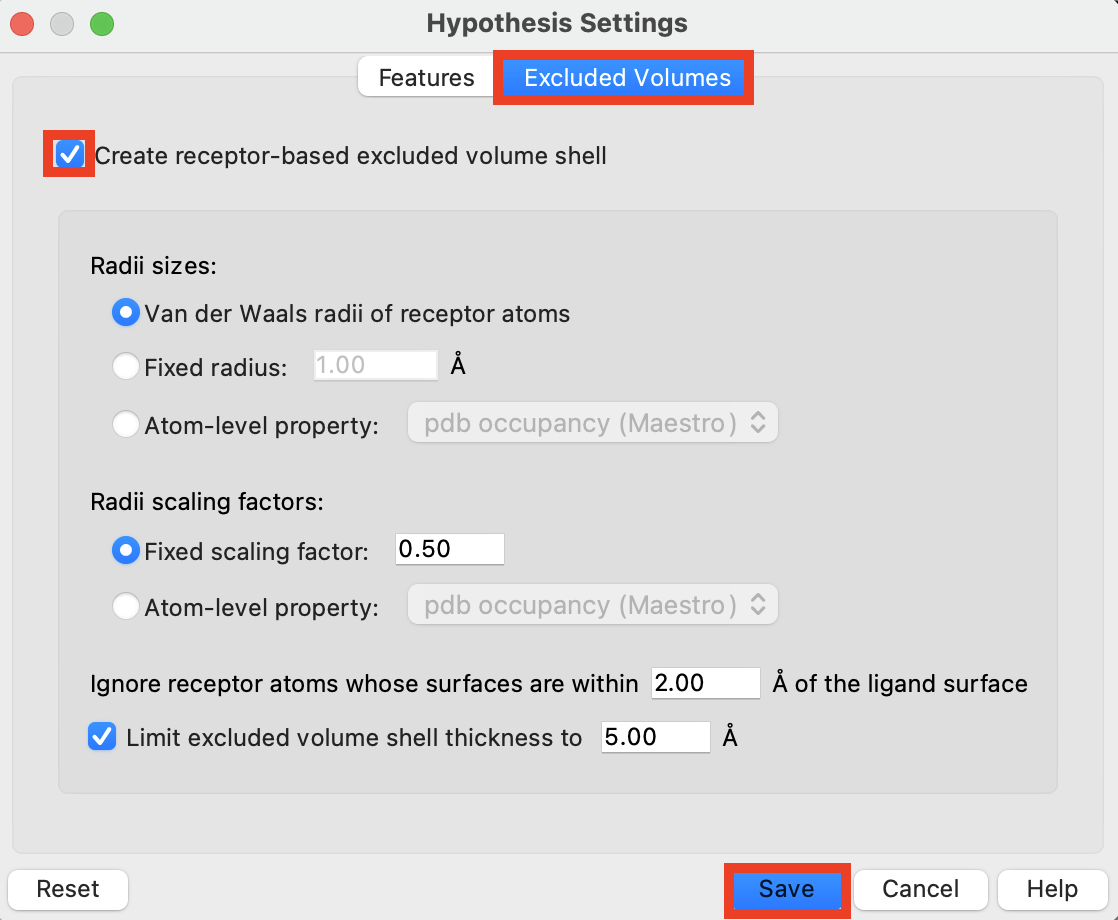
Figure 3-4. The Excluded Volumes tab in Hypothesis Settings.
Click the Excluded Volumes tab
Choose Create receptor-based excluded volumes shell
Click Save
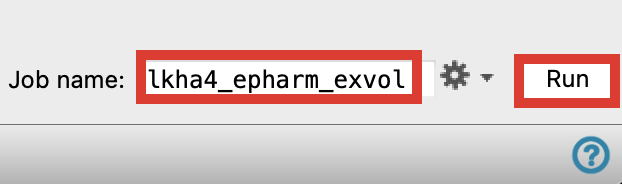
Figure 3-5. Create hypothesis.
In Develop Pharmacophore Model, change Job name to lkha4_epharm_exvol
Click Run
This job takes a few minutes
A banner appears in the Workspace when the job has been incorporated
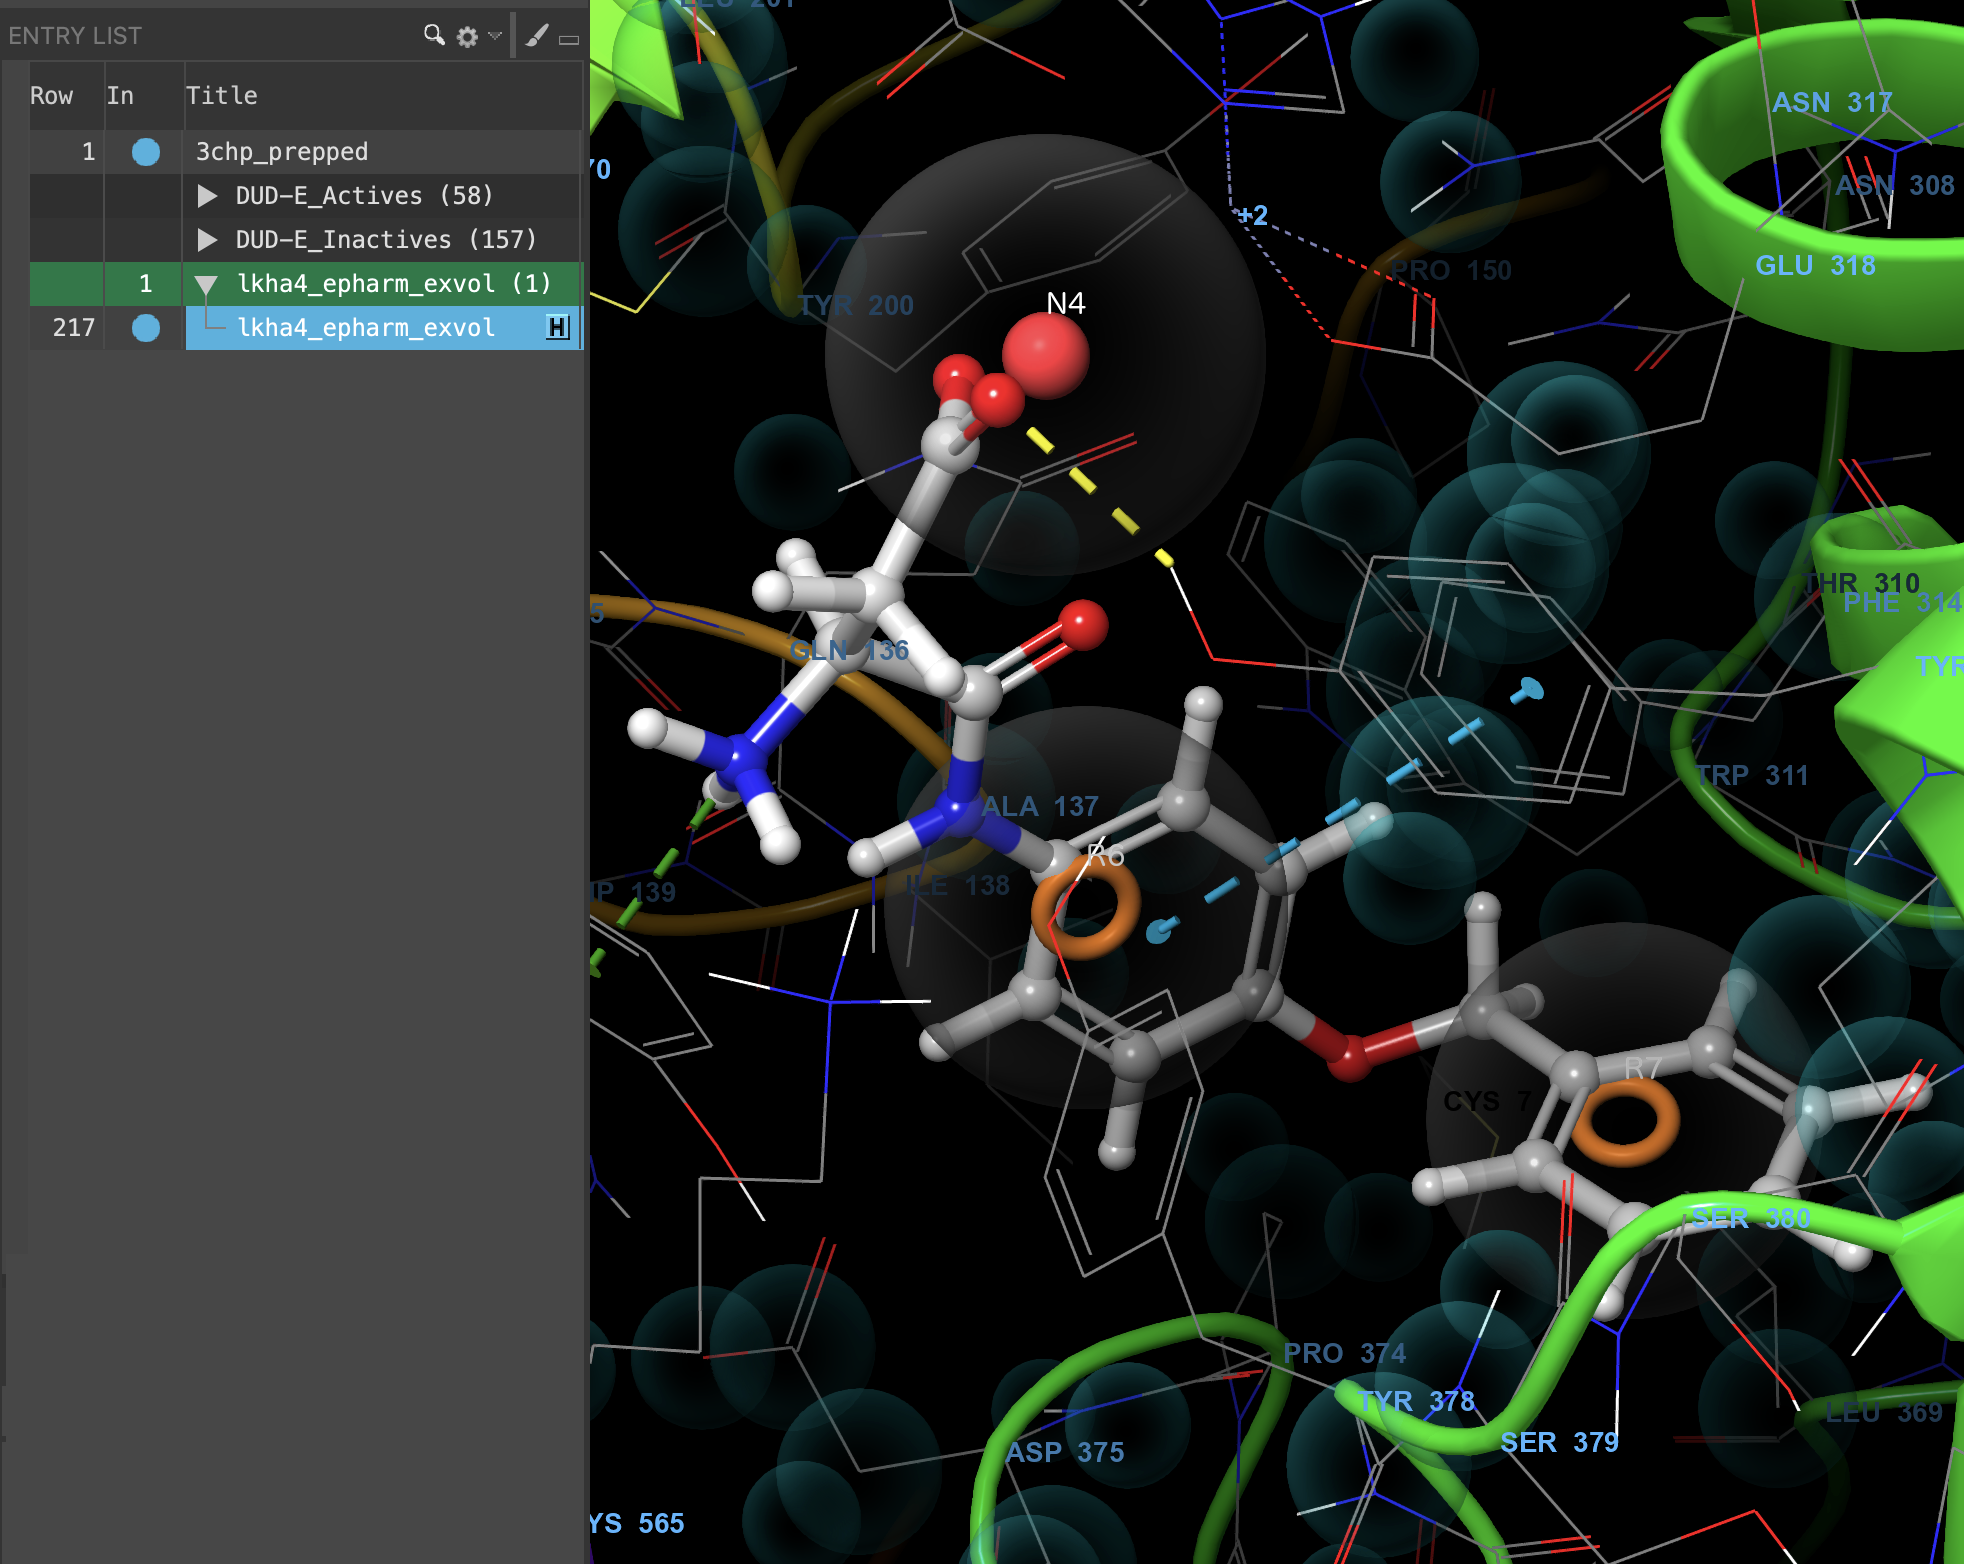
Figure 3-6. E-Pharmacophore overlaid with 3CHP prepped complex.
- Include lkha4_epharm_exvol and 3chp_prepped
- The generated E-Pharmacophore is now overlaid in the Workspace with the input protein-ligand complex
3.2 Create a pharmacophore hypothesis manually
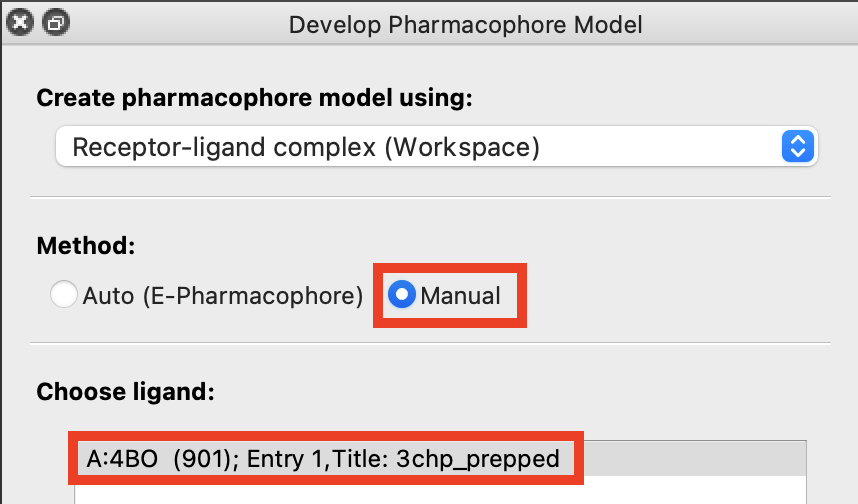
Figure 3-6. Creating a complex hypothesis manually.
Note: Several studies have noted the presence of hydrogen-bonding between the TRP 311 residue backbone and the bound ligand. Since that feature is not present in the previously generated pharmacophore hypothesis, we can add it through a manual hypothesis.
- In Develop Pharmacophore Model, choose Manual
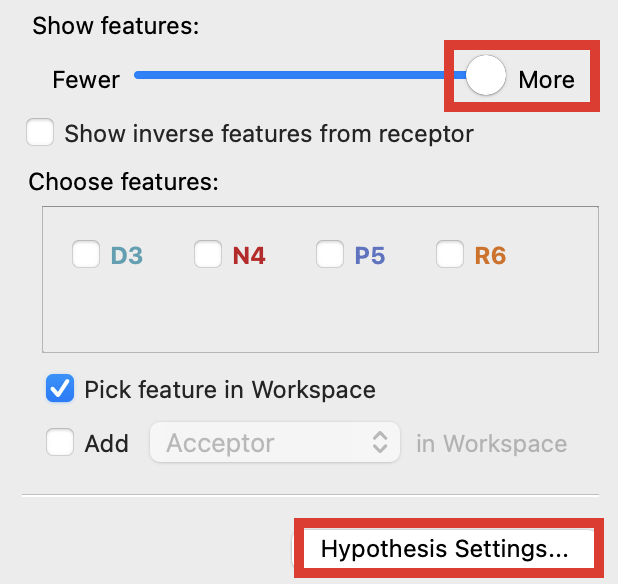

Figure 3-7. Use the slider to show features.
Note: There are some features that were not included in the ePharmacophore that can be chosen when generating a Manual Hypothesis. This is due to a difference in cutoff between the two tools.
Under Show features, drag the slider right to More
Click Hypothesis Settings
Check Create receptor-based excluded volumes shell
Click Save
Selecting Show inverse features from receptor generates additional features based on idealized geometries of specific interactions and hydrophobic features of the binding site
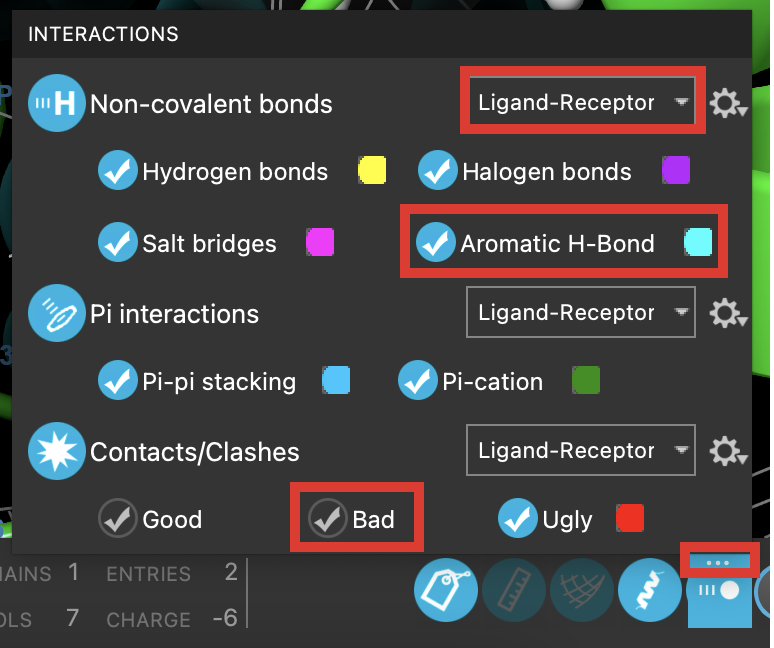
Figure 3-8. Interactions panel.
- In the Workspace Configuration Toolbar (bottom right), right-click Interactions
- The Interactions panel opens
Next to Non-covalent bonds, choose Ligand-receptor
Click Aromatic H-bonds
- Aromatic H-bonds are visualized in the Workspace
- Click Bad
- Bad clashes are hidden in the Workspace

Figure 3-9. TRP 311 selected in the Structure Hierarchy.
In the Structure Hierarchy, search for TRP 311
Select TRP 311
Note: The search field can be opened or closed by clicking the magnifying glass or Structure Hierarchy

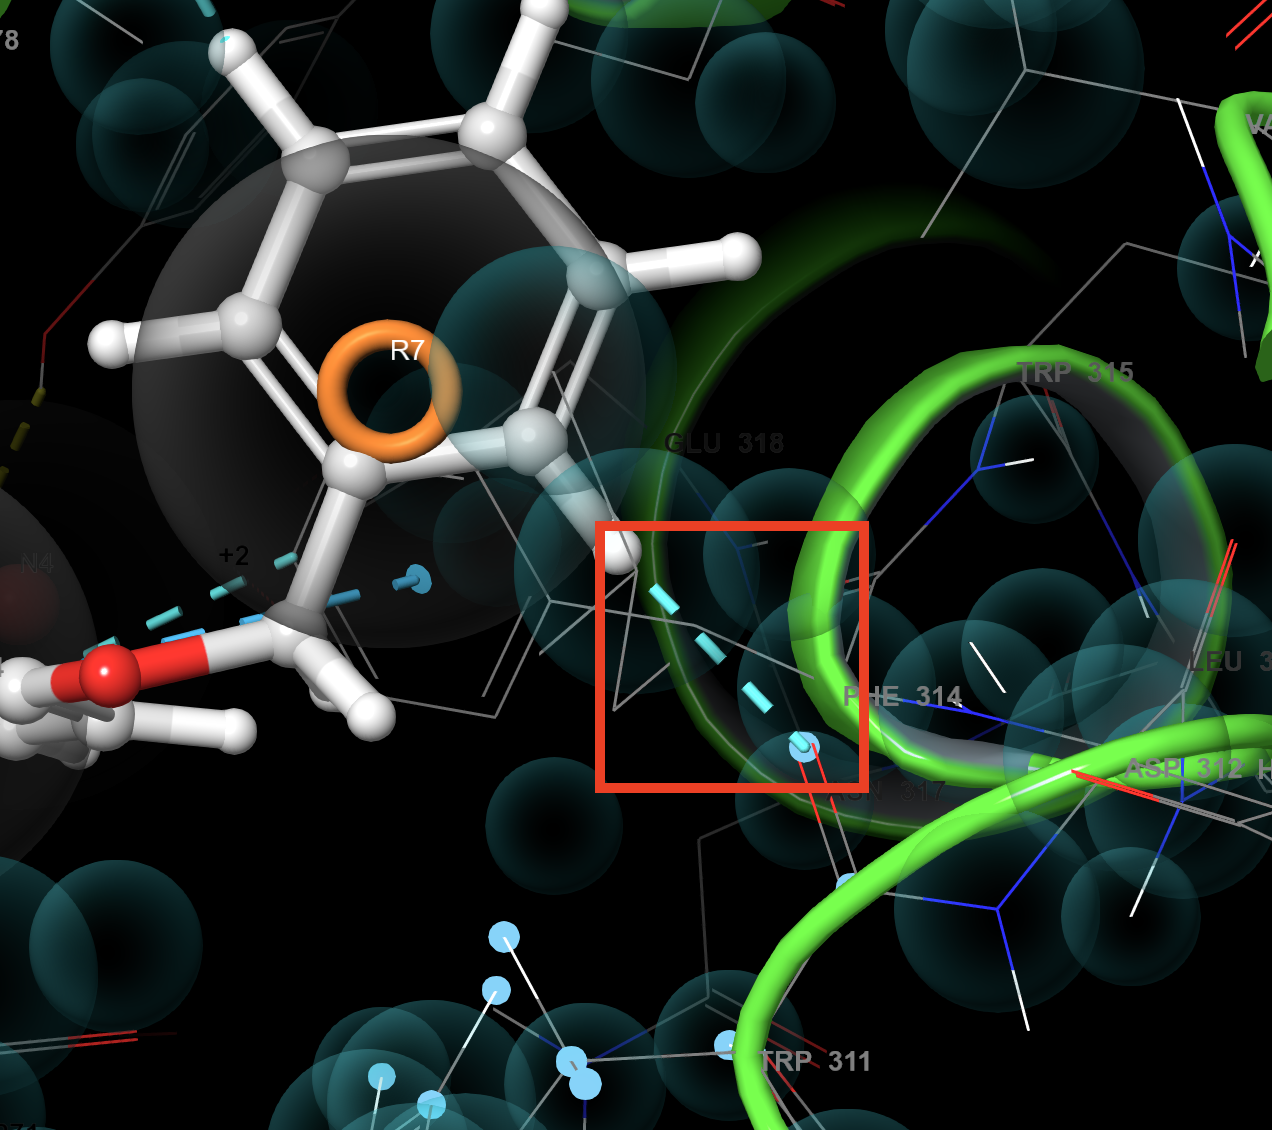
Figure 3-10. Fit view to selected atoms.
- On the toolbar, under Fit, click Fit view to selected atoms
- The Workspace zooms to TRP 311
Note: You may also double-click TRP 311 in the Structure Hierarchy to zoom to the residue selection.
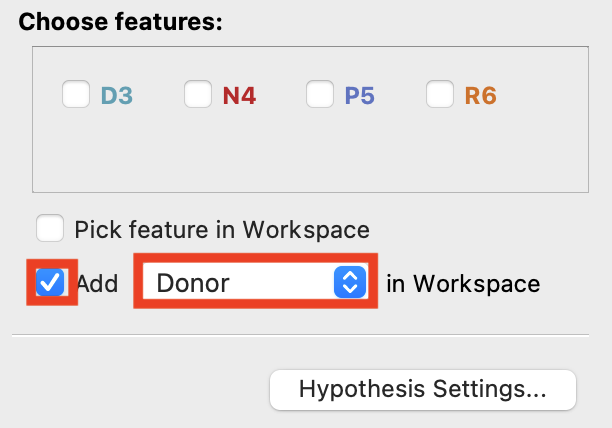
Figure 3-11. Add a Donor to the Workspace.
- In the Develop Pharmacophore Model panel, under Choose features, check Add and choose Donor in Workspace
- A banner appears prompting you to pick an atom
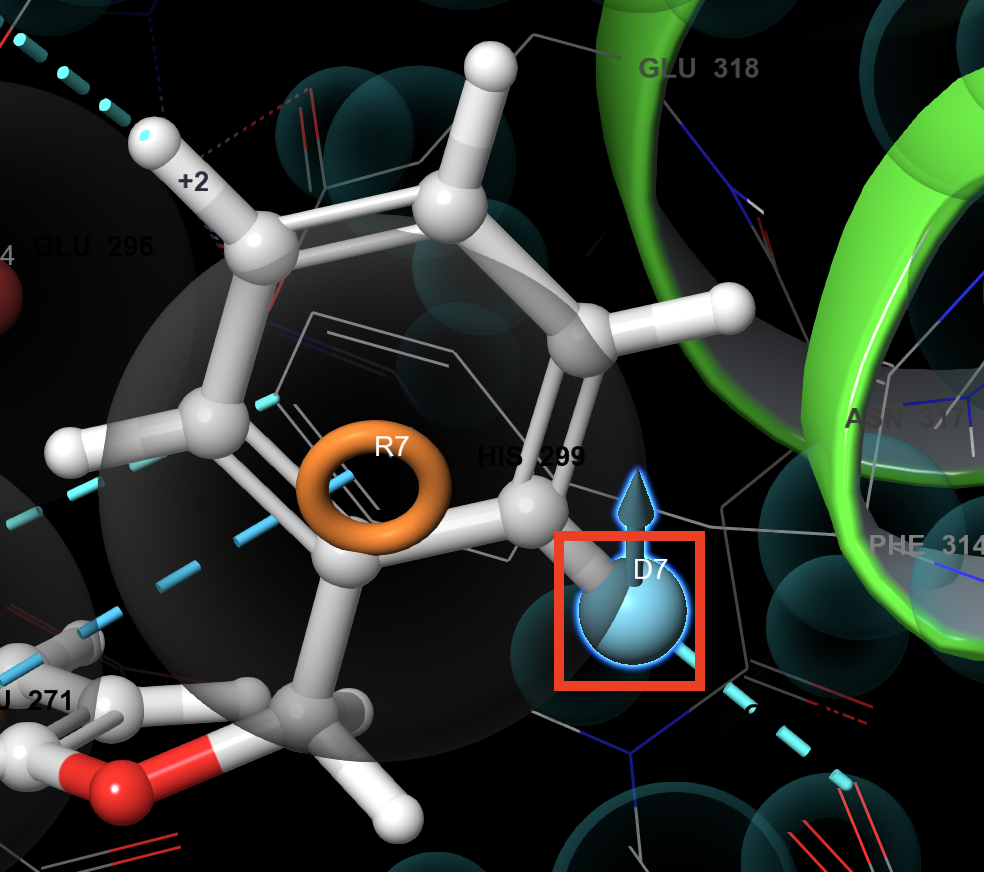
Figure 3-12. Select atom H20 on the ligand.
- Select atom H20 on the ligand, which makes an aromatic H-bond with the backbone of TRP 311
A donor vector, D7, appears in the Workspace
D7 is added in the Choose features box of the Develop Pharmacophore Model panel
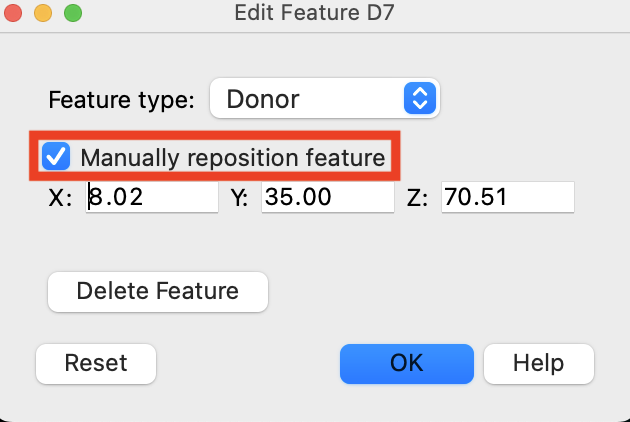
Figure 3-13. Edit Feature D7 panel.
In the Workspacethe 3D display area in the center of the main window, where molecular structures are displayed, right-click the D7 vector
Choose Manually reposition feature
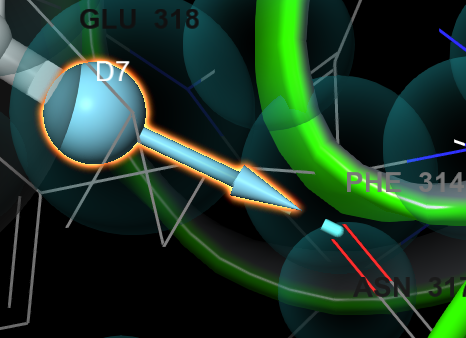
Figure 3-14. D7 vector after repositioning.
Click and drag the scroll wheel (Shift-click and drag on a Trackpad) to reposition the vector along the hydrogen bond
Click OK
Note: See the Custom Mouse Actions Panel help topic for further information on mouse actions
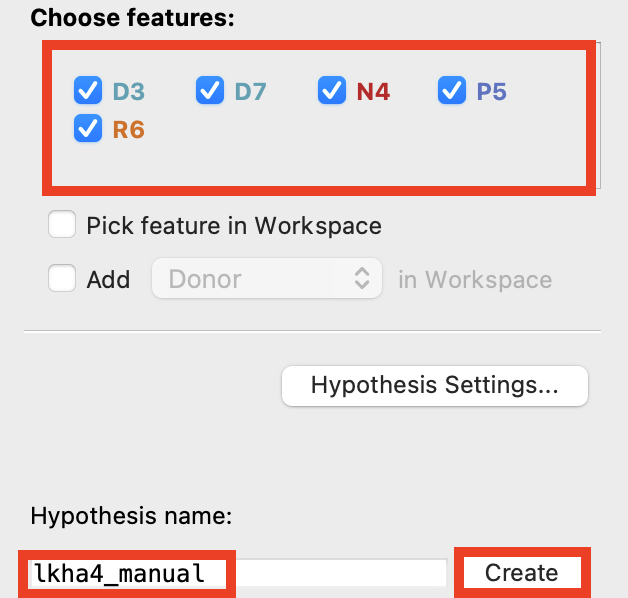
Figure 3-15. Check all five features.
In Develop Pharmacophore Model, under Choose features, check all five features
Change Hypothesis name to lkha4_manual
Click Create
This job takes less than a minute
A banner appears in the Workspace when the job has been incorporated
A new entry titled lkha4_manual is added to the Entry List
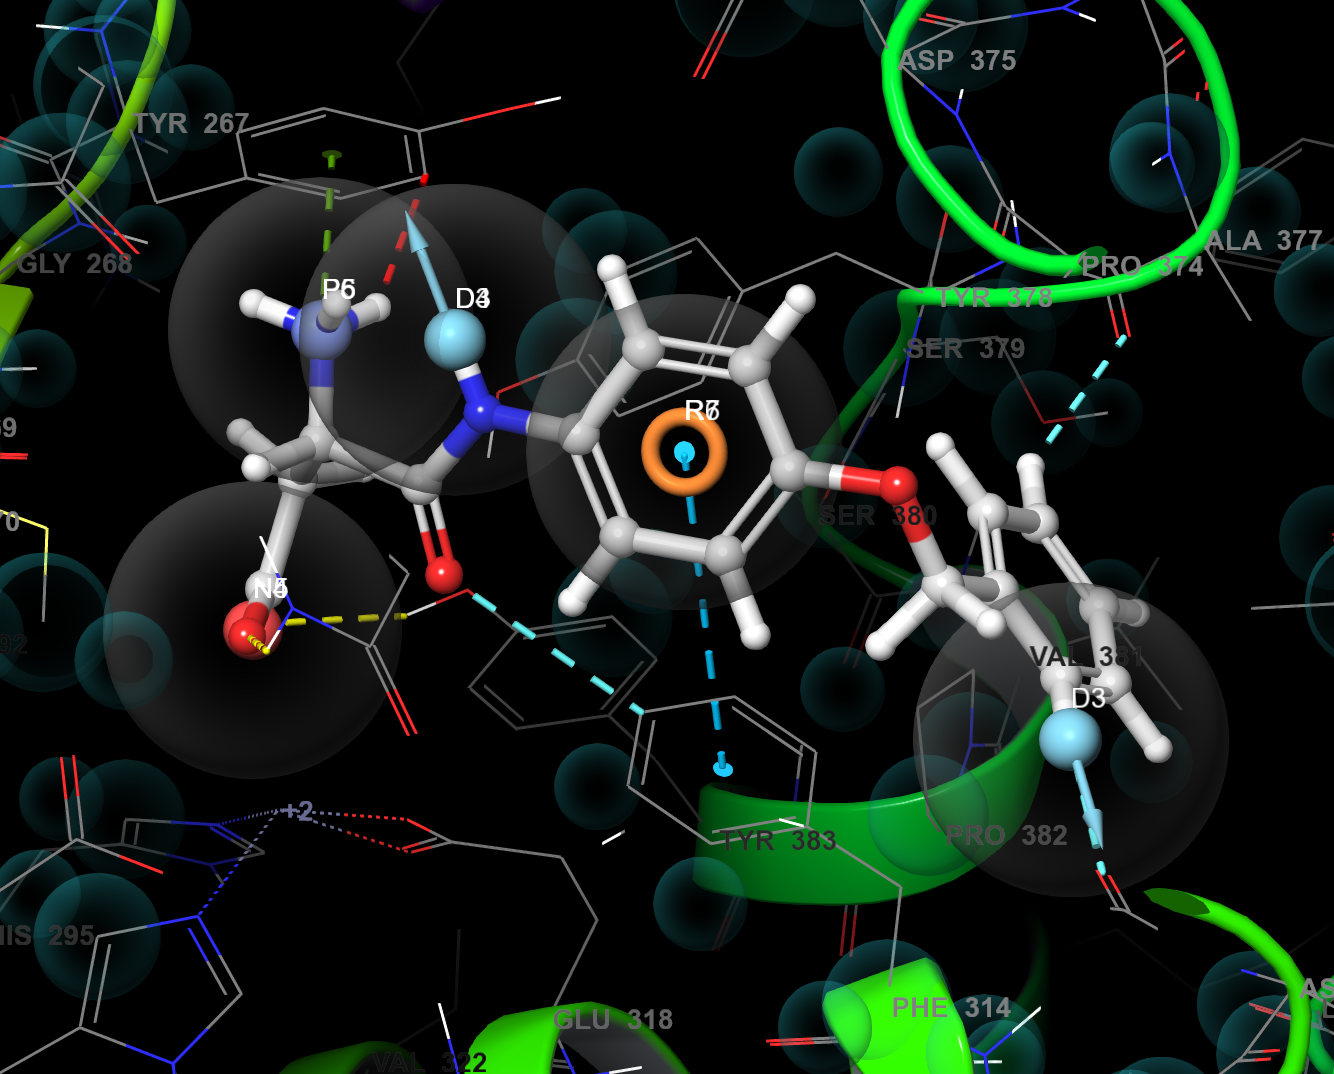
Figure 3-16. Manual Pharmacophore overlaid with 3CHP prepped complex.
- Include lkha4_manual and 3chp_prepped in the Workspace
- The generated Pharmacophore is now overlaid in the Workspace with the input protein-ligand complex
3.3 Manipulate a hypothesis
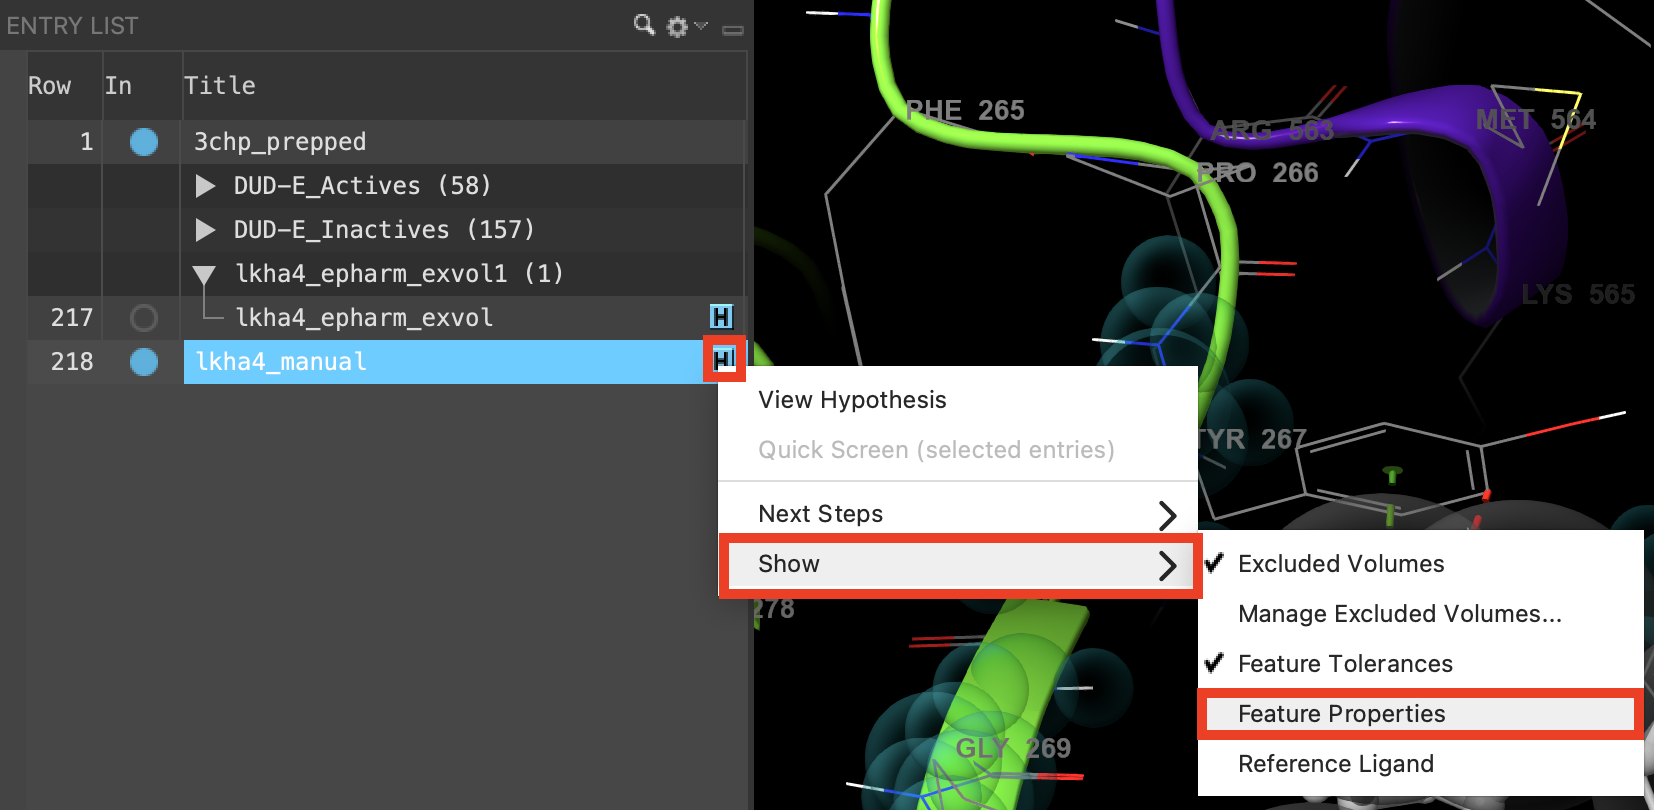
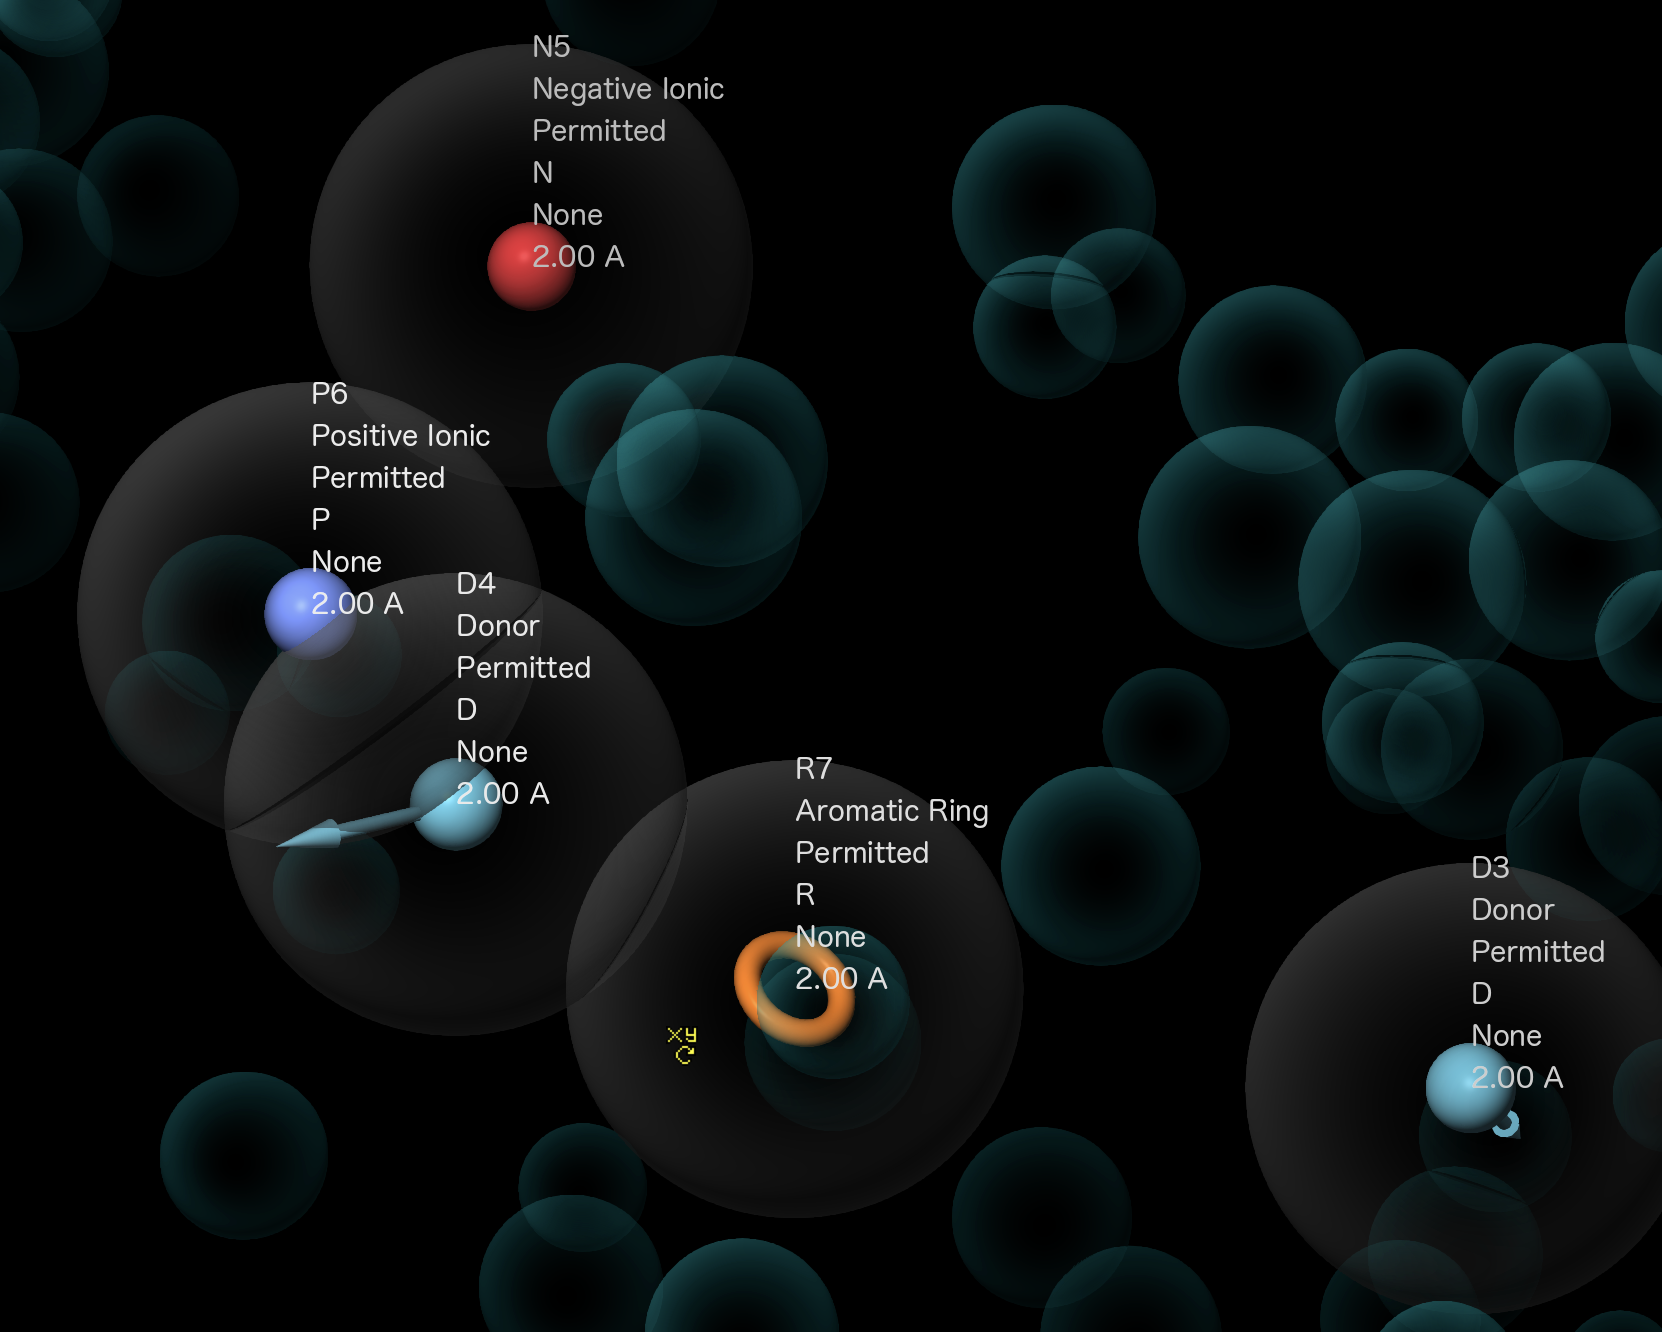
Figure 3-17. Show hypothesis feature properties in the Workspace.
Note: For ligand screening, it is at times desirable to broaden or narrow the types of moieties a particular pharmacophore feature is allowed to match.
Includethe entry is represented in the Workspace, the circle in the In column is blue lkha4_manual
Next to lkha4_manual, click the H
Choose Show and then feature properties
Excluded volumes can be edited manually. As a pedagogical practice, we will demonstrate adding and removing excluded volumes below.
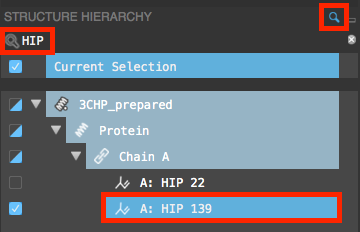
Figure 3-18. HIP 139 selected in the Structure Hierarchy.
Ctrl-click (Cmd-click) to includethe entry is represented in the Workspace, the circle in the In column is blue lkha4_manual and 3CHP_prepared
In the Structure Hierarchy, search for HIP
On the toolbar, under Fit, click Fit view to selected atoms
- The Workspace zooms to HIP 139
- On the toolbar, under Fit, click Fit view to selected atoms
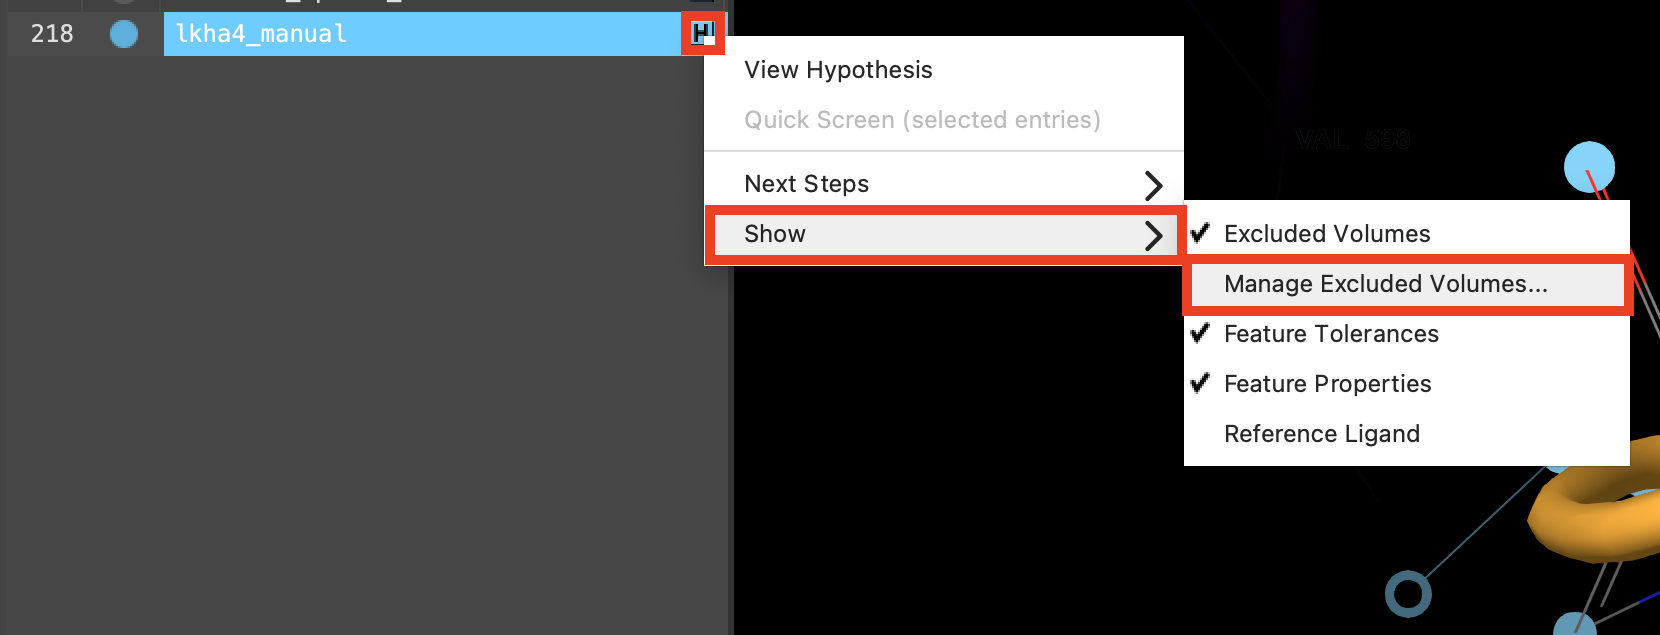
Figure 3-19. Manage excluded volumes option.
Next to lkha4_manual, click the H
Choose Manage excluded volumes
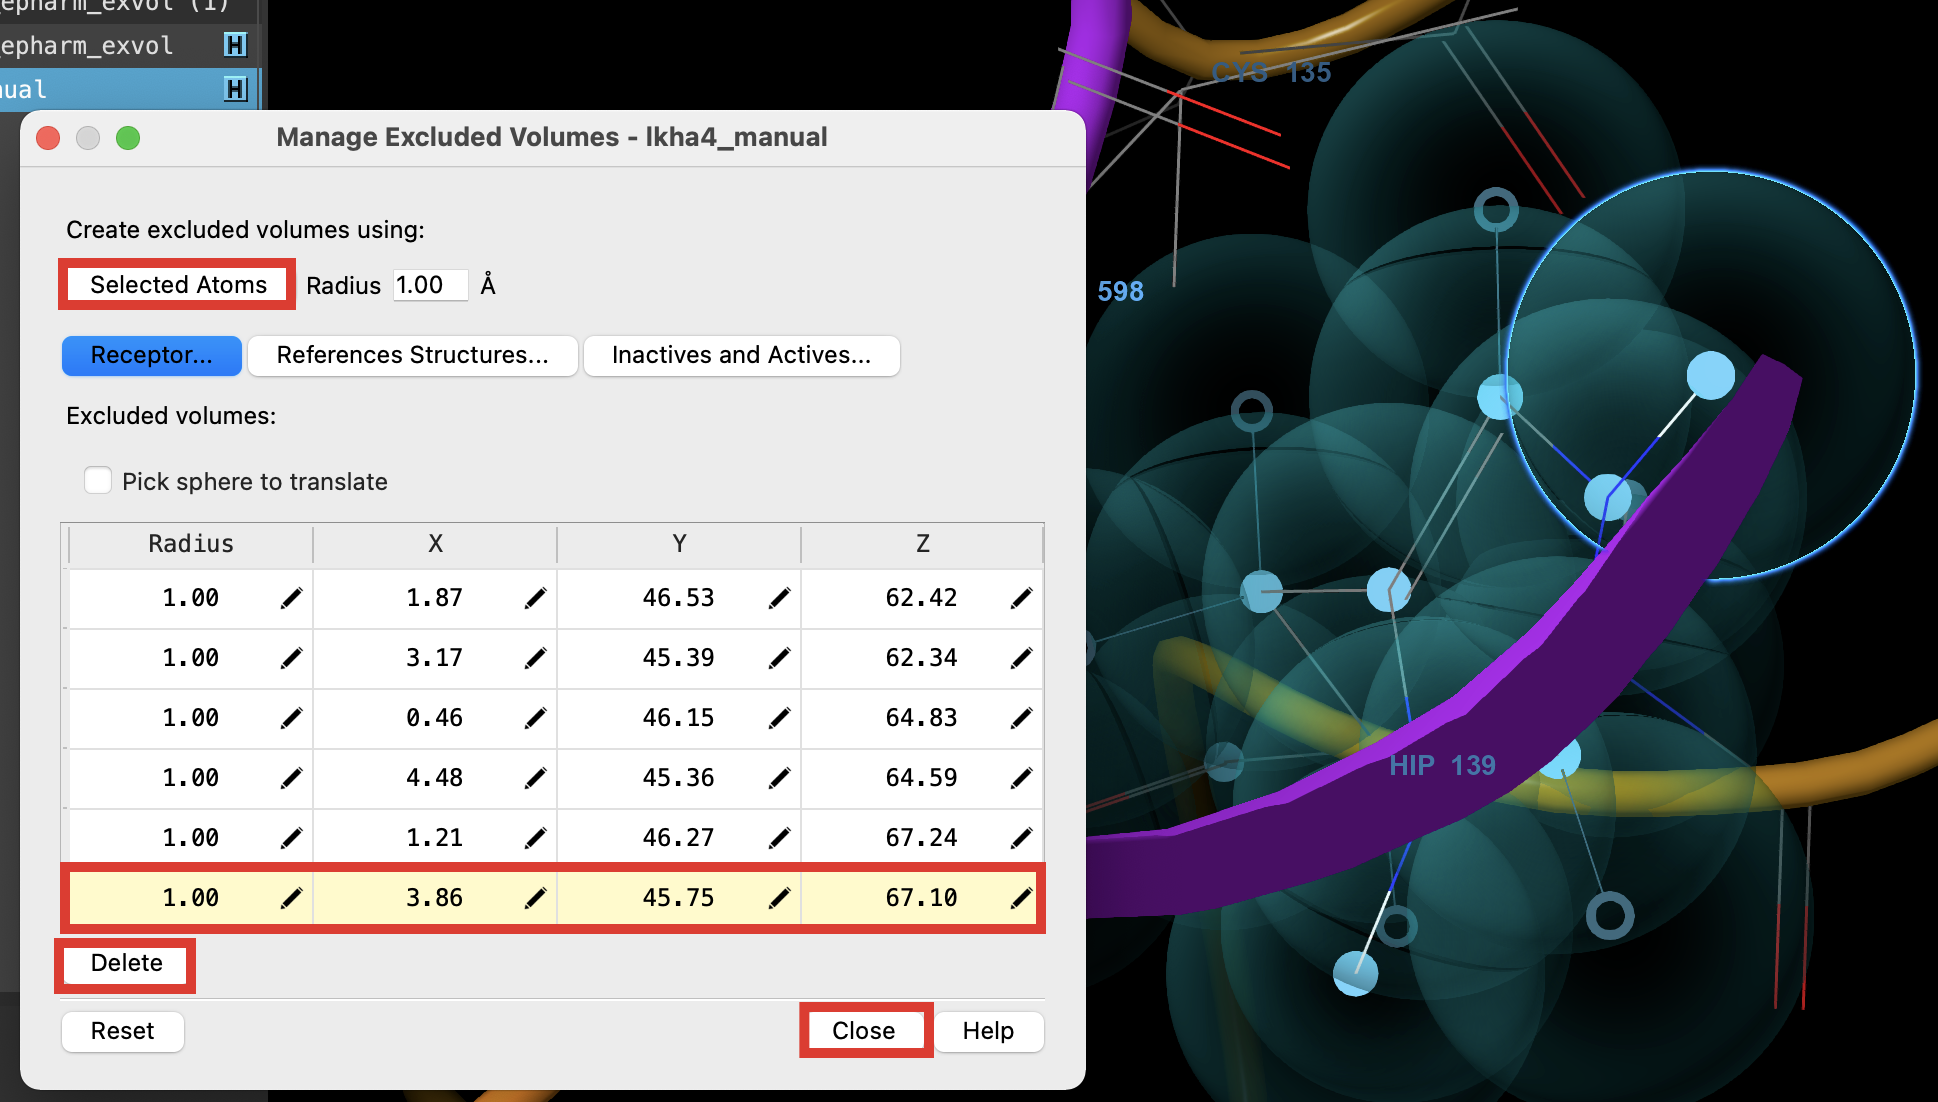
Figure 3-20. Manage Excluded Volumes panel (left) with new excluded volumes added to selected atoms in the Workspace (right).
- In the Manage Excluded Volumes panel, click Selected Atoms
Excluded volumes are added for atoms in HIP 139
Information is added to the bottom of the table
- Scroll to the bottom of the table and select the last excluded volume
- The selected excluded volume is highlighted in the Workspace
- Click Delete
- The highlighted excluded volume is deleted from the Workspace
- Click Close
3.4 Merge hypotheses
Merging hypotheses allows you to develop multiple models and choose common/desired features manually.
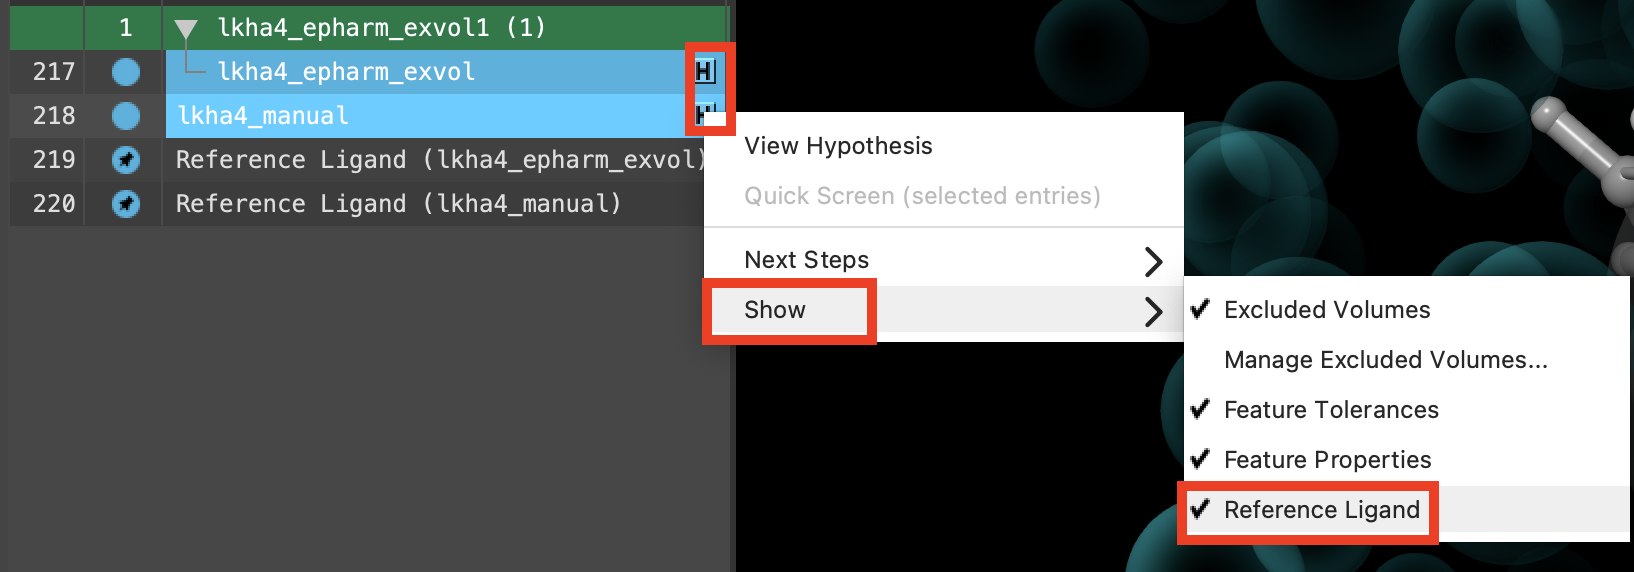
Figure 3-21. Reference ligands are added to the Workspace for both included entries.
Shift-click to include lkha4_manual and lkha4_epharm_exvol
For each included entry, click the H and choose Show then Reference ligand
Reference ligands are added to the Entry List
Reference ligands are included and fixed in the Workspace
- Go to Tasks > Browse > Ligand-Based Virtual Screening > Develop Pharmacophore Hypotheses
- The Develop Pharmacophore Model panel opens

Figure 3-22. Merged hypotheses (Workspace) option in Develop Pharmacophore Model.
- For Create pharmacophore model using, choose Merged hypotheses (Workspace)
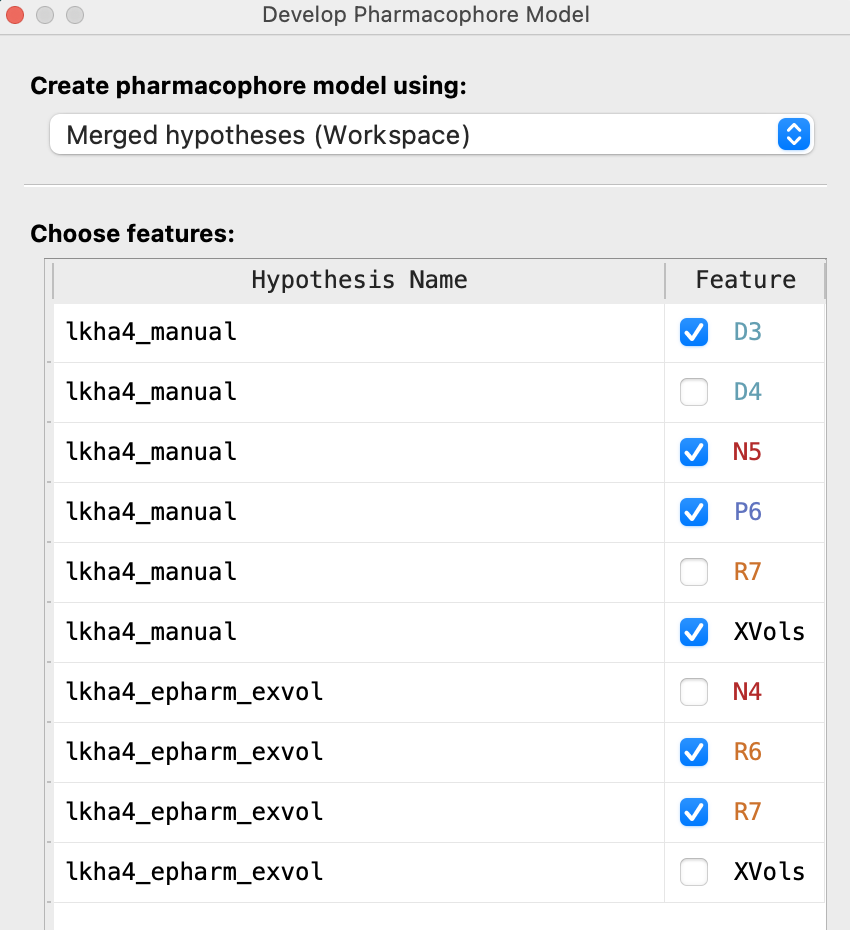
Figure 3-23. Picking features to merge.
For Choose features, from lkha4_manual choose D3, N5, P6, and XVols
For Choose features, from lkha4_epharm_exvol choose R6 and R7
Note: The D3 feature is the donor that we added manually. The R6 feature in the ePharmacophore aligns well with the R7 from the manual pharmacophore, so only one of them needs to be added to the merged hypothesis.
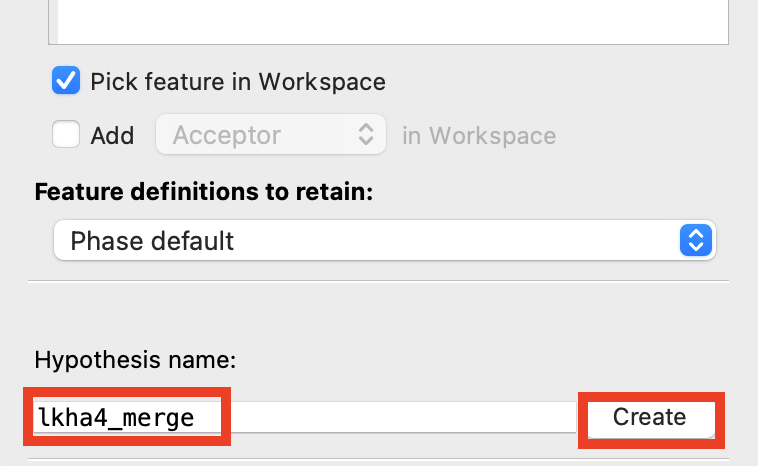
Figure 3-24. Merge hypothesis.
Change Hypothesis name to lkha4_merge
Click Create
4 Screening Ligands against a Hypothesis
In this section, we will cover screening ligands against a hypothesis. We will then visualize the results and examine the PhaseScreenScore to evaluate how well the ligands align to the pharmacophore features of the hypothesis it was screened against.
4.1 Screen ligands from a file
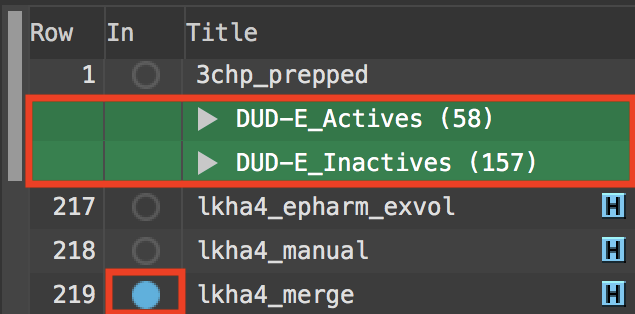
Figure 4-1. Entry List selection and inclusion.
In the Entry List, select the DUD-E_Actives and DUDE_Inactives groups
Ctrl-click (Cmd-click) to include lkha4_merge
DUD-E is a ‘Database of Useful Decoys: Enhanced.’ For each active in the database, there are 50 decoys with similar 1-D physio-chemical properties, but different 2-D topology. DUD-E ligand set can thus be used in pharmacophore screening to avoid artificial enrichment.
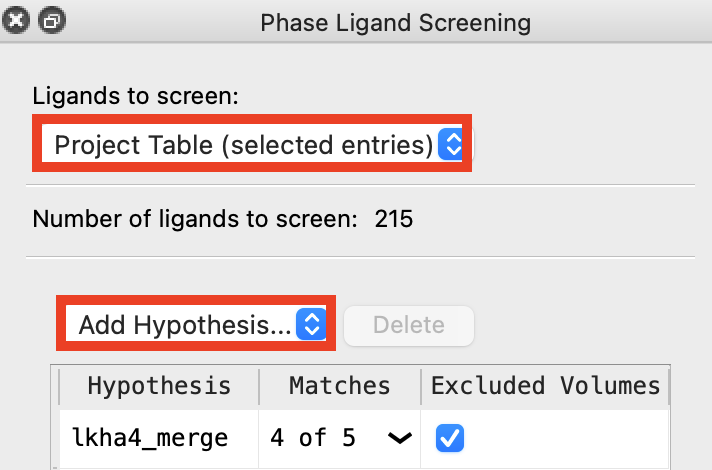
Figure 4-2. Phase Ligand Screening panel.
Go to Tasks > Browse > Ligand-Based Virtual Screening > Ligand Screening
For Ligands to screen, choose Project Table (selected entries)
Click Add Hypothesis
Choose Workspace
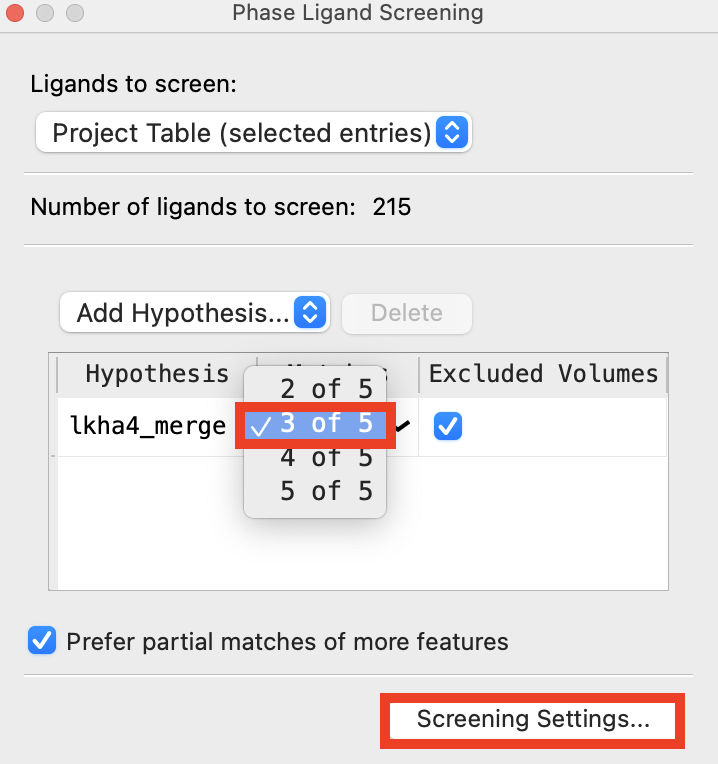
Figure 4-4. Ligands must satisfy at least 3 features of each hypothesis.
For the lkha_merge hypothesis, click the Matches column and choose 3 of 5
Click Screening Settings
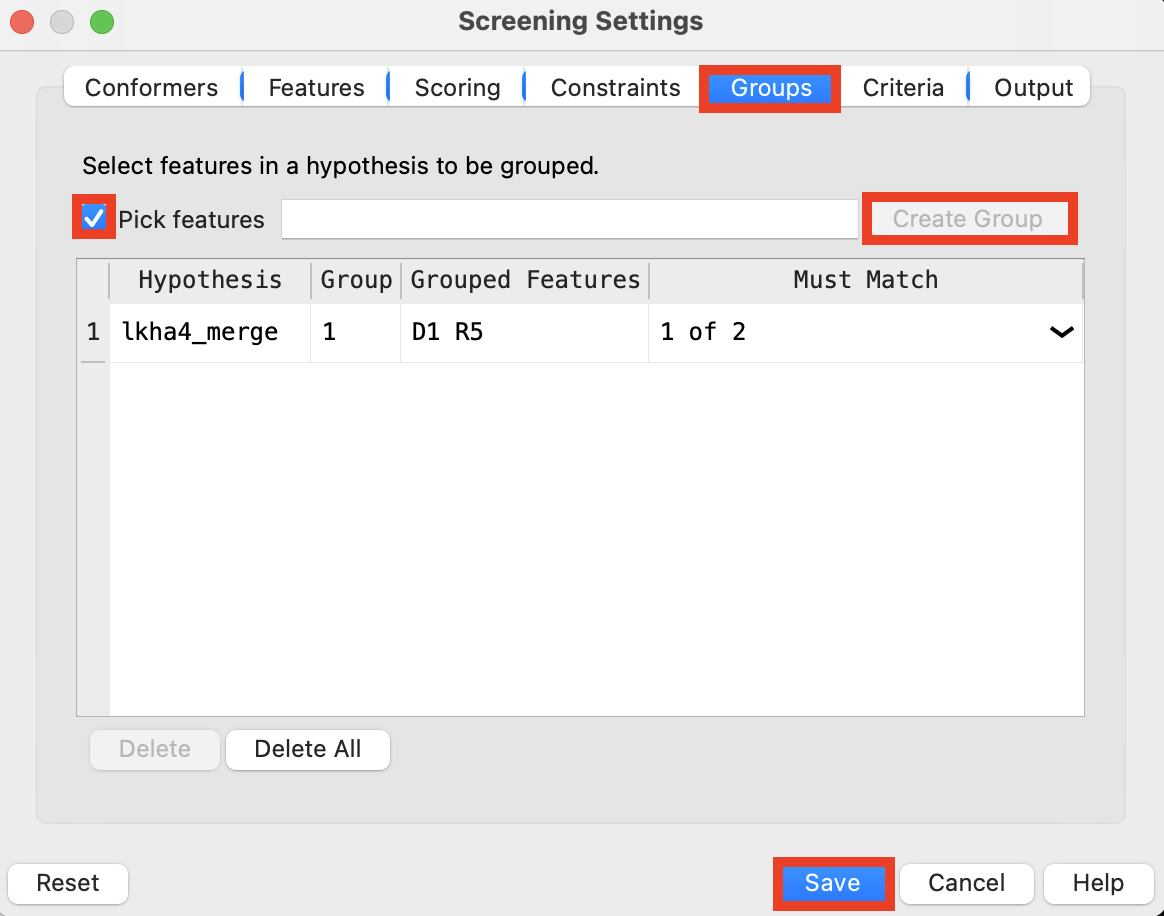
Figure 4-5. Add feature group to ligand screening.
Go to the Groups tab
Select features D1 and R5
Click Create Group
Click Save
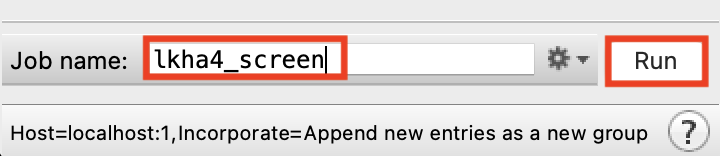
Figure 4-6. Change Job name.
Change the Job name to lkha4_screen
Click Run
Close the Phase Ligand Screening panel
4.2 Visualize pharmacophore screening results
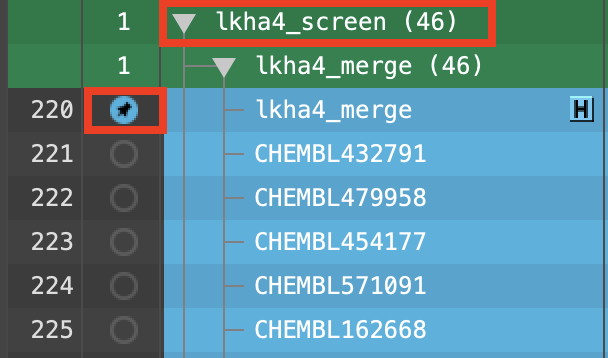
Figure 4-7. Ligand screening results visualized with the corresponding hypothesis.
In the lkha4_screen group, double-click the lhka4_merge In circle to fix the hypothesis in the Workspace
Select the lkha4_screen group
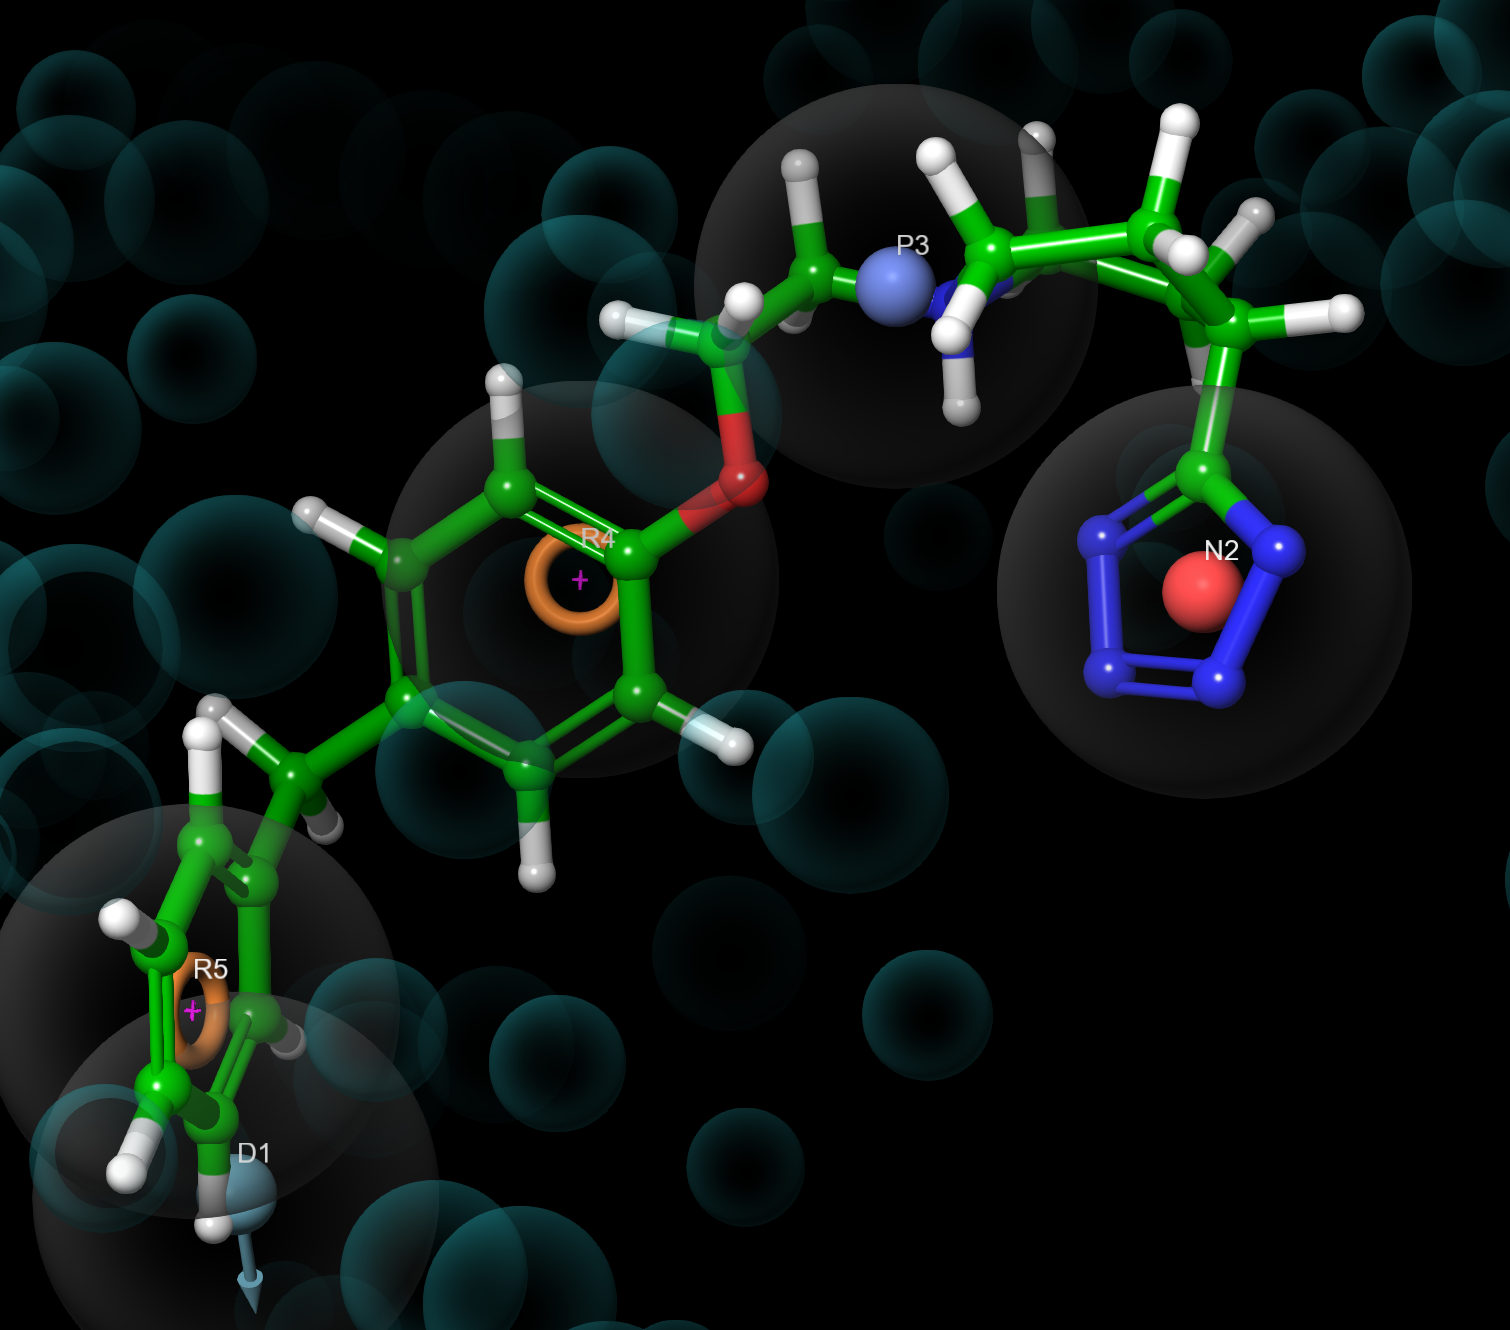
Figure 4-8. Ligand screening results visualized with the corresponding hypothesis.
- Use right and left arrow keys to step through the ligands
Note: Double click the presets button for the view displayed in Figure 4-8.
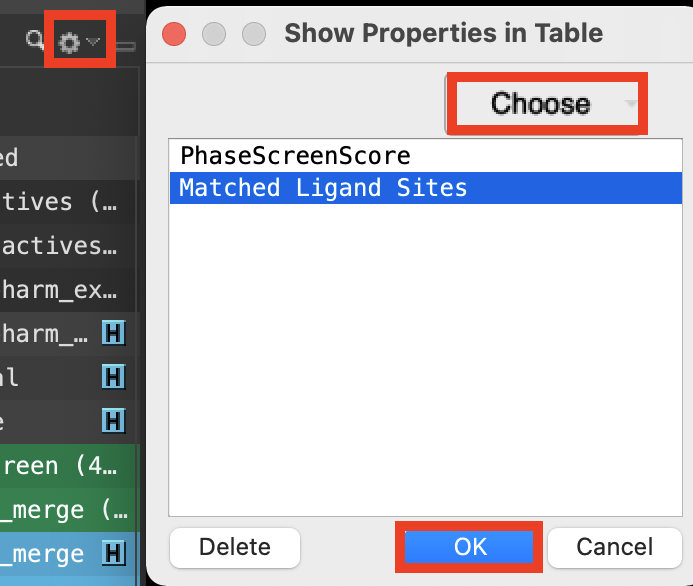
Figure 4-9. Add properties to the Entry List.
At the top right corner of the Entry List, click the Settings button (cog)
Select Show Property
- The Show Property panel opens
Click Choose
Type and select PhaseScreenScore
Type and select Matched Ligand Sites
Click OK
Note: Hover over the Matched Ligand Sites circles to see what features are present
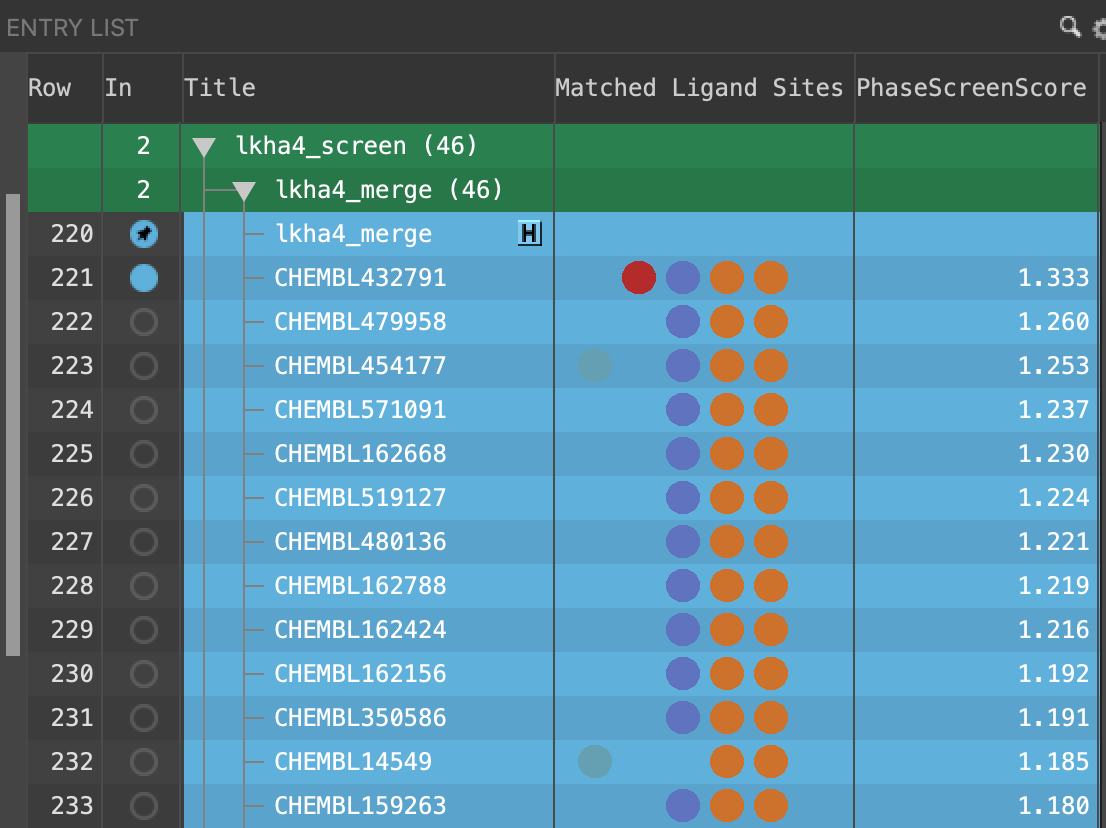
Figure 4-10. Updated Entry List with Matched Ligand Sites and Phase Screen Score.
Note: Only 46 of the 215 screened ligands were returned following the Phase Ligand Screen due to the matching criteria. Of those returned, only 6 were inactives, and those had low Phase Screen Scores relative to the rest of the dataset.
Please note that your results may vary slightly from those in Figure 4-10. due to periodic upgrades in our software over time.
Both the quantity and quality of feature matching is taken into account in the PhaseScreenScore. A ligand can thus both match fewer sites and have a higher PhaseScreenScore than another ligand in the screening set.
5 Conclusion
In this tutorial, we learned how to create a pharmacophore hypothesis from a receptor-ligand complex, manipulate a hypothesis by adding features in the Workspace and merge hypotheses. Finally, we screened a ligand set against the merged hypothesis, and examined their PhaseScreenScores and Matched Ligand Sites.
References
[1] Structure-Based Virtual Screening Using Phase (schrodinger.com)