Schrödinger Notes—Enumeration Tools for Library Design
Declaration
This note is based on the article, “Enumeration Tools for Library Design”1, and created with the Schrödinger Software Release 2023-4.
This note contains only minimal annotations to the original text, along with corrections to formatting errors. It is intended for educational and communicative purposes only, and all rights remain with the original author.
Introduction
In this tutorial, you will learn how to use various enumeration tools in Maestro to design libraries for the lead optimization stage of a CDK2 inhibitor drug discovery project. In addition to building libraries, you will learn some workflows for library curation and enrichment.
1 Creating Projects and Importing Structures
At the start of the session, change the file path to your chosen Working Directory in Maestro to make file navigation easier. Each session in Maestro begins with a default Scratch Project, which is not saved. A Maestro project stores all your data and has a .prj extension. A project may contain numerous entries corresponding to imported structures, as well as the output of modeling-related tasks. Once a project is created, the project is automatically saved each time a change is made.

- Double-click the Maestro icon
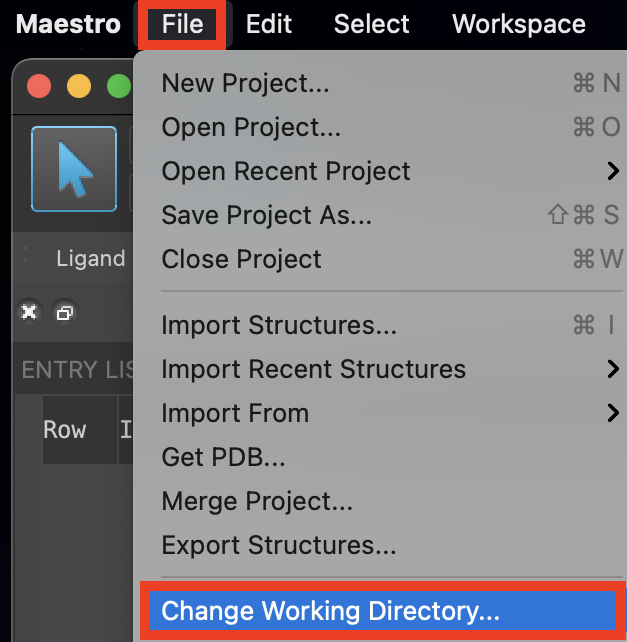
Figure 1-1. Change Working Directory option.
Go to File > Change Working Directory
Find your directory, and click Choose
Pre-generated input and results files are included for running jobs or examining output. Download the zip file here: https://www.schrodinger.com/sites/default/files/s3/release/current/Tutorials/zip/library_design.zip
After downloading the zip file, unzip the contents in your Working Directory for ease of access throughout the tutorial
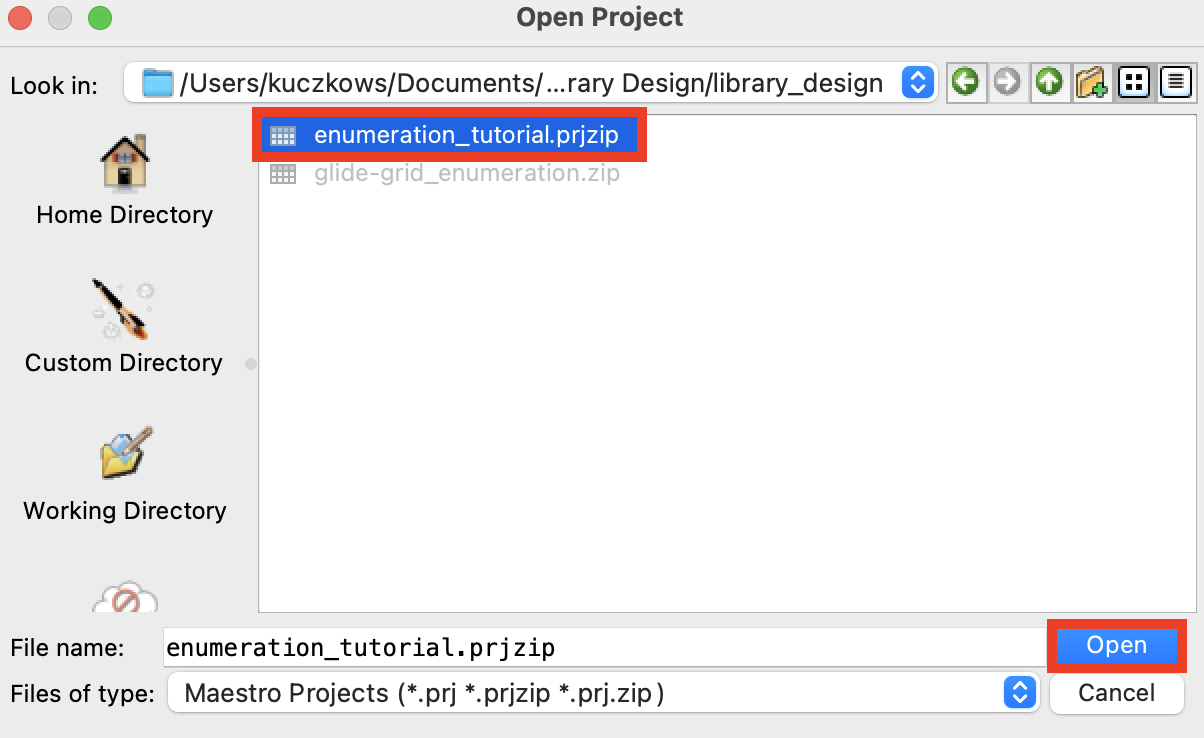
Figure 1-2. Open Project panel.
Go to File > Open Project
Select the file
enumeration_tutorial.prjzipClick Open
- Structures are shown in the Entry List
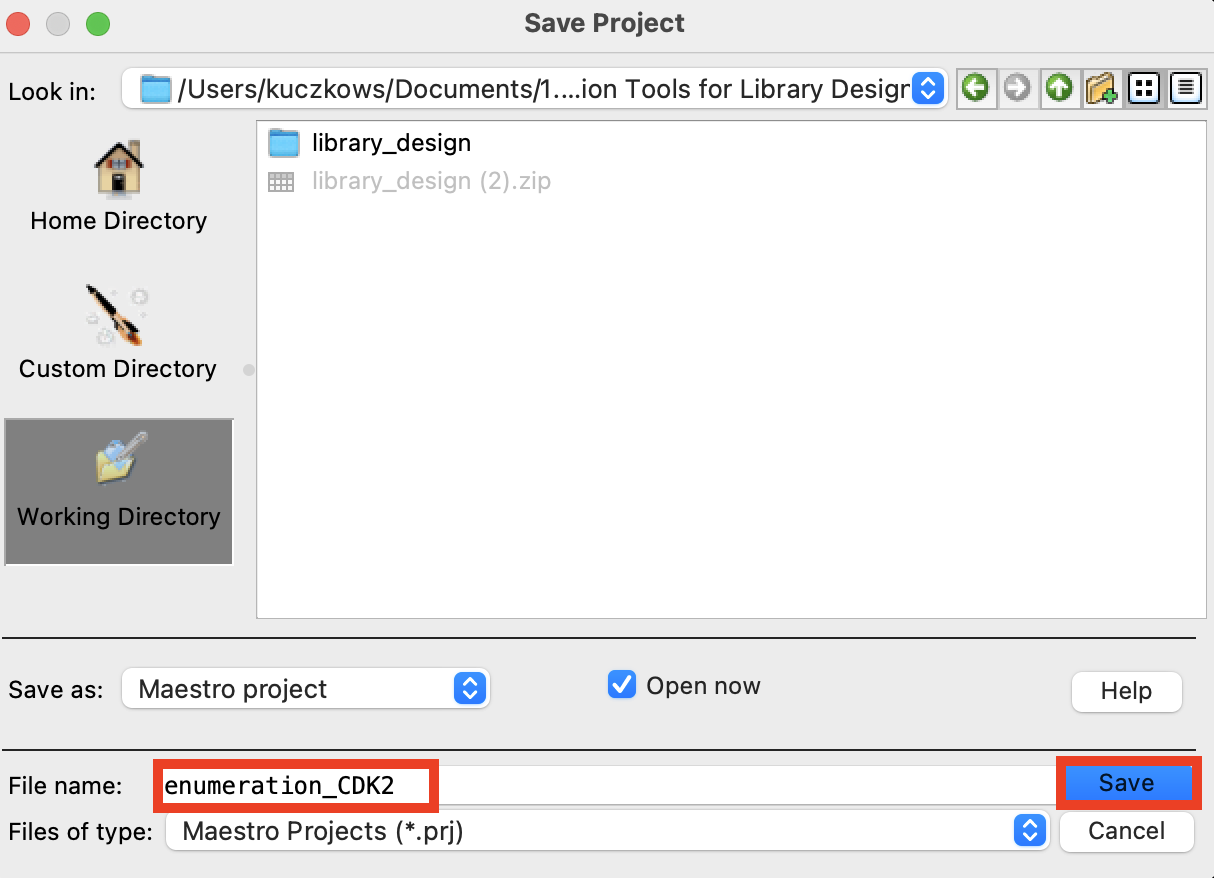
Figure 1-3. Save Project panel.
Go to File > Save Project As
Change the File name to enumeration_CDK2
Click Save
- The project is now named
enumeration_CDK2.prj# 2 Enumerating with an R-Group Library
The R-Group Enumeration panel can be used to generate synthetically tractable analogs of a hit molecule from a library of R-group fragments. There is an R-group library packaged into the software and additional libraries can be added from file. Up to 10 R-groups can be enumerated at a time, allowing for the generation of a combinatorial library of analogs.
Coxon et al. have demonstrated through extensive SAR analysis the importance of substitutions at the purine 6-position for CDK2 inhibition (the 6-substituent is needed to occupy a lipophilic pocket), thus we will set that position as our enumeration connection point.
After expanding the chemical space, we would like to pass it through various filtering and scoring methods. This allows for dataset enrichment for ranking by more sophisticated computational methods, such as MM-GBSA and FEP+. In this section, we will dock ligands using Glide SP Docking, and filter based on Glide gscore, Lipinski’s Rule of 5, and polar surface area (docking and filtering criteria should be selected based on the specific requirements of the system/project).
2.1 Perform custom R-Group enumeration
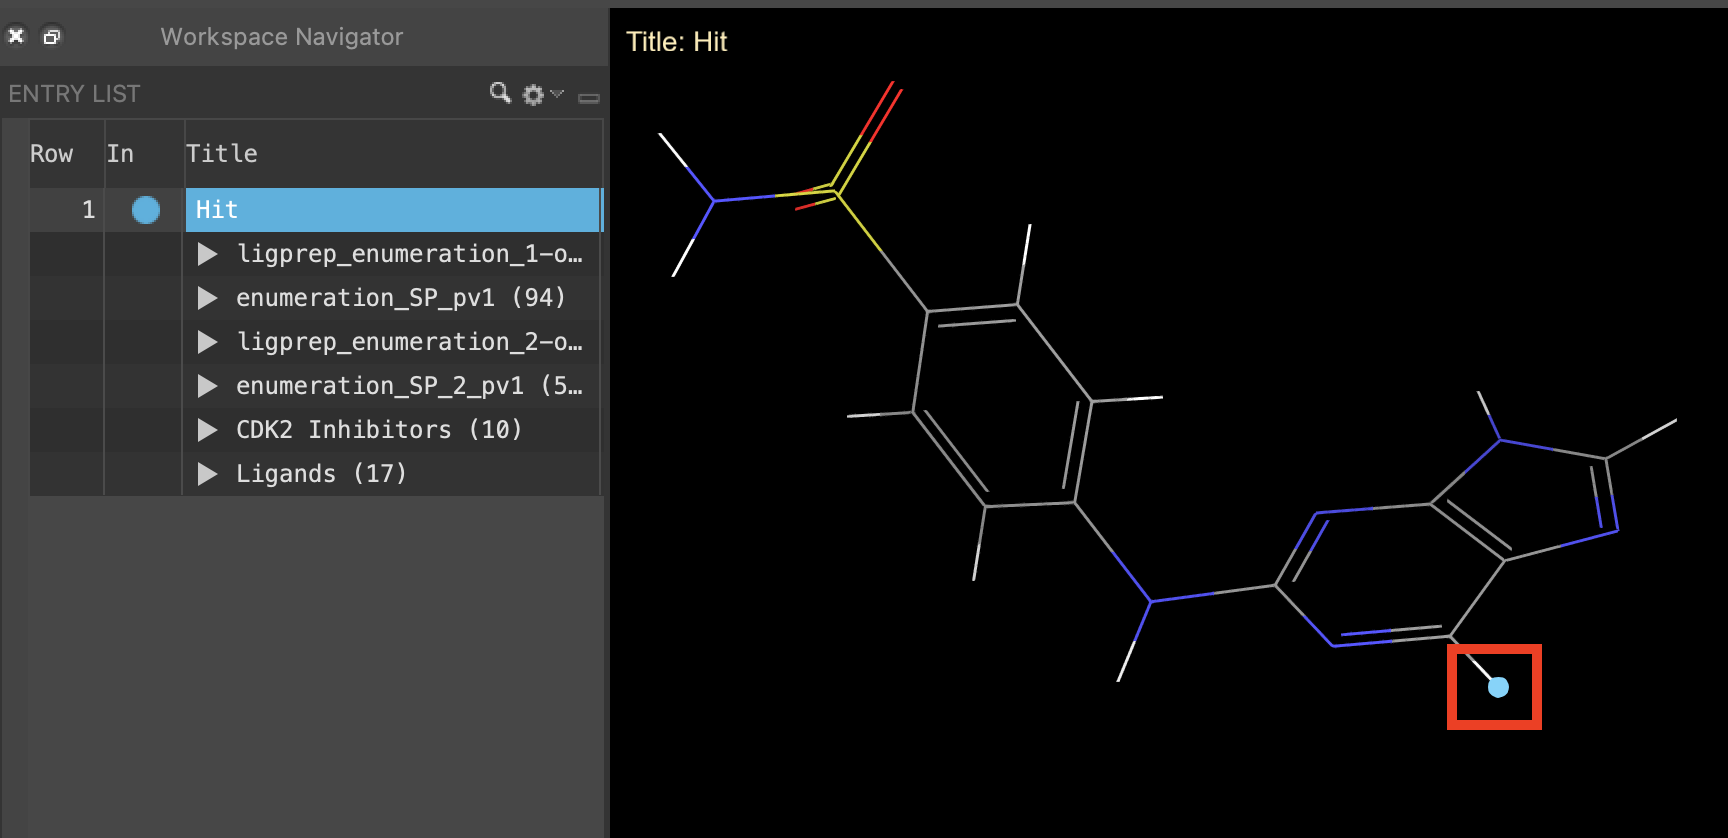
Figure 2-1. Select connection point for enumeration.
Click the In circle next to Hit to include the hit structure in the Workspace
Select H21 in the purine core
- H21 is selected and highlighted in the Workspace
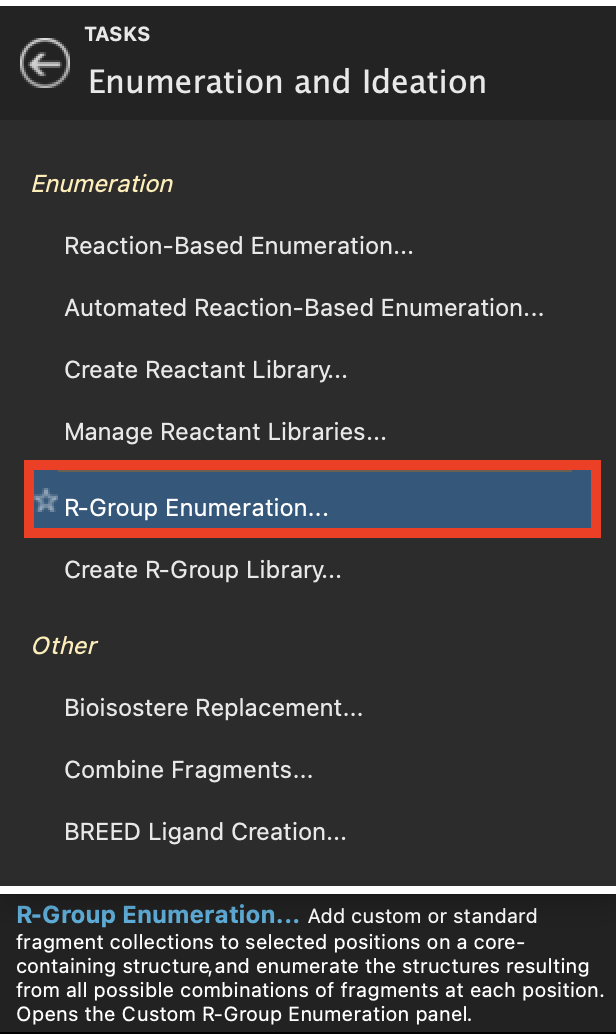
Figure 2-2. R-Group Enumeration option in Enumeration and Ideation.
- Go to Tasks > Browse > Enumeration and Ideation > R-Group Enumeration
Note: This tutorial uses the Diverse_R-groups library that is packaged along with Maestro but any fragment library can be loaded from file or using the R-Group Creator panel
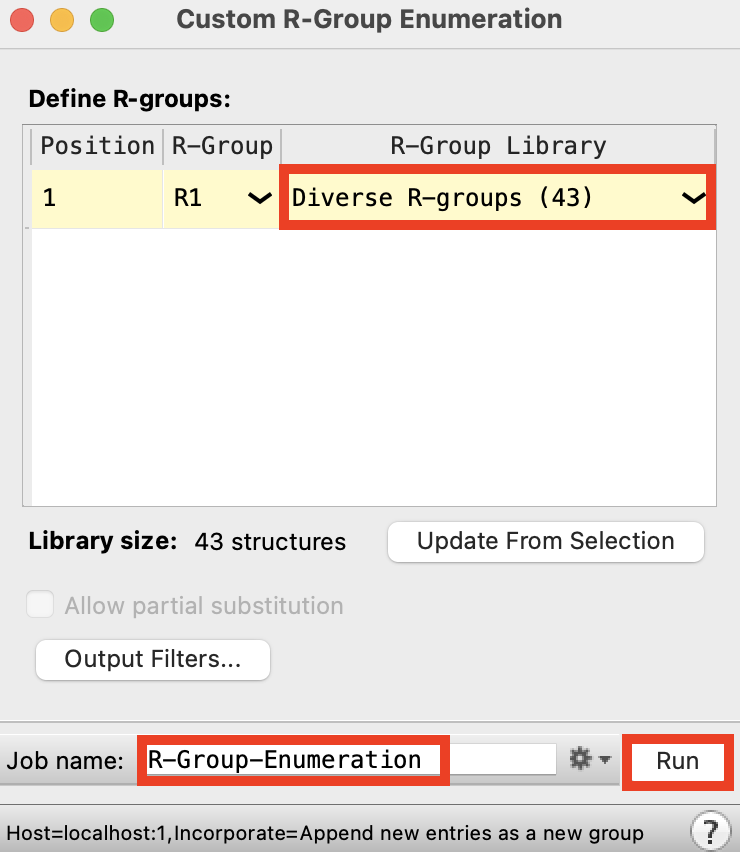
Figure 2-3. Custom R-Group Enumeration panel.
For R-Group Library, choose Diverse R-groups (43)
Change the Job name to R-Group_Enumeration
Click Run
Close the Custom R-Group Enumeration panel
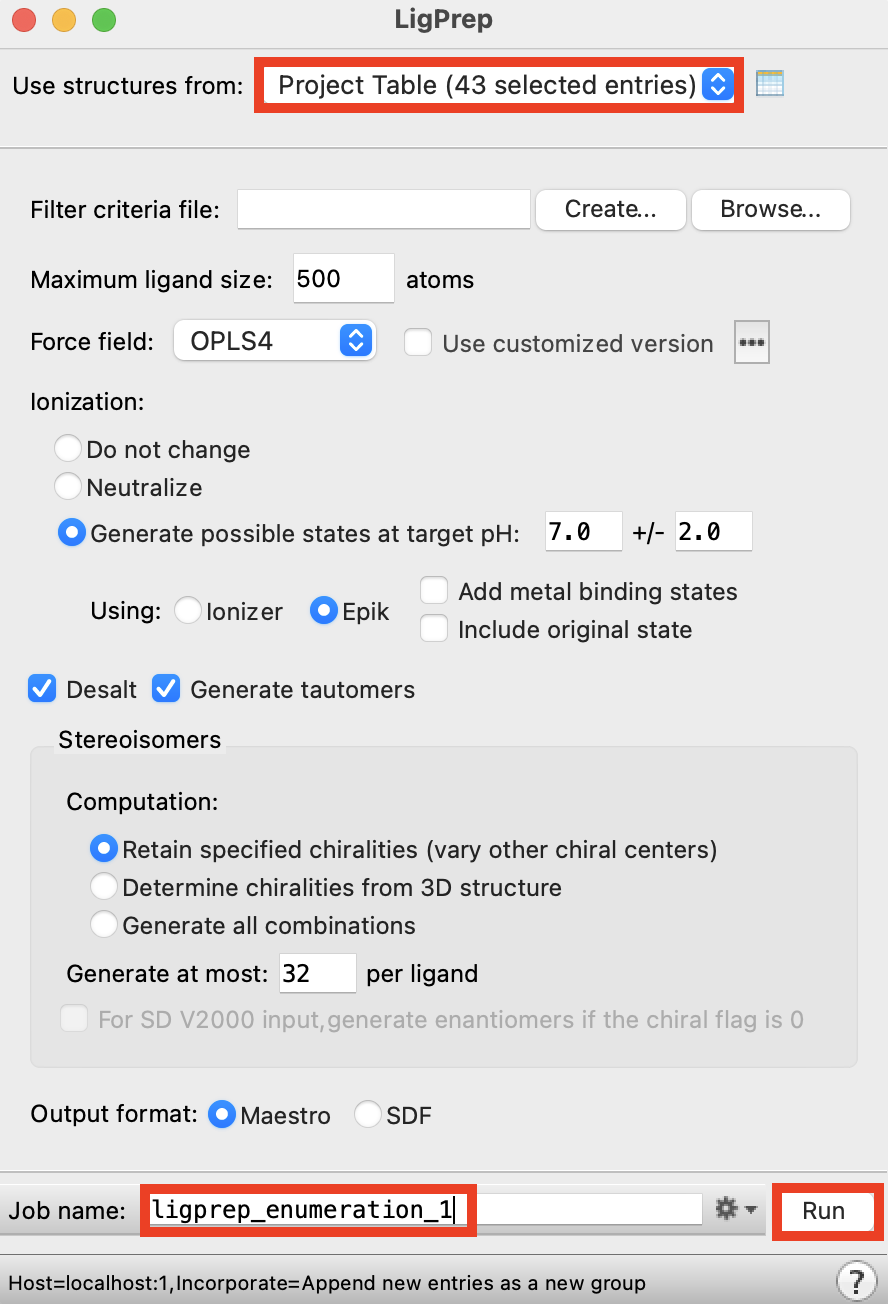
Figure 2-4. LigPrep panel.
Select the R-Group_Enumeration group
Go to Tasks > Browse > Ligand Preparation and Library Design > LigPrep
- The LigPrep panel opens
For Use structures from, choose Project Table (selected entries)
Change Job name to ligprep_enumeration
Click Run
The job takes 4-6 minutes
A new group is added to the Entry List
To save time we will use pre-generated results
2.2 Dock enumerated ligands
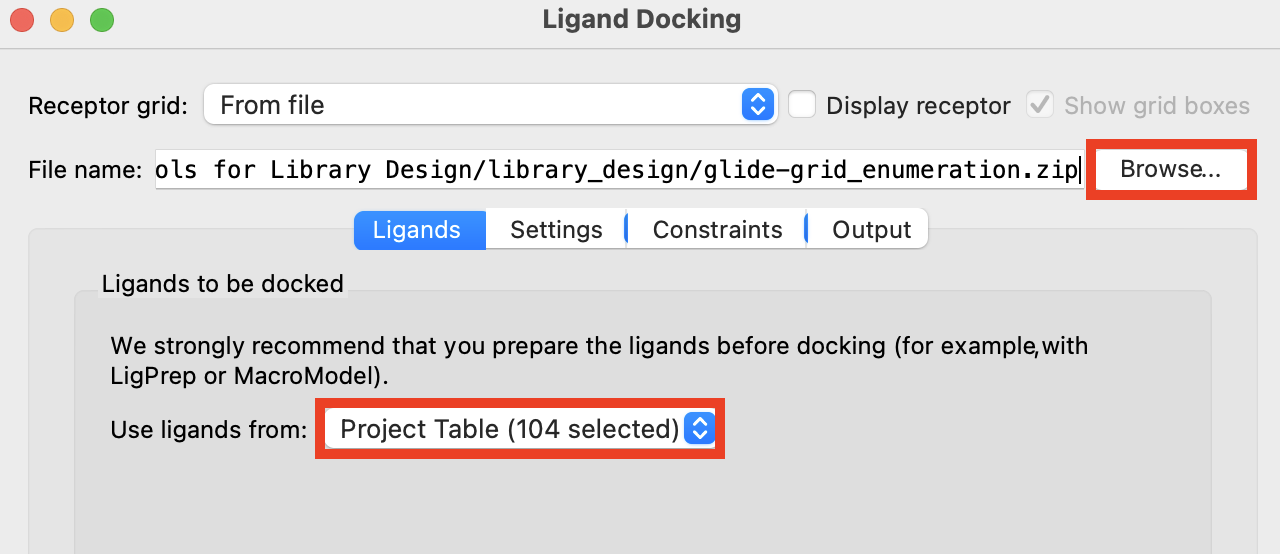
Figure 2-5. Ligand Docking panel.
Select the ligprep_enumeration-out group
Go to Tasks > Browse > Receptor-Based Virtual Screening > Ligand Docking
- The ligand screening panel opens
For Receptor grid, click Browse and choose
glide-grid_enumeration.zipFor Use ligands from, select Project Table (selected entries)
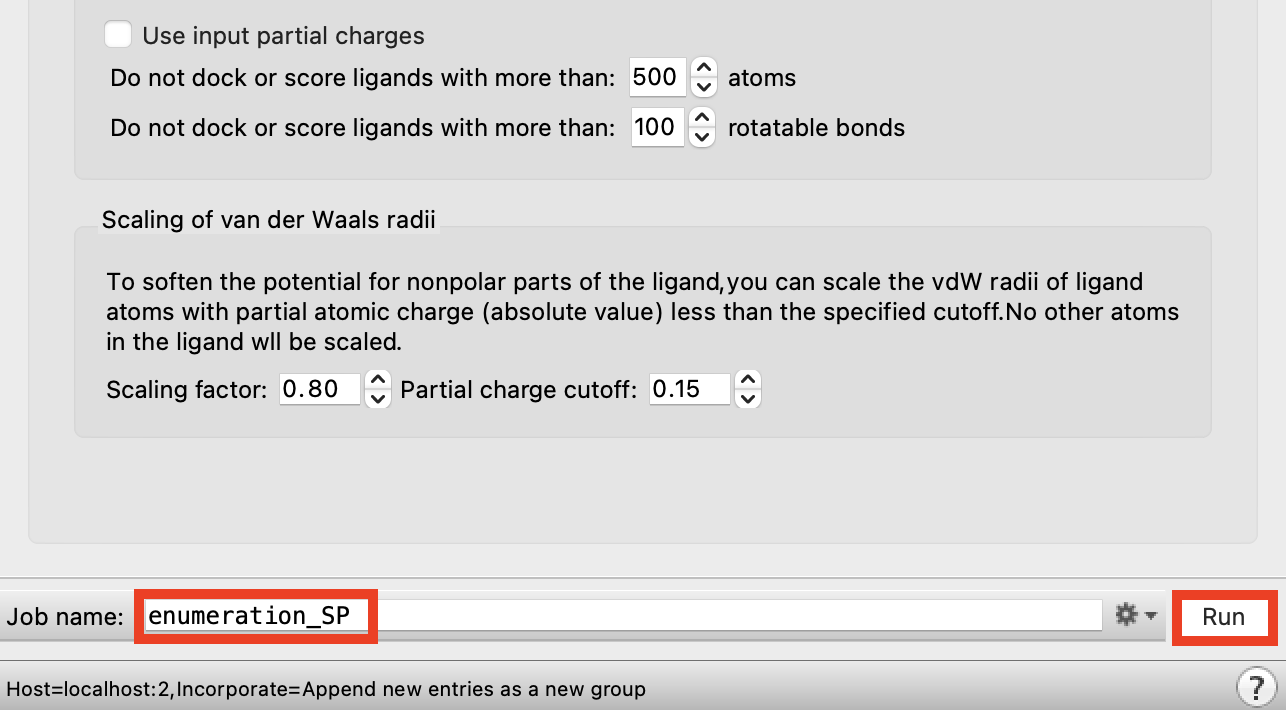
Figure 2-6. Run Ligand Docking job.
Change the job name to enumeration_SP
Click Run
The job takes 5-6 minutes to run
A new group is added to the Entry List
To save time we will look at pregenerated results
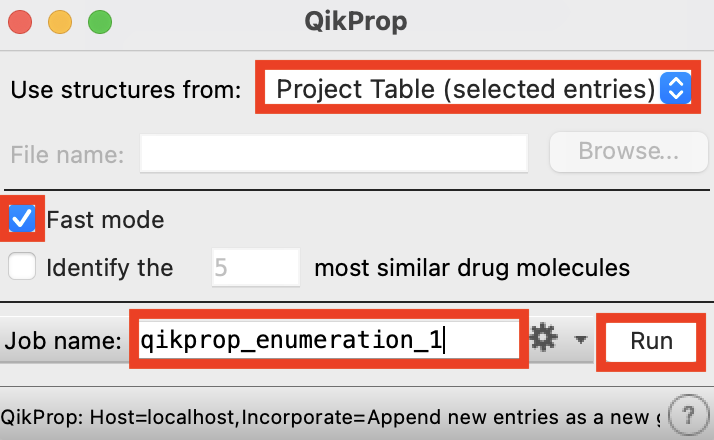
Figure 2-7. QikProp panel.
Select the group enumeration_SP_pv1
Go to Tasks > Browse > ADME and Molecular Properties > Ligand-Based ADME/Tox Prediction
- The QikProp panel opens
For Use structures from, select Project Table (selected entries)
Select Fast Mode
Change the job name to qikprop_enumeration_1
Click Run
The job takes a few seconds
A new group is added to the Entry List
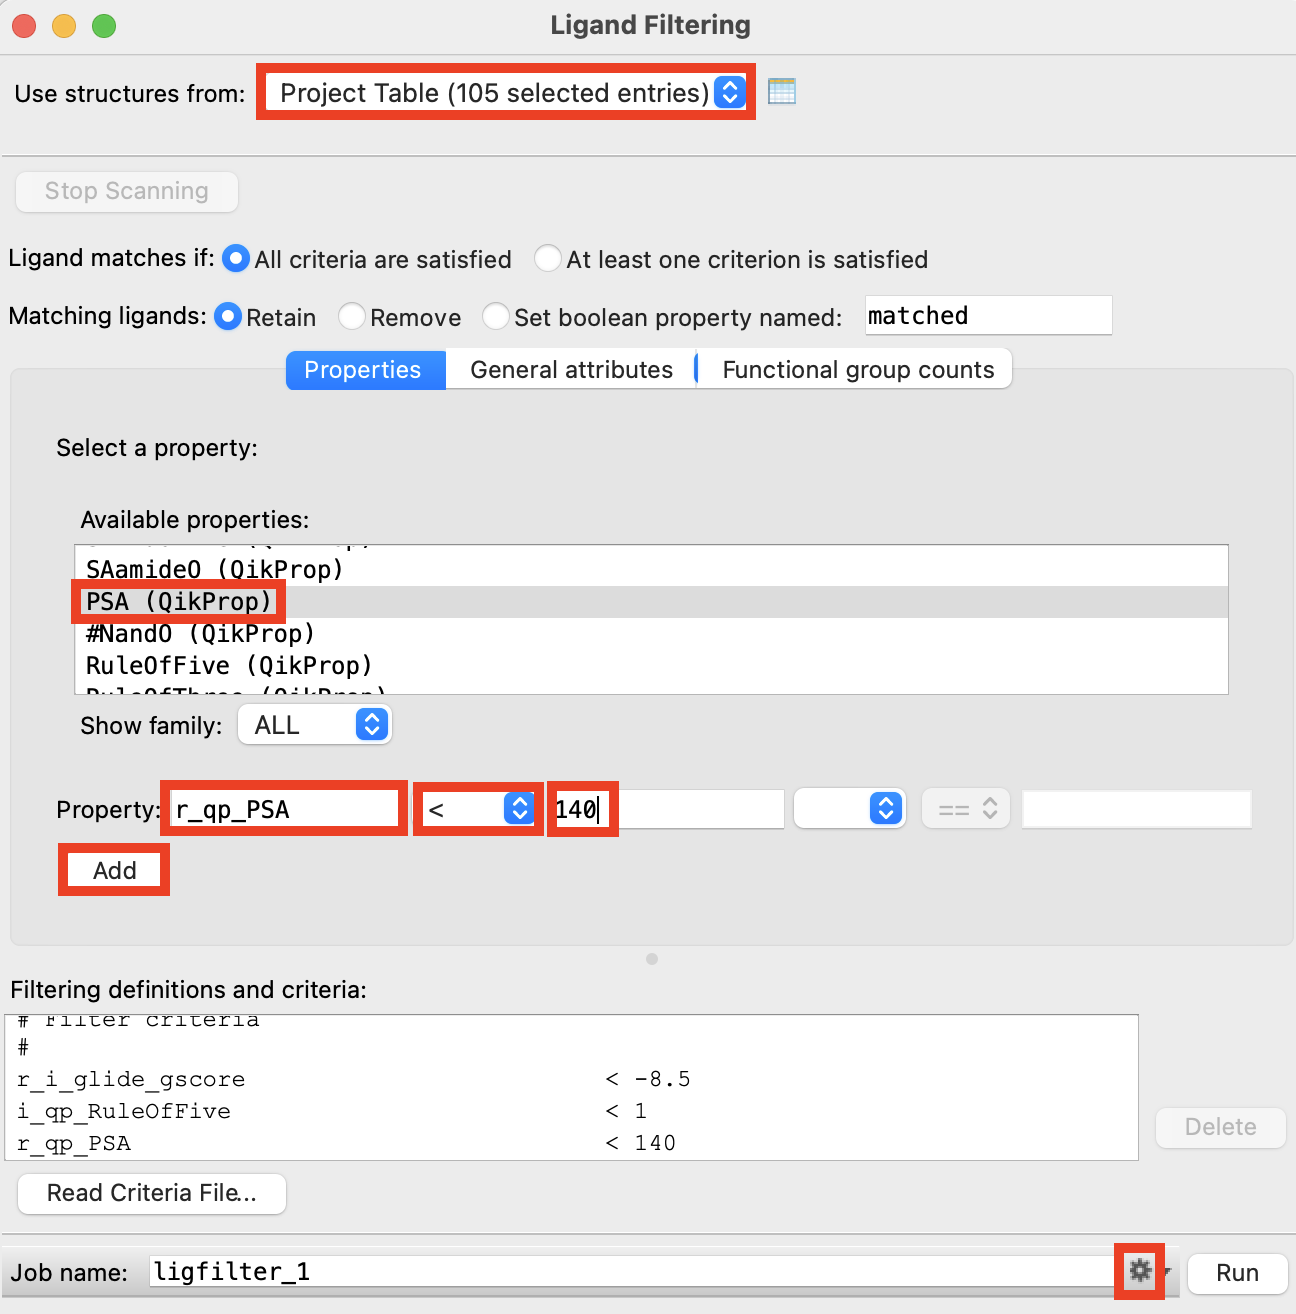
Figure 2-8. Ligand Filtering panel.
Select the group qikprop_enumeration_1_out
Go to Tasks > Browse > Ligand Preparation and Library Design > Ligand Filtering
- The Ligand filtering panel opens
For Use structures from, choose Project Table (selected entries)
Under Available properties, select glide gscore(Impact)
For Property, set up the filter criterion glide_gscore < -8.5
Click Add
- The filtering criterion is added
Repeat steps 16-18 for RuleOfFive < 1 and PSA < 140
Click the cog
- The Jobs Settings panel opens
Glide scores cannot be used for rank-ordering, nor do they correlate with binding affinity. Glide score filtering is used here for dataset enrichment, and the cutoff of -8.5 was chosen based on the distribution of docking scores

Figure 2-9. Run Ligand Filtering job.
For Incorporate, choose Append new entries as a new group
Change the job name to ligfilter_enumeration_1
Click Run
The job takes a few seconds
A new group is added to the Entry List
Note: Only 10 ligands remain following the ligand filtering
3. Enumerating with Bioisosteres
Bioisosteres are compounds or groups that have strong chemical and physical similarity, while also having similar biological activity. They can be used in lead optimization to improve potency, enhance selectivity, improve ADME-Tox properties, or to acquire novel IP.
The Bioisostere Replacement panel allows for 479, mostly non-classical (i.e. functional-group centric) bioisostere transformations. Bioisostere replacements are performed sequentially, resulting in every output having only one functional group replacement (a more combinatorial approach is available through the command line). The key groups for bioisostere transformation are acids, esters, t-butyls, carbonyls, amides, and phenyls, though others are included as well. The packaged bioisosteres are encoded as Reaction SMARTS, and can be easily added to or modified through the command line. Additionally, it is possible within the panel to set certain regions of a molecule as immutable, thus limiting the moieties with matching bioisosteres to be replaced.
In this section, our input structures will be one of the outputs of the final filtering of the R-group Enumeration section. Due to aqueous solubility concerns of phenyl-containing molecules, we will be performing a bioisostere replacement to add in a group with more 3D character to break the planar symmetry. The resulting ligands will be docked via Glide SP Docking and filtered by Glide gscore values. (Docking and filtering criteria should be selected based on the specific requirements of the system/project).
3.1 Perform bioisostere replacement
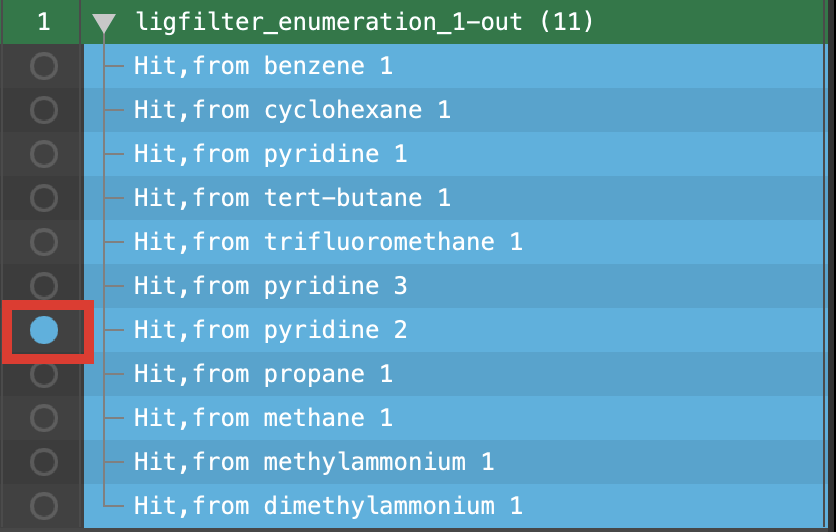
Figure 3-1. Include Hit, from pyridine 2.
- Include the Hit, from pyridine 2 entry in the Entry List
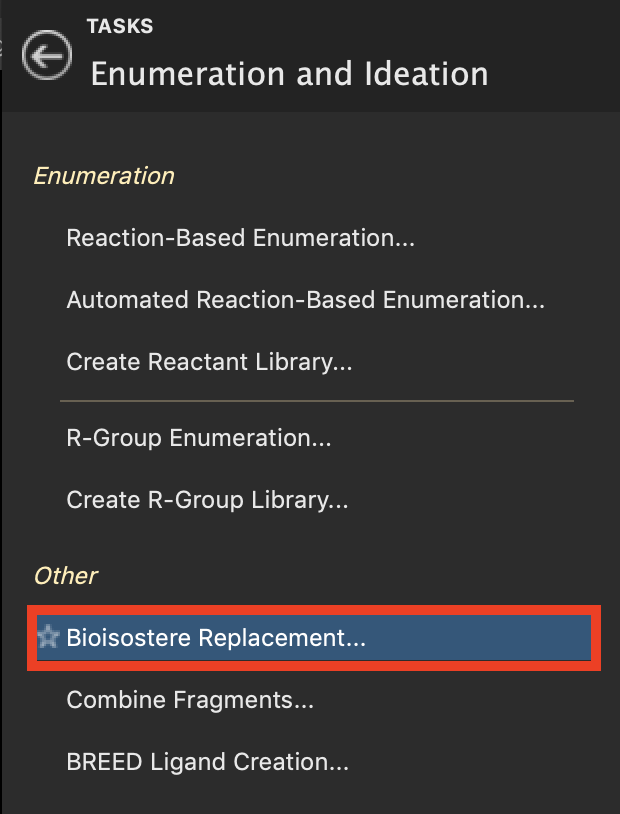
Figure 3-2. Bioisostere Replacement option in Enumeration and Ideation.
- Go to Tasks > Browse > Enumeration and Ideation > Bioisostere Replacement
- The Bioisostere Replacement panel opens
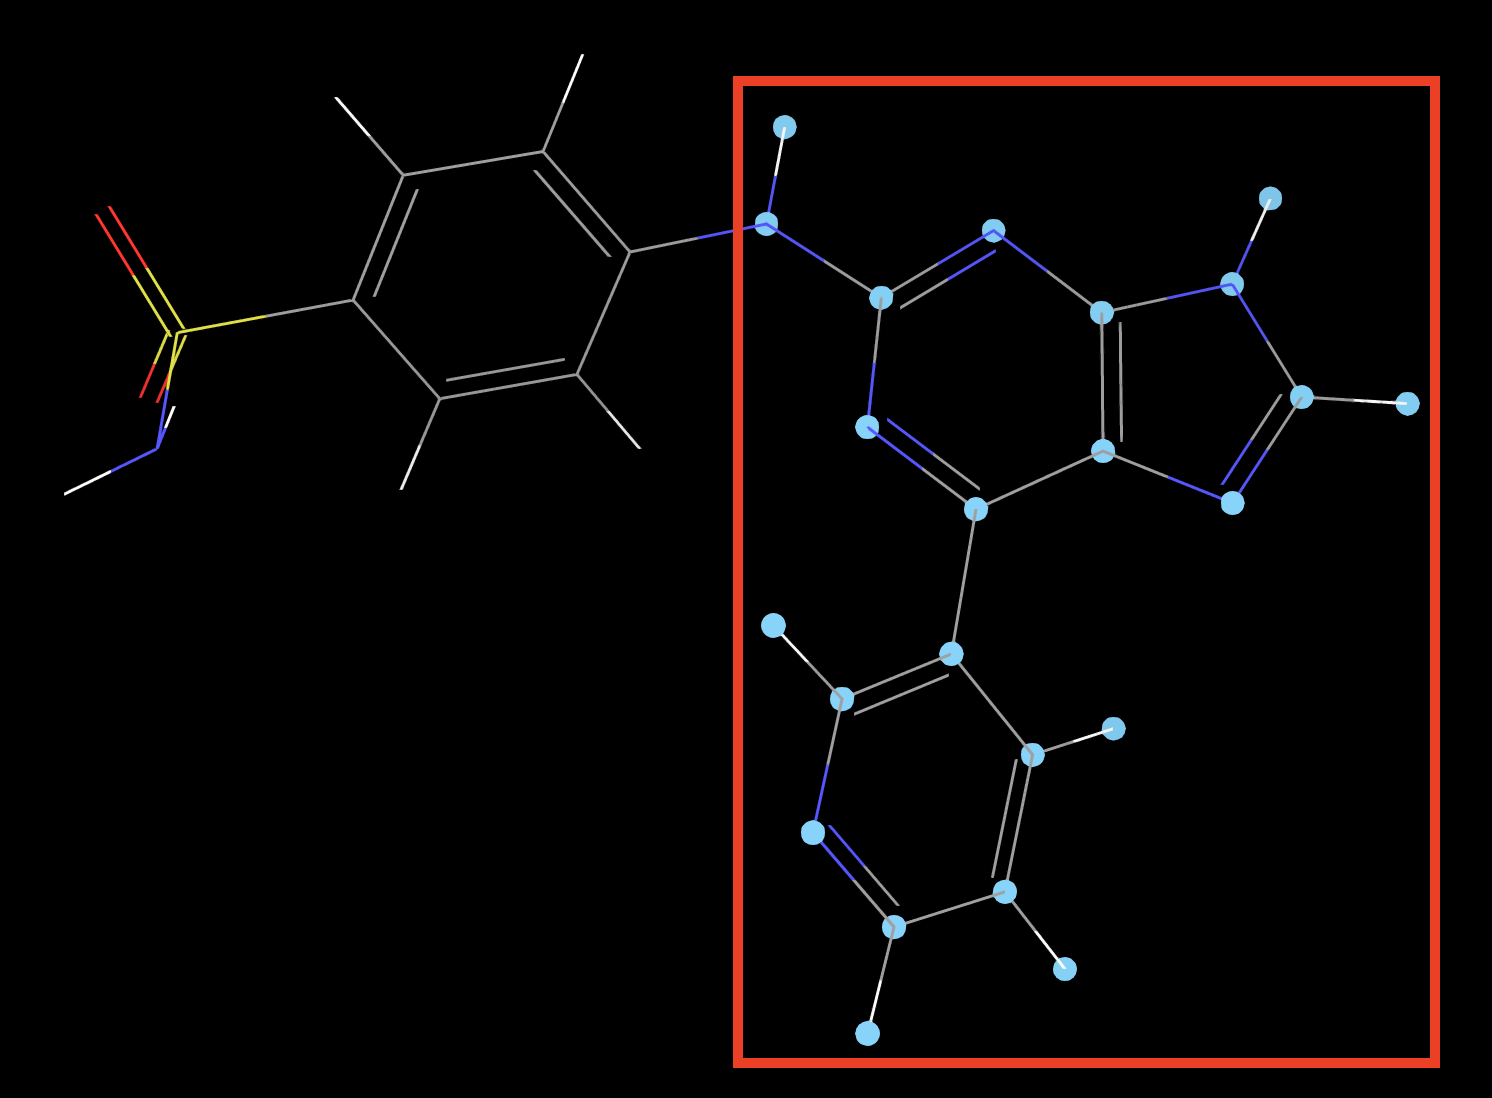
Figure 3-3. Selection for bioisostere replacement.
- In the Workspace, shift-click to select the entire molecule except for the sulfonamide group.
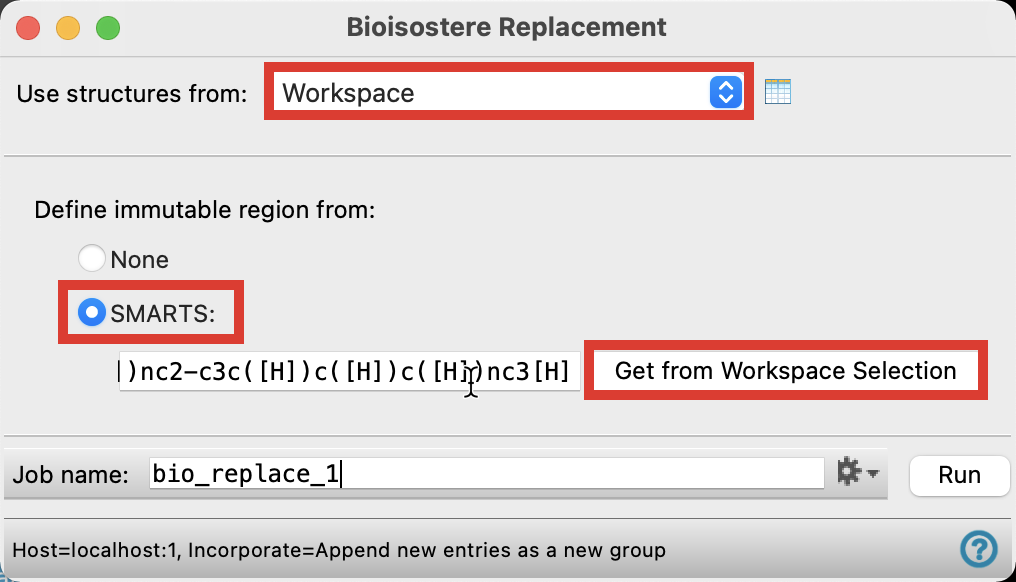
Figure 3-4. Define immutable region.
For Use structures from, choose Workspace
For Define immutable region from, Select SMARTS and click Get from Workspace Selection

Figure 3-5. Run Bioisostere Replacement.
Change the Job name to bio_replace_tutorial
Click Run
The job takes ~1 minute to run
18 new groups will be added to the Entry List, one for each input structure
3.2 Dock structures from bioisostere replacement
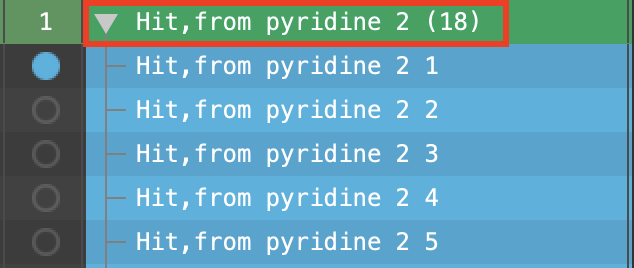
Figure 3-6. Select Bioisostere Replacement outputs in the Entry List.
- Select the Hit, from pyridine 2 (18) group header to select all 18 compounds in the group

Figure 3-7. LigPrep panel.
Open the LigPrep panel
For Use structures from, choose Project Table (selected entries)
Change Job name to ligprep_enumeration_2
Click Run
This job will take 1-2 minutes to finish
To save time, we will look at pregenerated results
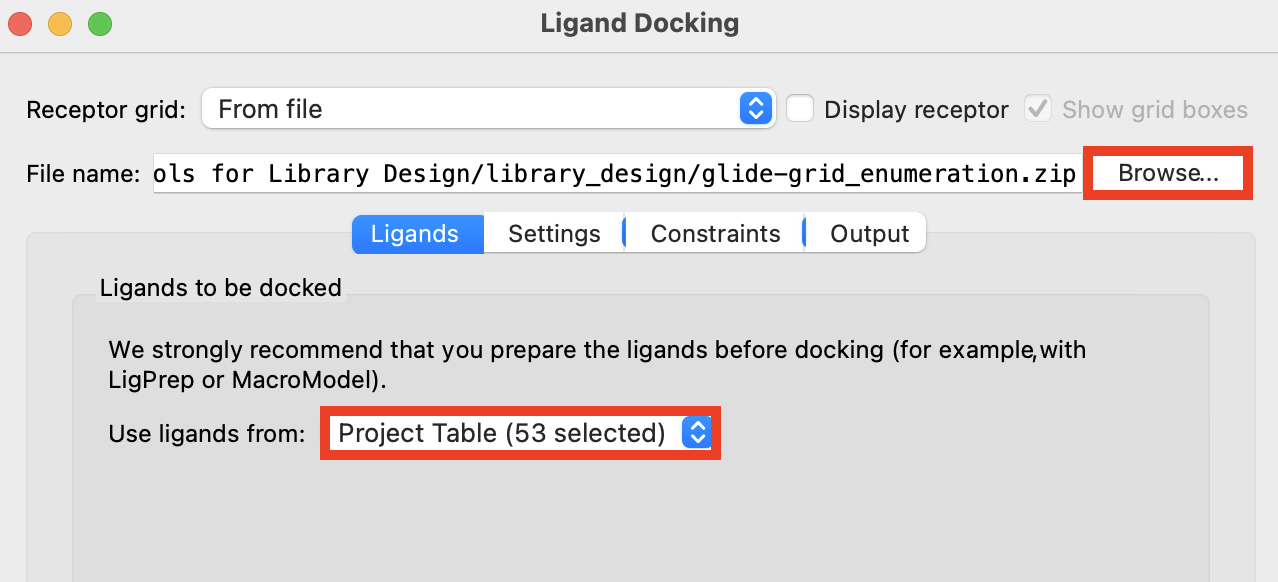
Figure 3-8. Ligand Docking panel.
Select the group ligprep_enumeration_2-out1
Open the Ligand Docking panel
For Receptor grid, click Browse and choose
glide-grid_enumeration.zip
- This grid should already be selected from the previous docking setup
- For Use ligands from, select Project Table (selected entries)
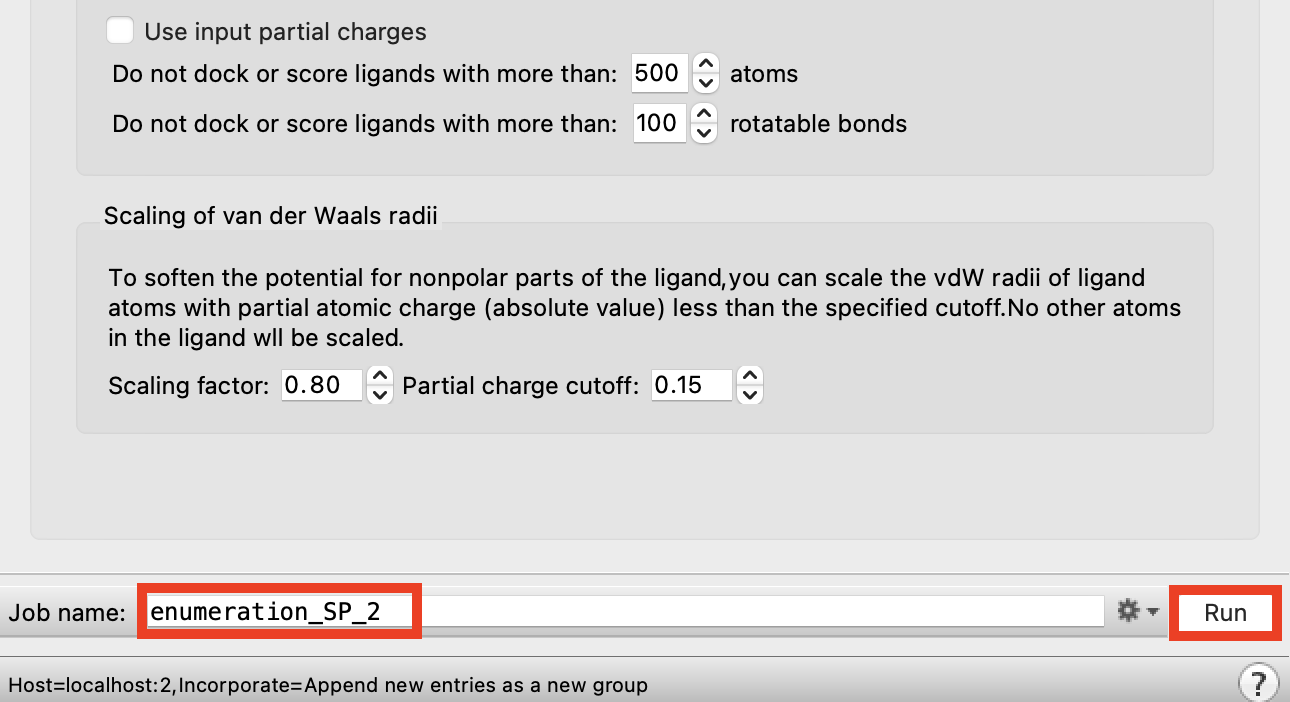
Figure 3-9. Run Ligand Docking job.
- Change Job name to enumeration_SP_2
This job will take ~5 minutes to finish
To save time we will look at pregenerated results
3.3 Analyze docking results
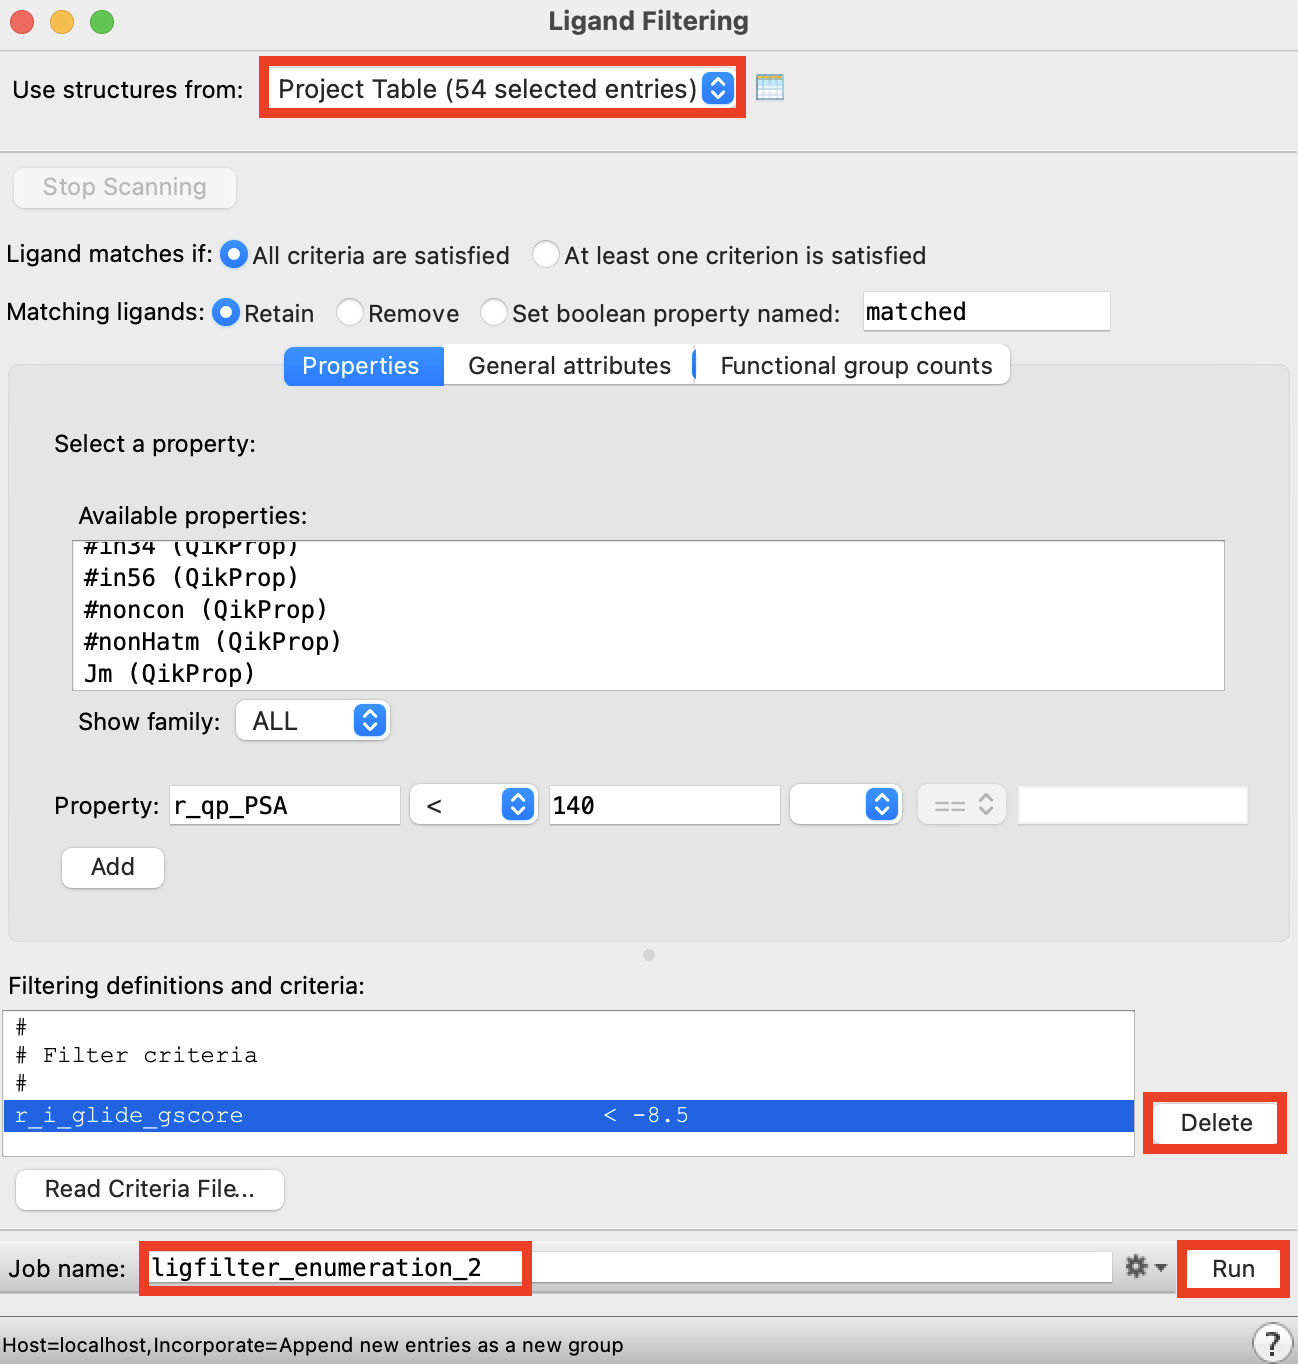
Figure 3-10. Ligand Filtering panel.
Select the group enumeration_SP_2_pv1
Open the Ligand Filtering panel
For Use structures from, choose Project Table (selected entries)
- All previous selections from the panel should still be poulated
Add the property glide gscore < -8.5
Delete PSA and Ruleof5 filters by selecting them and clicking Delete
Change the Job name to ligfilter_enumeration_2
Click Run
Note: Ligand filtering allows for a more reasonable number of compounds for later visual inspection.
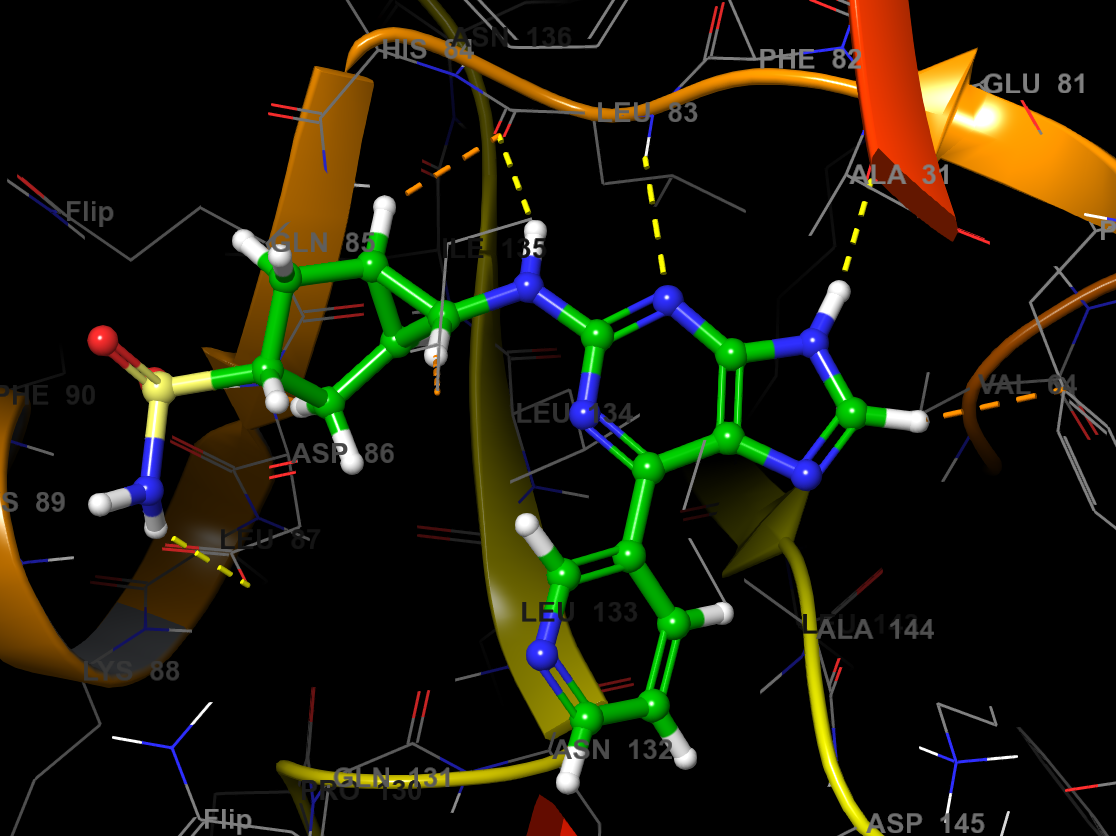
Figure 3-11. Ligand Docking output pose.
Open the enumeration_SP_2_pv1 group and double click on the In circle to fix 5NEV - minimized in the Workspace
Right-click the ligfilter_enumeration_2-out1 group header and choose Include first entry (top group)
Step through the results using the left and right arrows
Once you are done inspecting, right-click the Workspace and choose Clear Workspace
Note: The presets button has been double clicked here to better view the ligand binding site.
You may wish to turn off AUTO in the Fit menu, and fit to the ligand to make switching between poses easier.
4 Enumerating with Pathfinder and Reaction-Based Enumeration
The Reaction-Based Enumeration panel is a synthetically aware enumeration tool that can be used for core hopping, large-scale combinatorial enumeration and targeted R-group enumeration.
The workflow begins with the selection of a retrosynthetic path. Pathfinder can automatically generate possible routes to the desired targets, using reactions from a reaction file. While Pathfinder is not a retrosynthesizer, it can be used to generate a set of synthetically reasonable pathways. Pathfinder notes the reactions used in each pathway, as well as the associated reactant classes. There are currently 83 reactant classes and 127 reactions, including a tailored set of 25 functional group transformations, bundled into a Maestro installation that can be edited or added to if desired. In addition to automatic path generation through Pathfinder, reaction routes can be defined manually using the sketcher.
By default, the enumeration is performed pseudo-randomly, not systematically, but a common random seed is used in the enumeration job to ensure consistent results between runs. Sampling of combinations is performed until a specified maximum number of products is reached, or the number of samples exceeds 100 times the specified number of maximum products.
In this section, we will use the Reaction-Based Enumeration tool in three different ways to generate new ideas for potential CDK2 inhibitors. We will start with the same input molecule, and vary settings to perform a large scale enumeration (with product filtering), core hopping, and R-group enumeration.
4.1 Perform large-scale enumeration
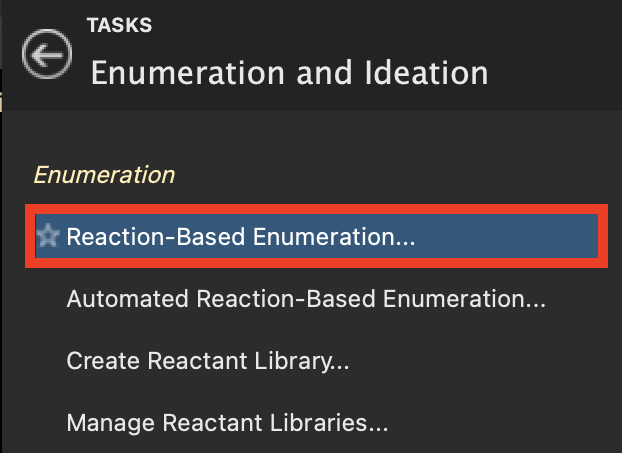
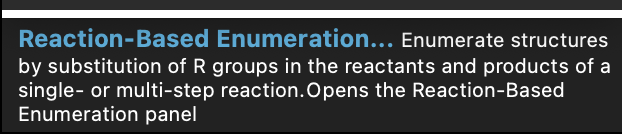
Figure 4-1. Reaction-Based Enumeration option in Enumeration and Ideation.
Select CHEMBL296468 from the CDK2 Inhibitors group in the Entry List
Go to Tasks > Browse > Ligand Enumeration and Ideation > Reaction-Based Enumeration
- The Reaction-Based Enumeration panel opens
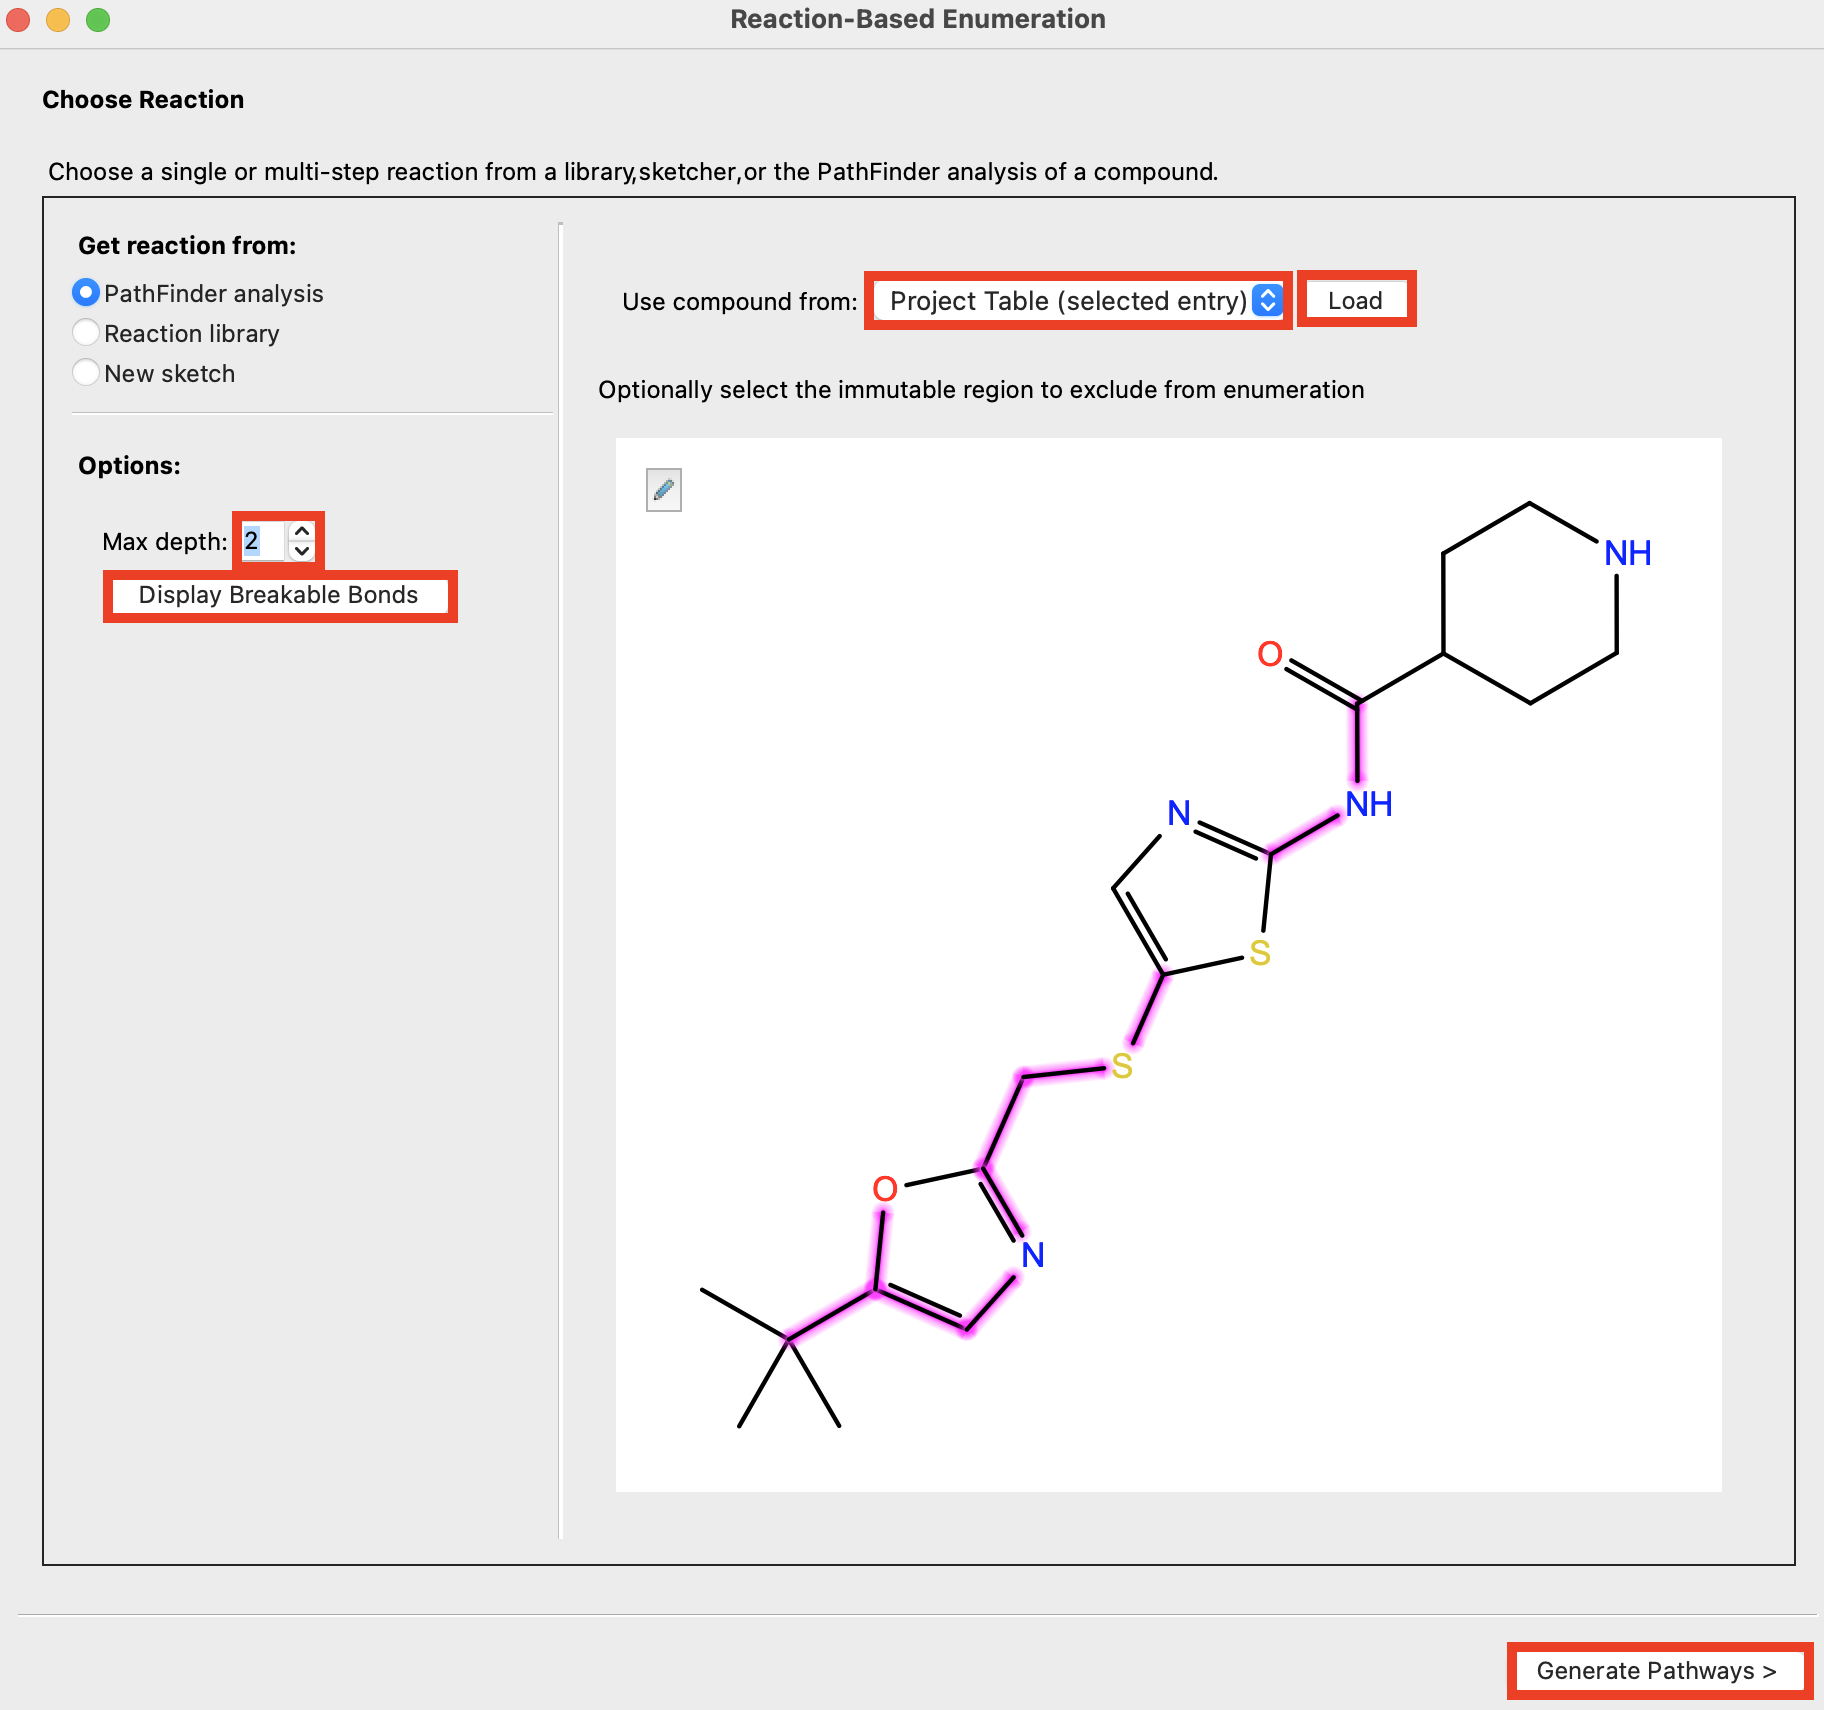
Figure 4-2. Import CHEMB296468.
For Use compound from, choose Project Table (selected entry)
Click Load
Set Max depth to 2
- Max depth text box: Specify the maximum depth of the PathFinder reaction analysis. This is the number of recursions performed by feeding reactant molecules from the previous analysis into PathFinder again. A depth of 1 means that only the original molecule is analyzed; a depth of 2 means that the reactants that produce the original molecule are also analyzed to find reactions that produce them., and so on.
- Click Display Breakable Bonds
- Breakable bonds are highlighted
- Click Generate Pathways
Depth is the longest sequence of steps leading from the target to a starting material. For a linear synthesis the depth is equal to the number of steps in a reaction, but in a convergent synthesis it can be less
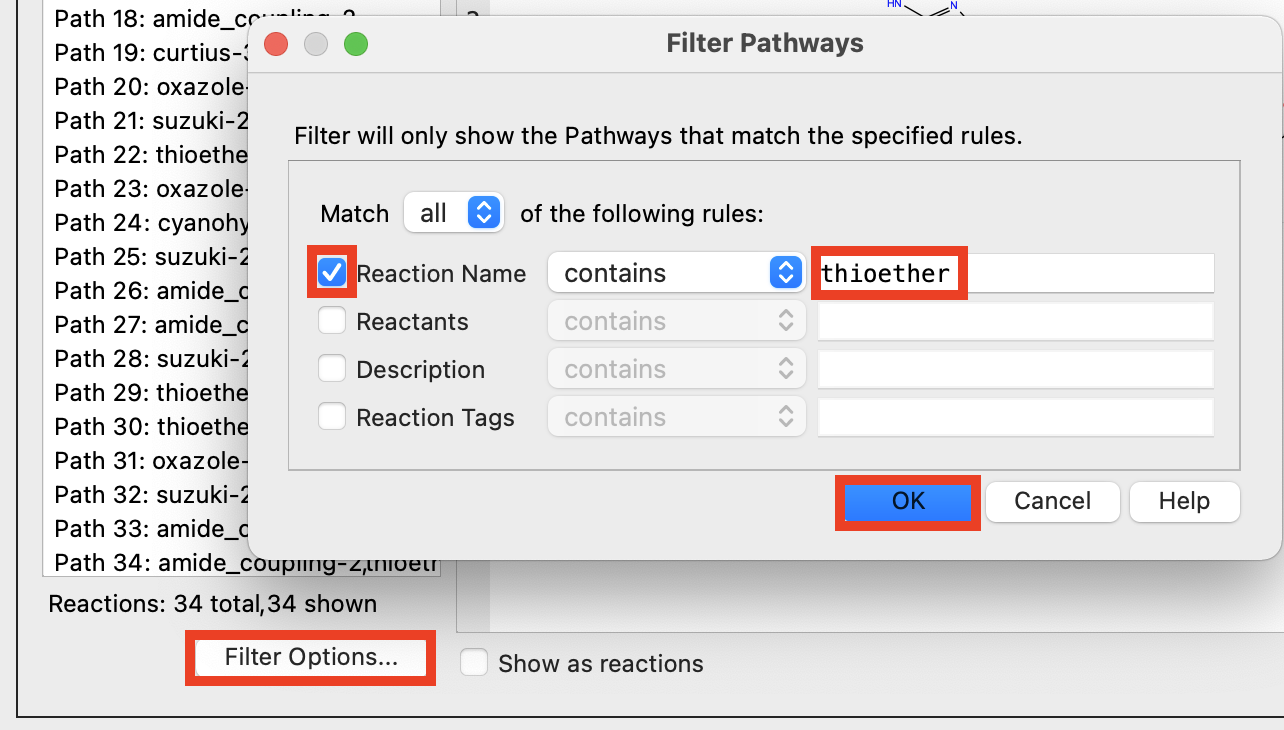
Figure 4-3. Filter Pathways.
- Select Filter Options
- The Filter Pathways panel opens
Check Reaction Name
In the text box, enter thioether
Click OK
- A filter has been added to the reaction pathways to only show those that include a thioether.
Pathway filtering is helpful for narrowing down the pathfinder results to a more manageable number of pathways.
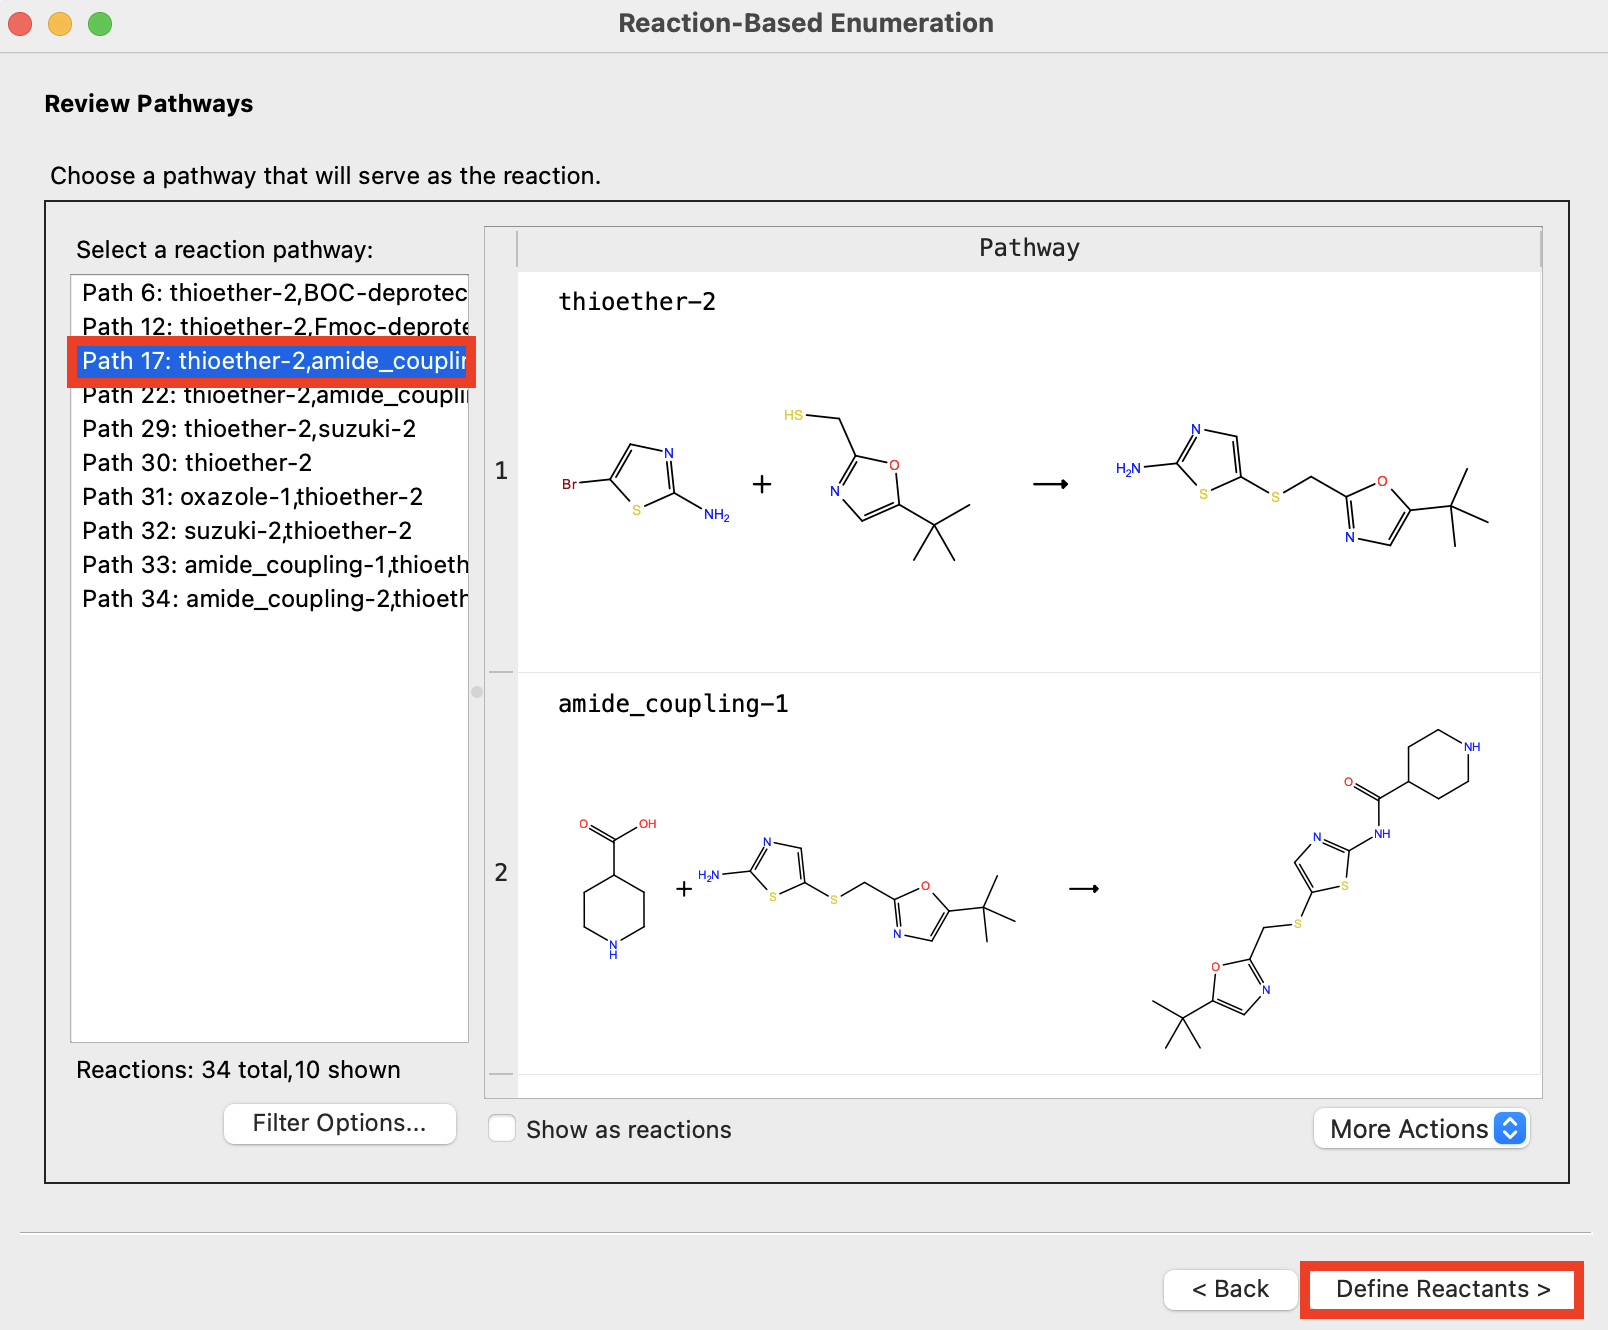
Figure 4-4. Choose pathway.
- Choose Path 17: thioether-2,amide-coupling-2
- The reaction names, as well as the reactants and products, appear under Pathway
- Click Define Reactants
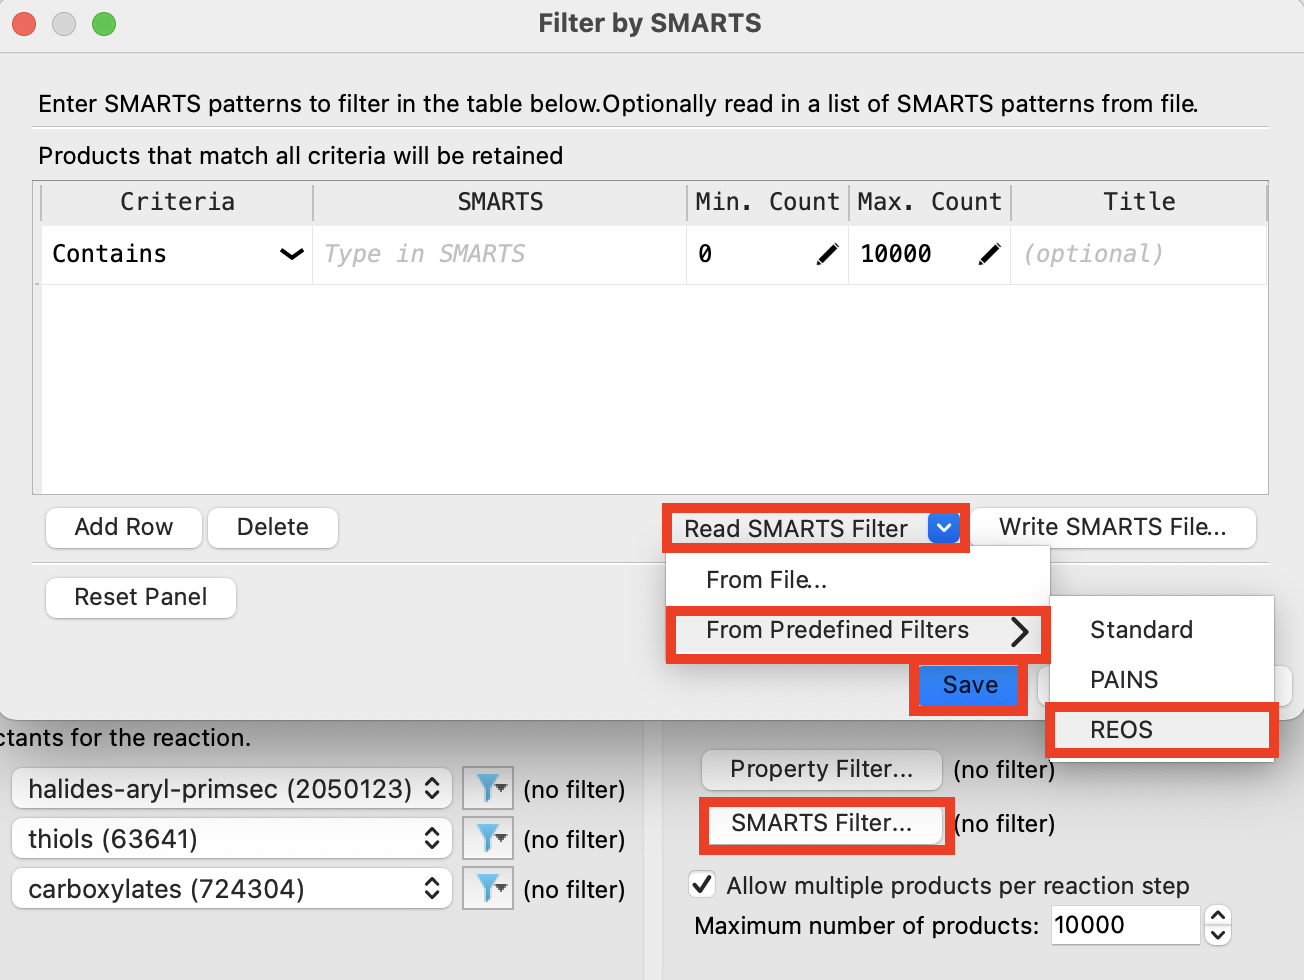
Figure 4-5. Choose filter properties.
- Click SMARTS Filter
- The Filter Options panel opens
Click Read SMARTS Filter
Choose From Predefined Filters
Choose REOS
Click Save
Note: You can use the SMARTS Filter to remove any undesired moieties from the enumeration output. You can also use the Property Filter to remove compounds that fall in undesired property-space
If the maximum number of products was set to 0 (i.e. no maximum), a total of 6.7*1016 products could be generated. However, when a maximum is set, a random seed is used to generate up to the maximum number of products. A consistent seed is used by default to enable reproducibility of enumeration results.
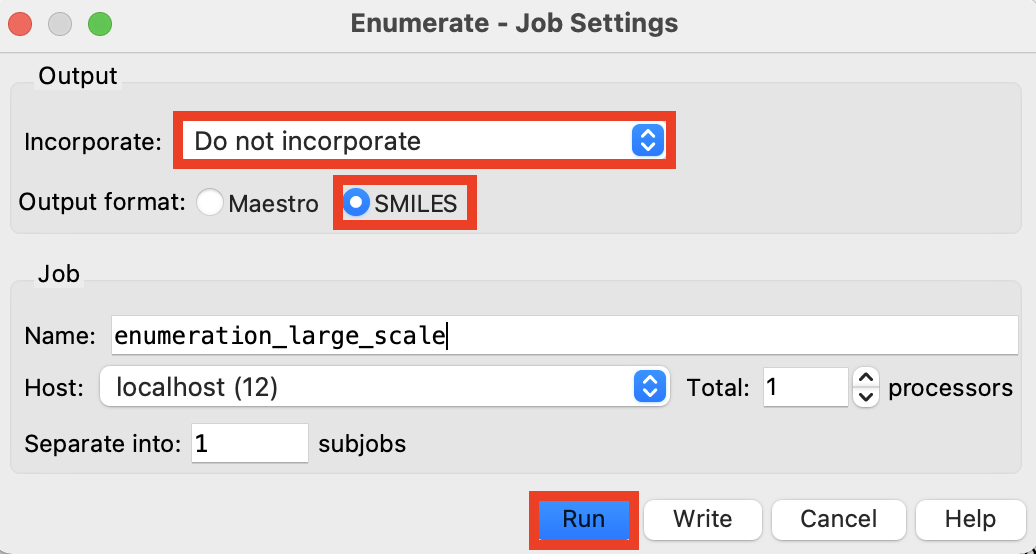
Figure 4-6. Run enumeration job.
- Click Enumerate
- Enumerate - Job Settings panel opens
For Incorporate, choose Do not incorporate
For Output format, choose SMILES
Change the job name to enumeration_large_scale
Click Run
- The job takes ~3 minutes on 1 CPU
Certain reactions will generate multiple products if there are multiple potential products from the given set of reactants. Uncheck Allow multiple products per reaction step if you would prefer only a single output from each step
4.2 Perform core-hopping enumeration
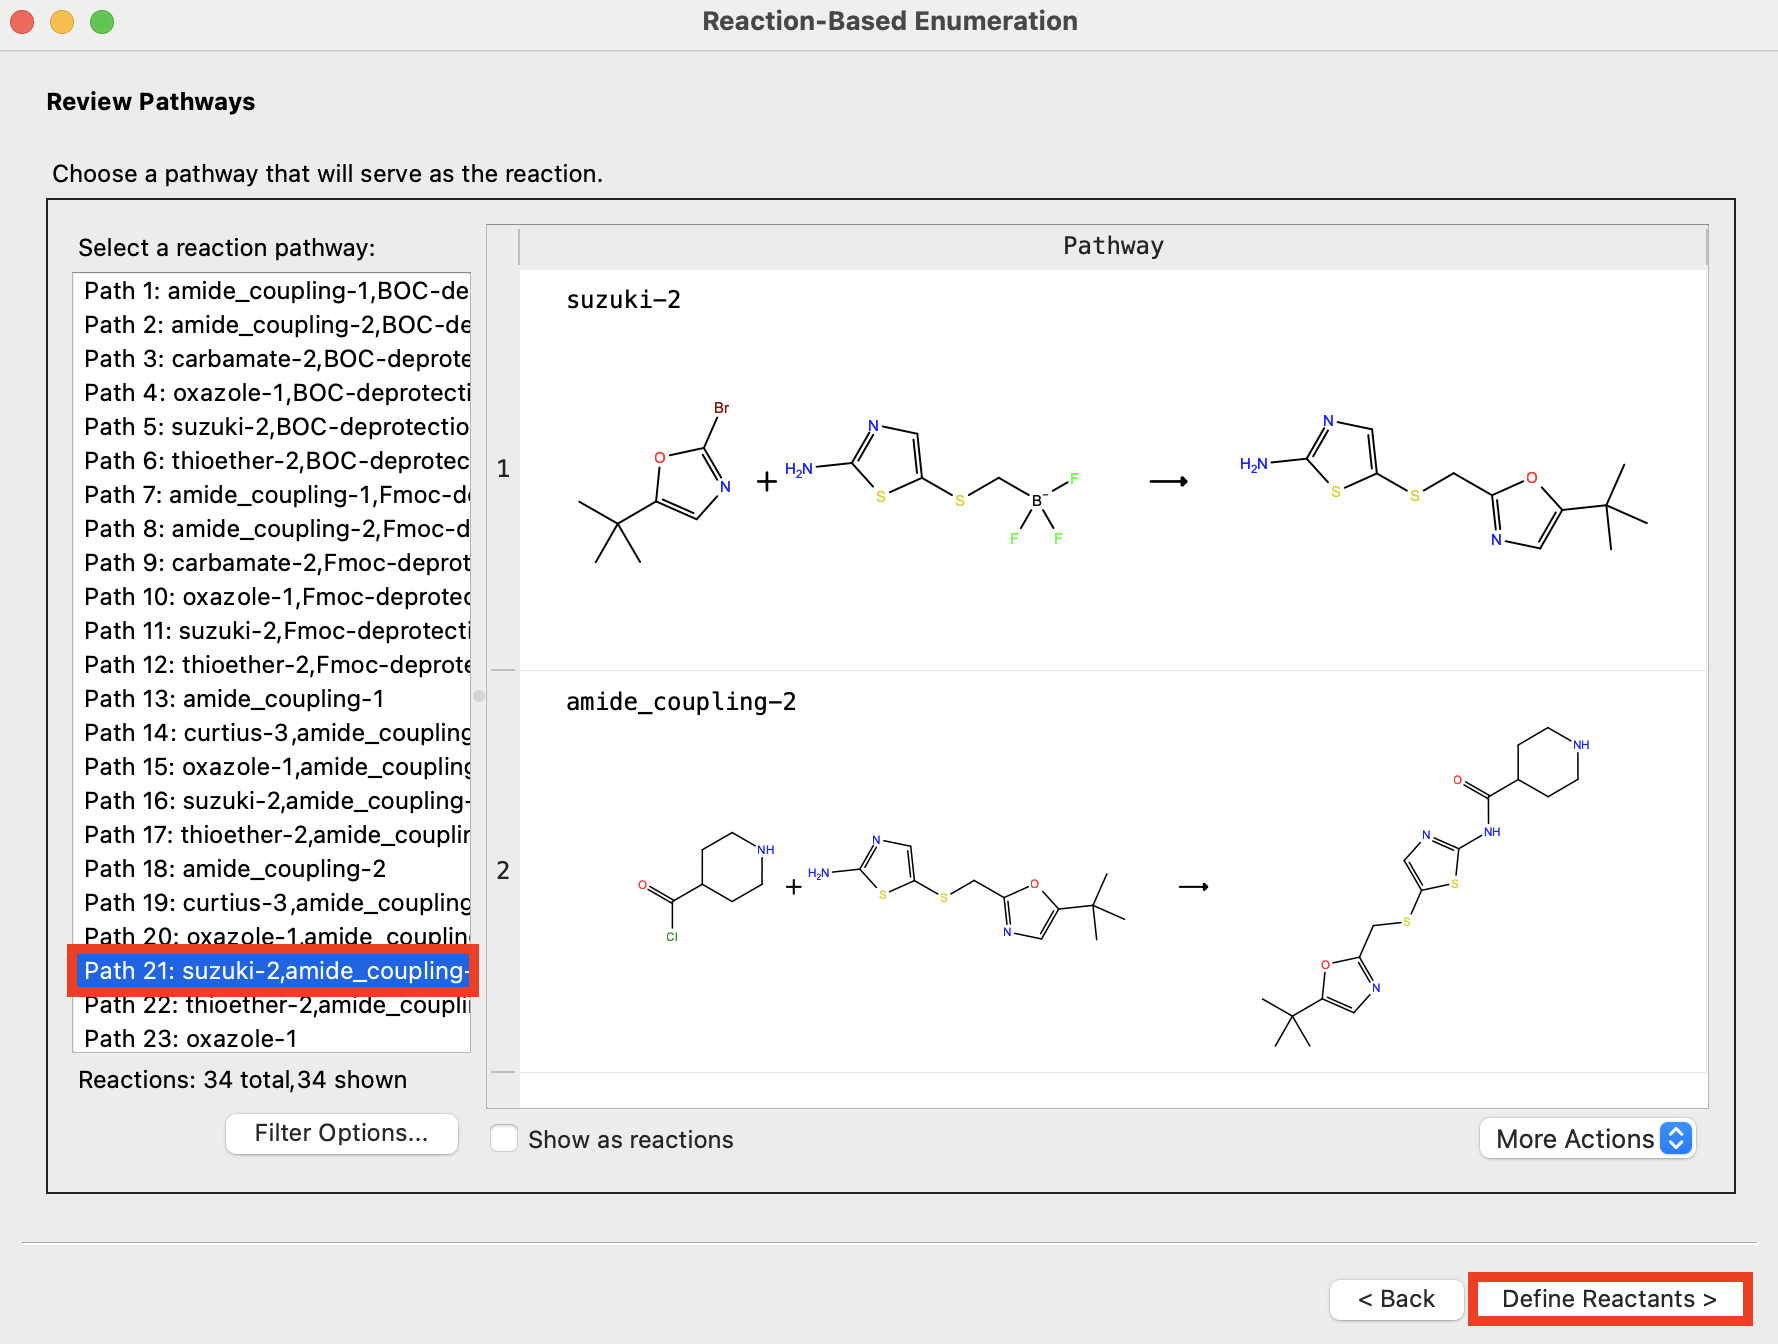
Figure 4-7. Choose pathway.
- In the Reaction-Based Enumeration panel, click Back twice to return to the Choose Reaction step
Note: This clears the Pathway filter added in the previous example.
Click Generate Pathways
Choose Path 21: suzuki-2,amide_coupling-2
Click Define Reactants
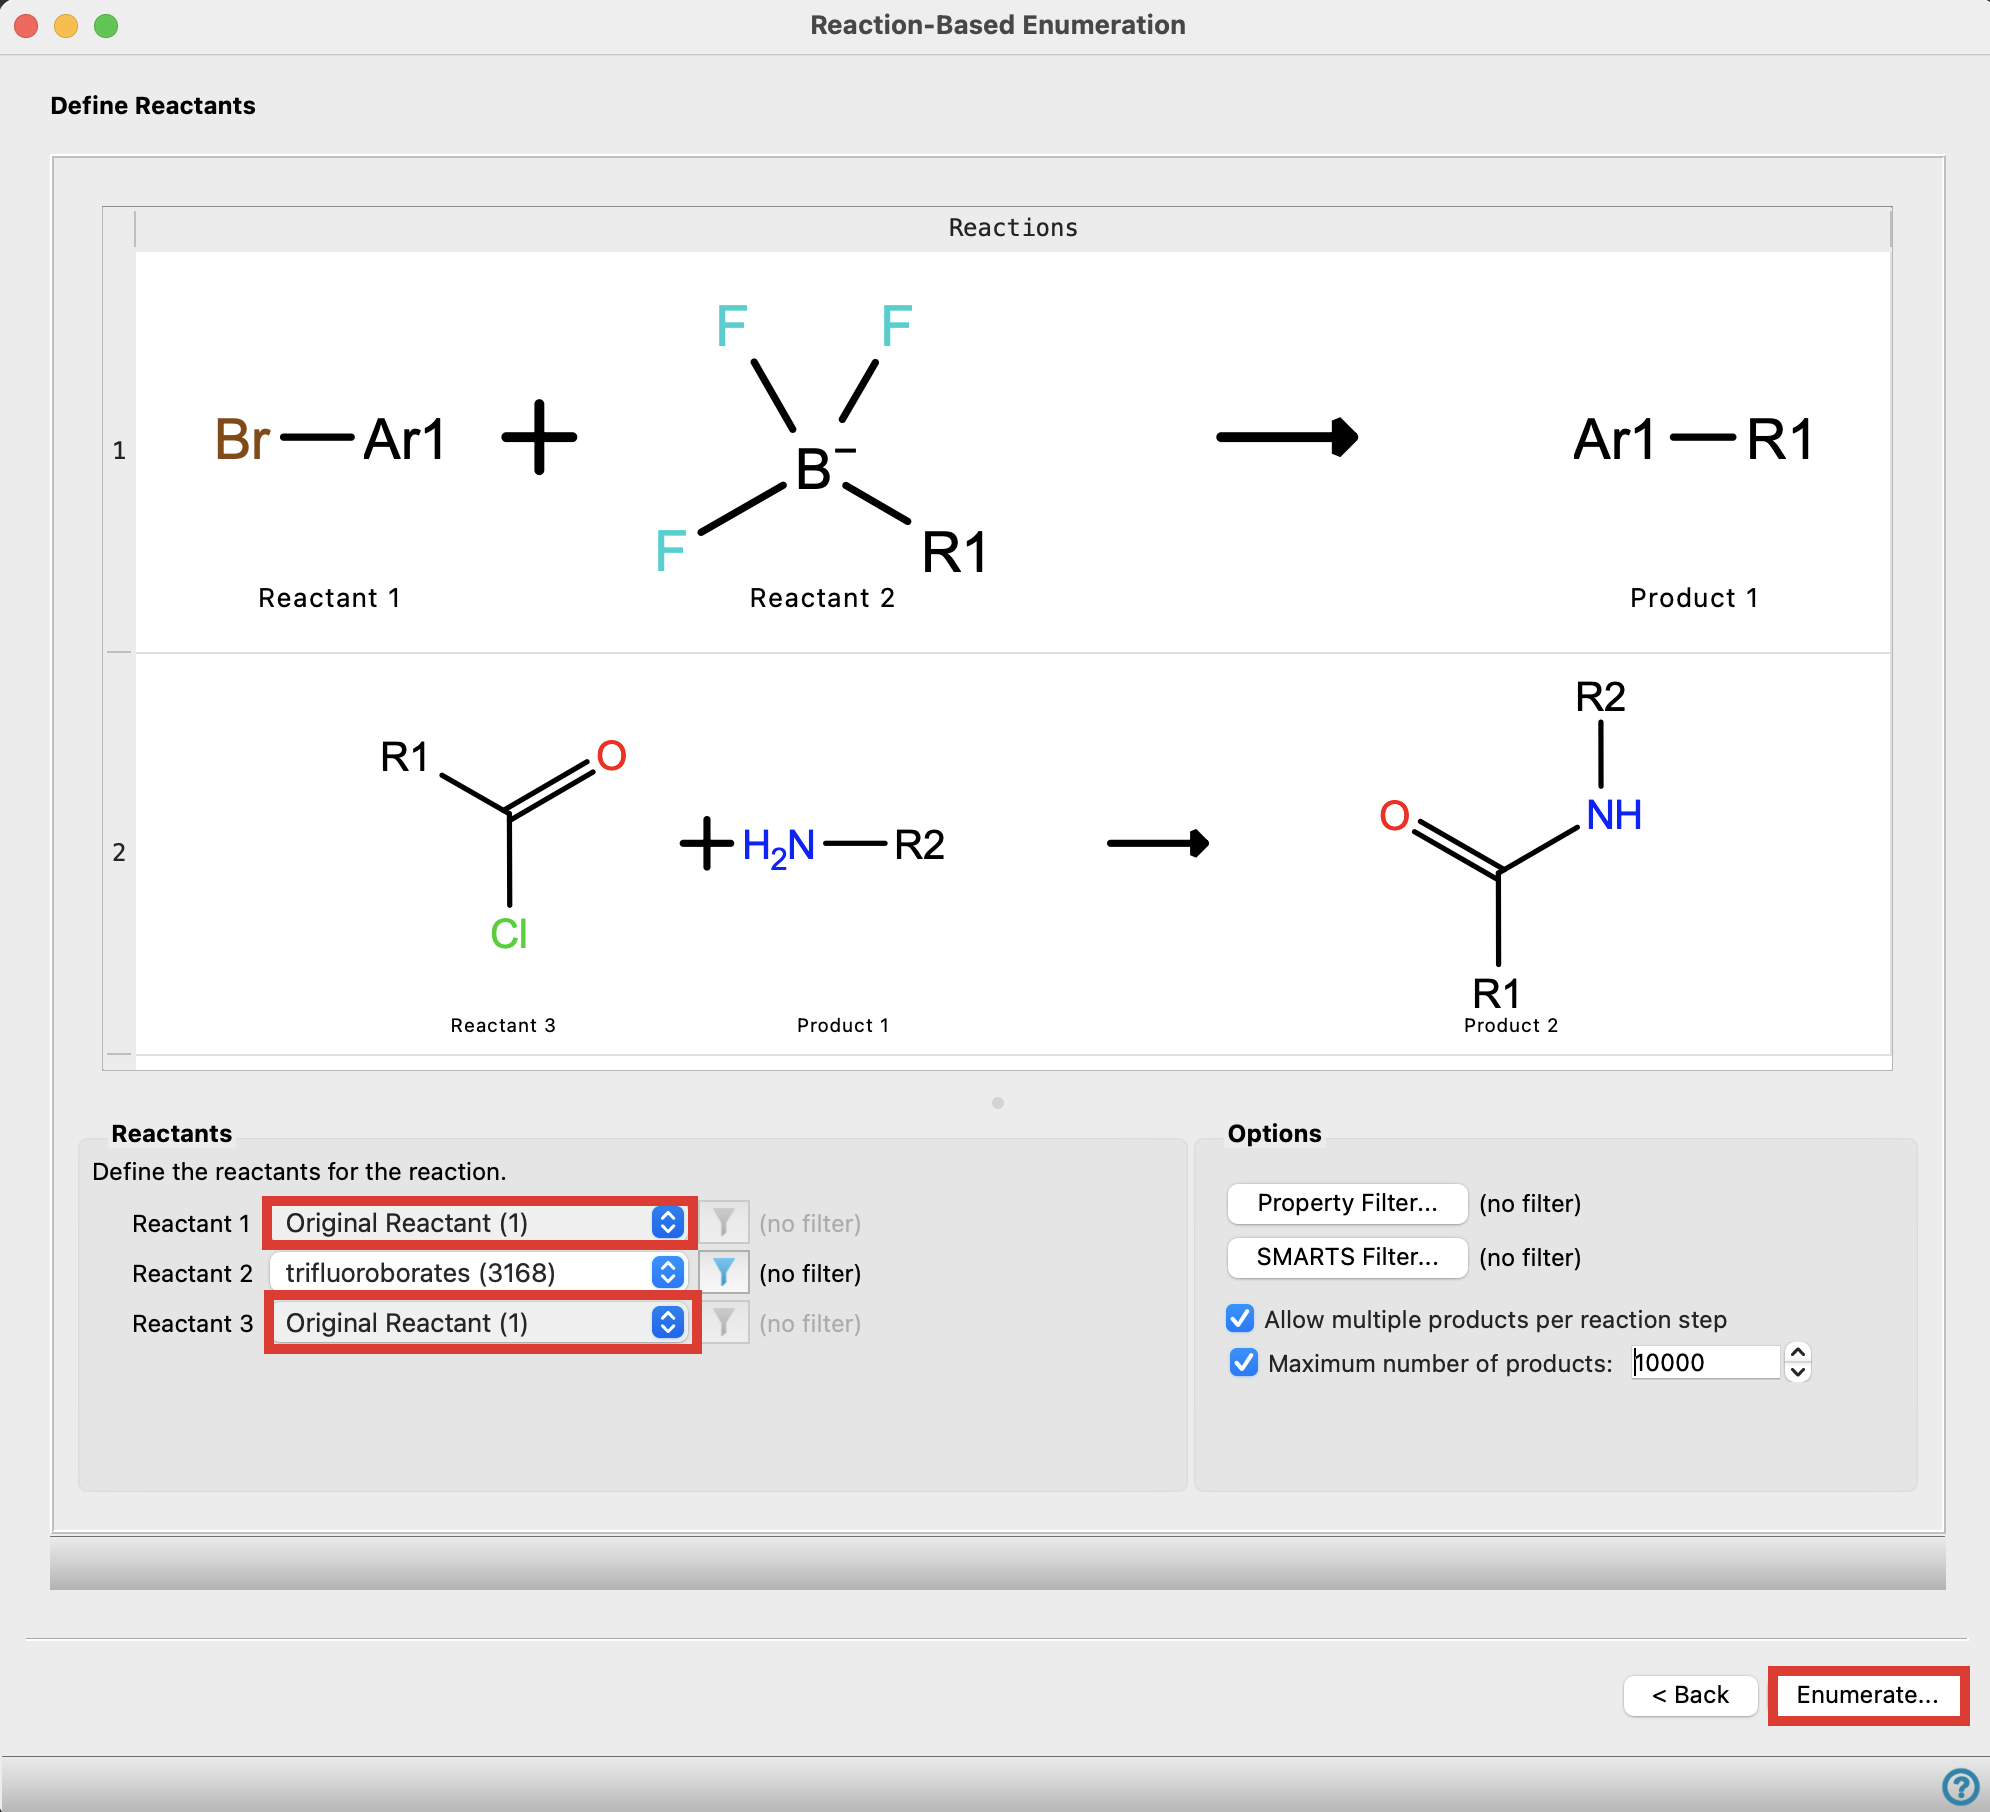
Figure 4-8. Choose reactants for the enumeration.
Note: To determine which reactants correspond to which portion of the input molecule, hover over the reaction until a tooltip pops up
For Reactant 1 and Reactant 3, choose Original reactant (1)
Click Enumerate
Depending on the functional groups required for the enumerated core and the reaction depth, it is potentially helpful to generate a custom library of cores that contain the particular functional groups needed for a given pathway (this is not necessary for this section)
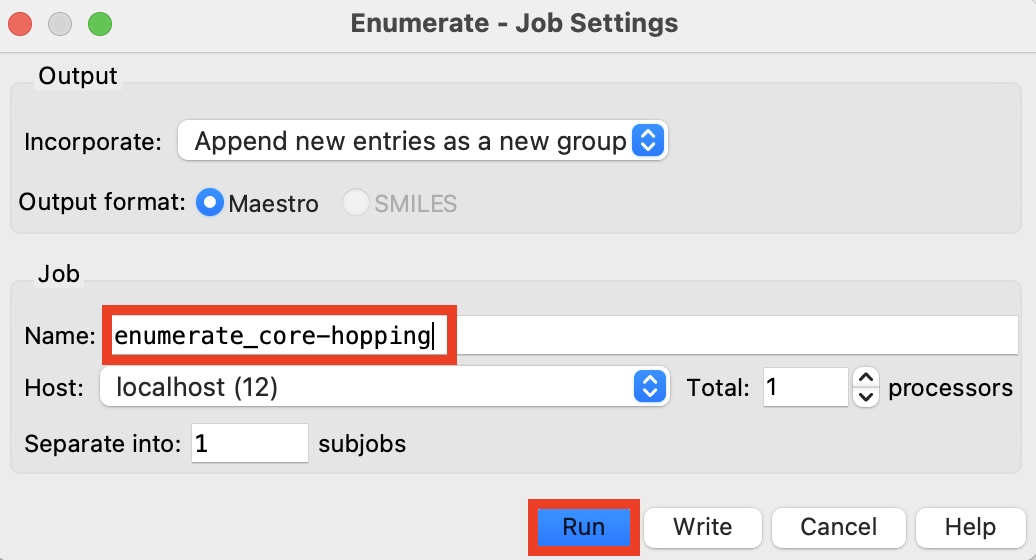
Figure 4-9. Run core-hopping job.
Rename the job enumeration_core-hopping
Click Run
The job takes less than a minute on 1 CPU
A new group is added to the Entry List
180 core hopped compounds were generated. It is normal to get lower than the desired number of products during a core-hopping enumeration since multiple reactive handles are required.
4.3 Enumerate R-groups
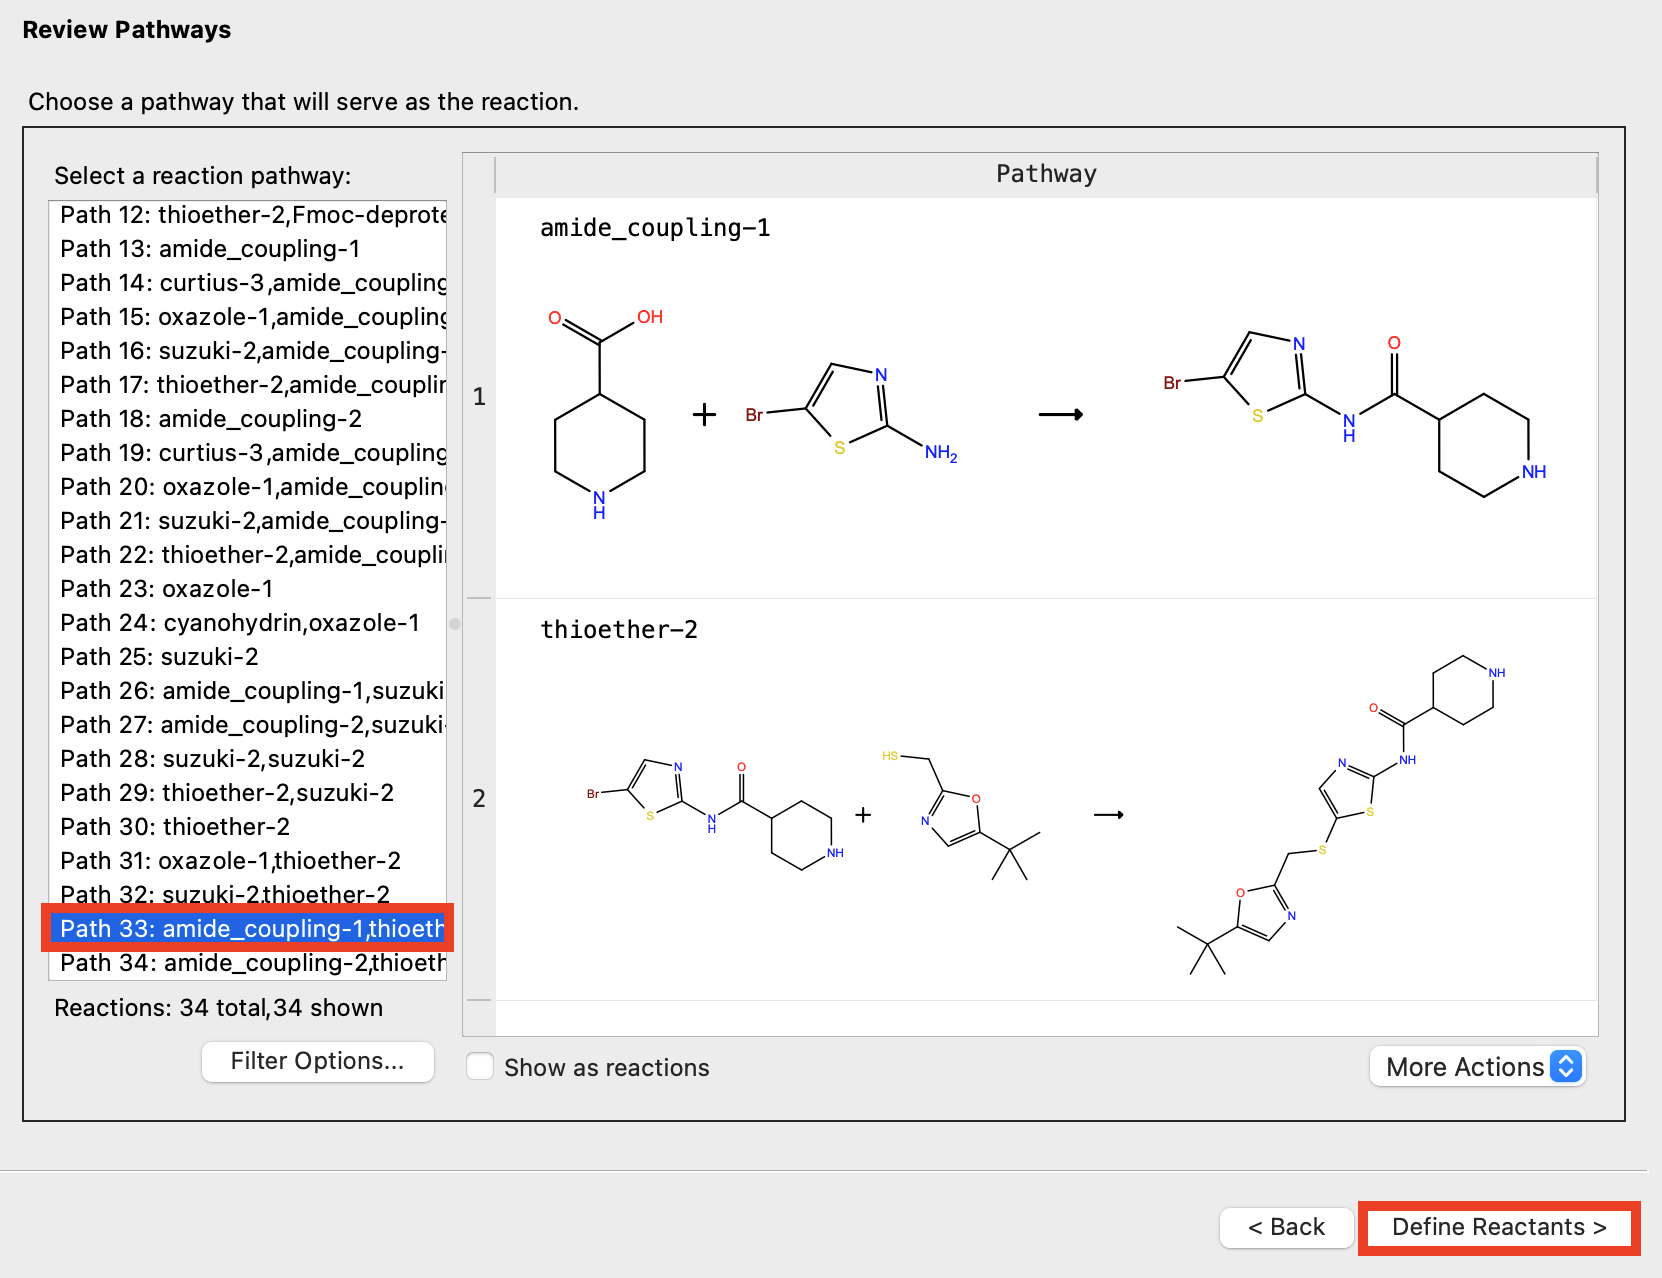
Figure 4-10. Choose pathway.
In the Reactions-Based Enumeration panel, click Back to return to the Review Pathway page
Choose Path 33: amide_coupling-1,thioether-2
Click Define Reactants

Figure 4-11. Choose reactants.
- For Reactant 2, choose Original Reactant (1)
- This will ensure that only the R-groups are varied in each of the outputs.
Note: Both of the non-core groups of the input molecule will be enumerated combinatorially
- Click Enumerate
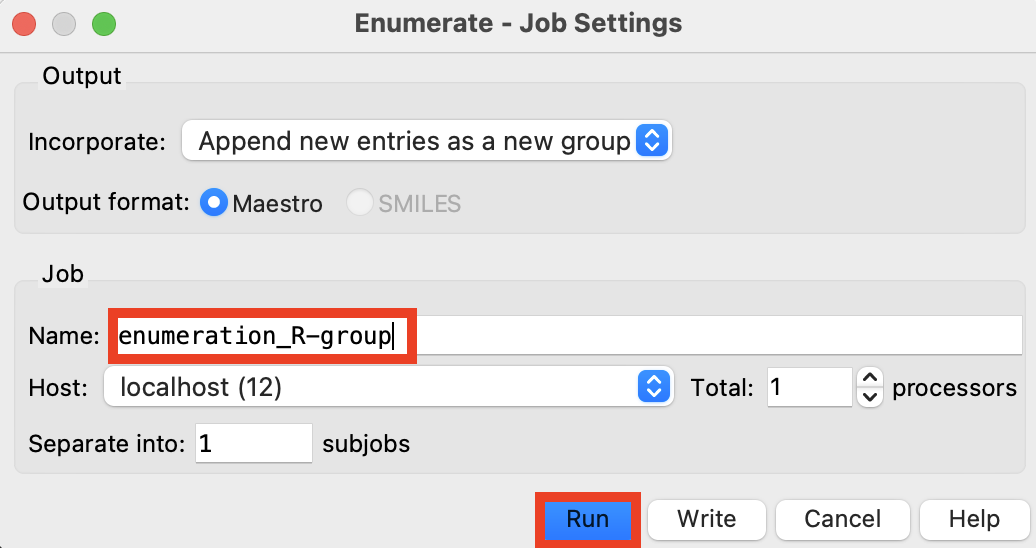
Figure 4-12. Run enumeration job.
Rename the job enumeration_R-group
Click Run
The job takes 4-5 minutes on 1 CPU
A new group is added to the Entry List
Note: The enumeration results in 10,000 unique compounds
4.4 Create reaction manually for enumeration (optional)
For manual reaction creation in Reaction-Based Enumeration, all R-groups must be drawn explicitly.
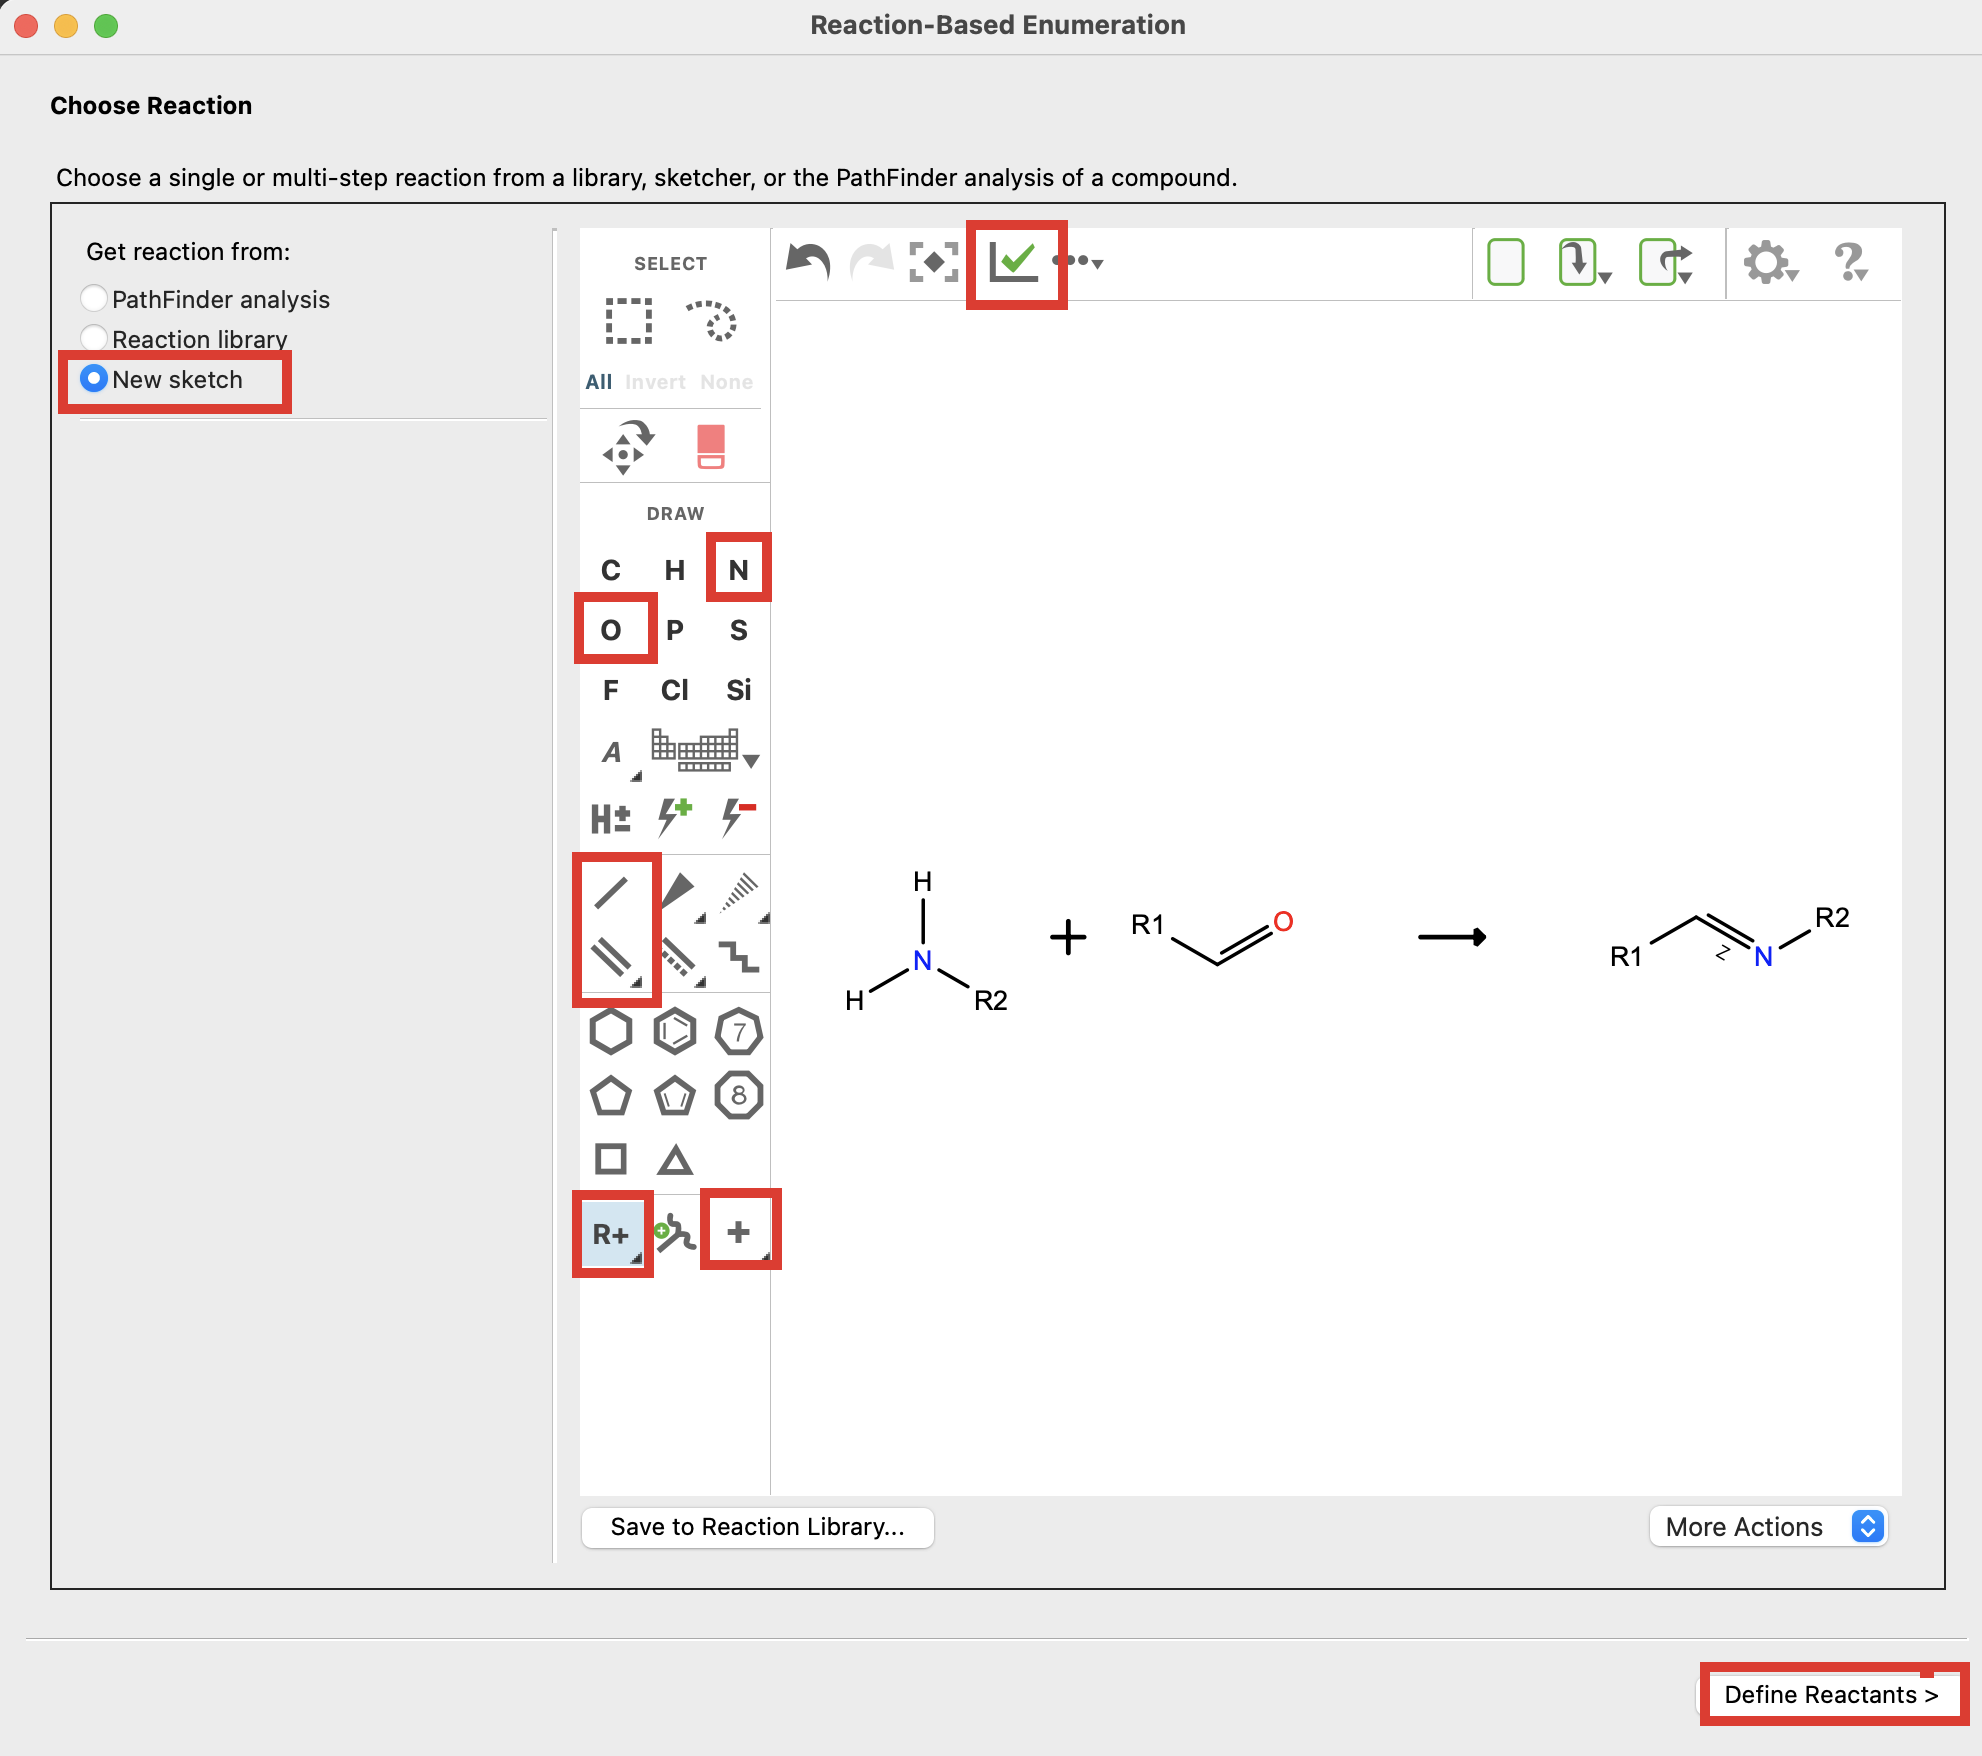
Figure 4-13. Sketch reaction.
In the Reactions-Based Enumeration panel, click Back to return to the Choose Reaction page
For Get reaction from, choose New Sketch
Sketch a Schiff base condensation
Select the green check mark to clean up
- The reaction will appear linear, further modification may be needed
- Click Define Reactants
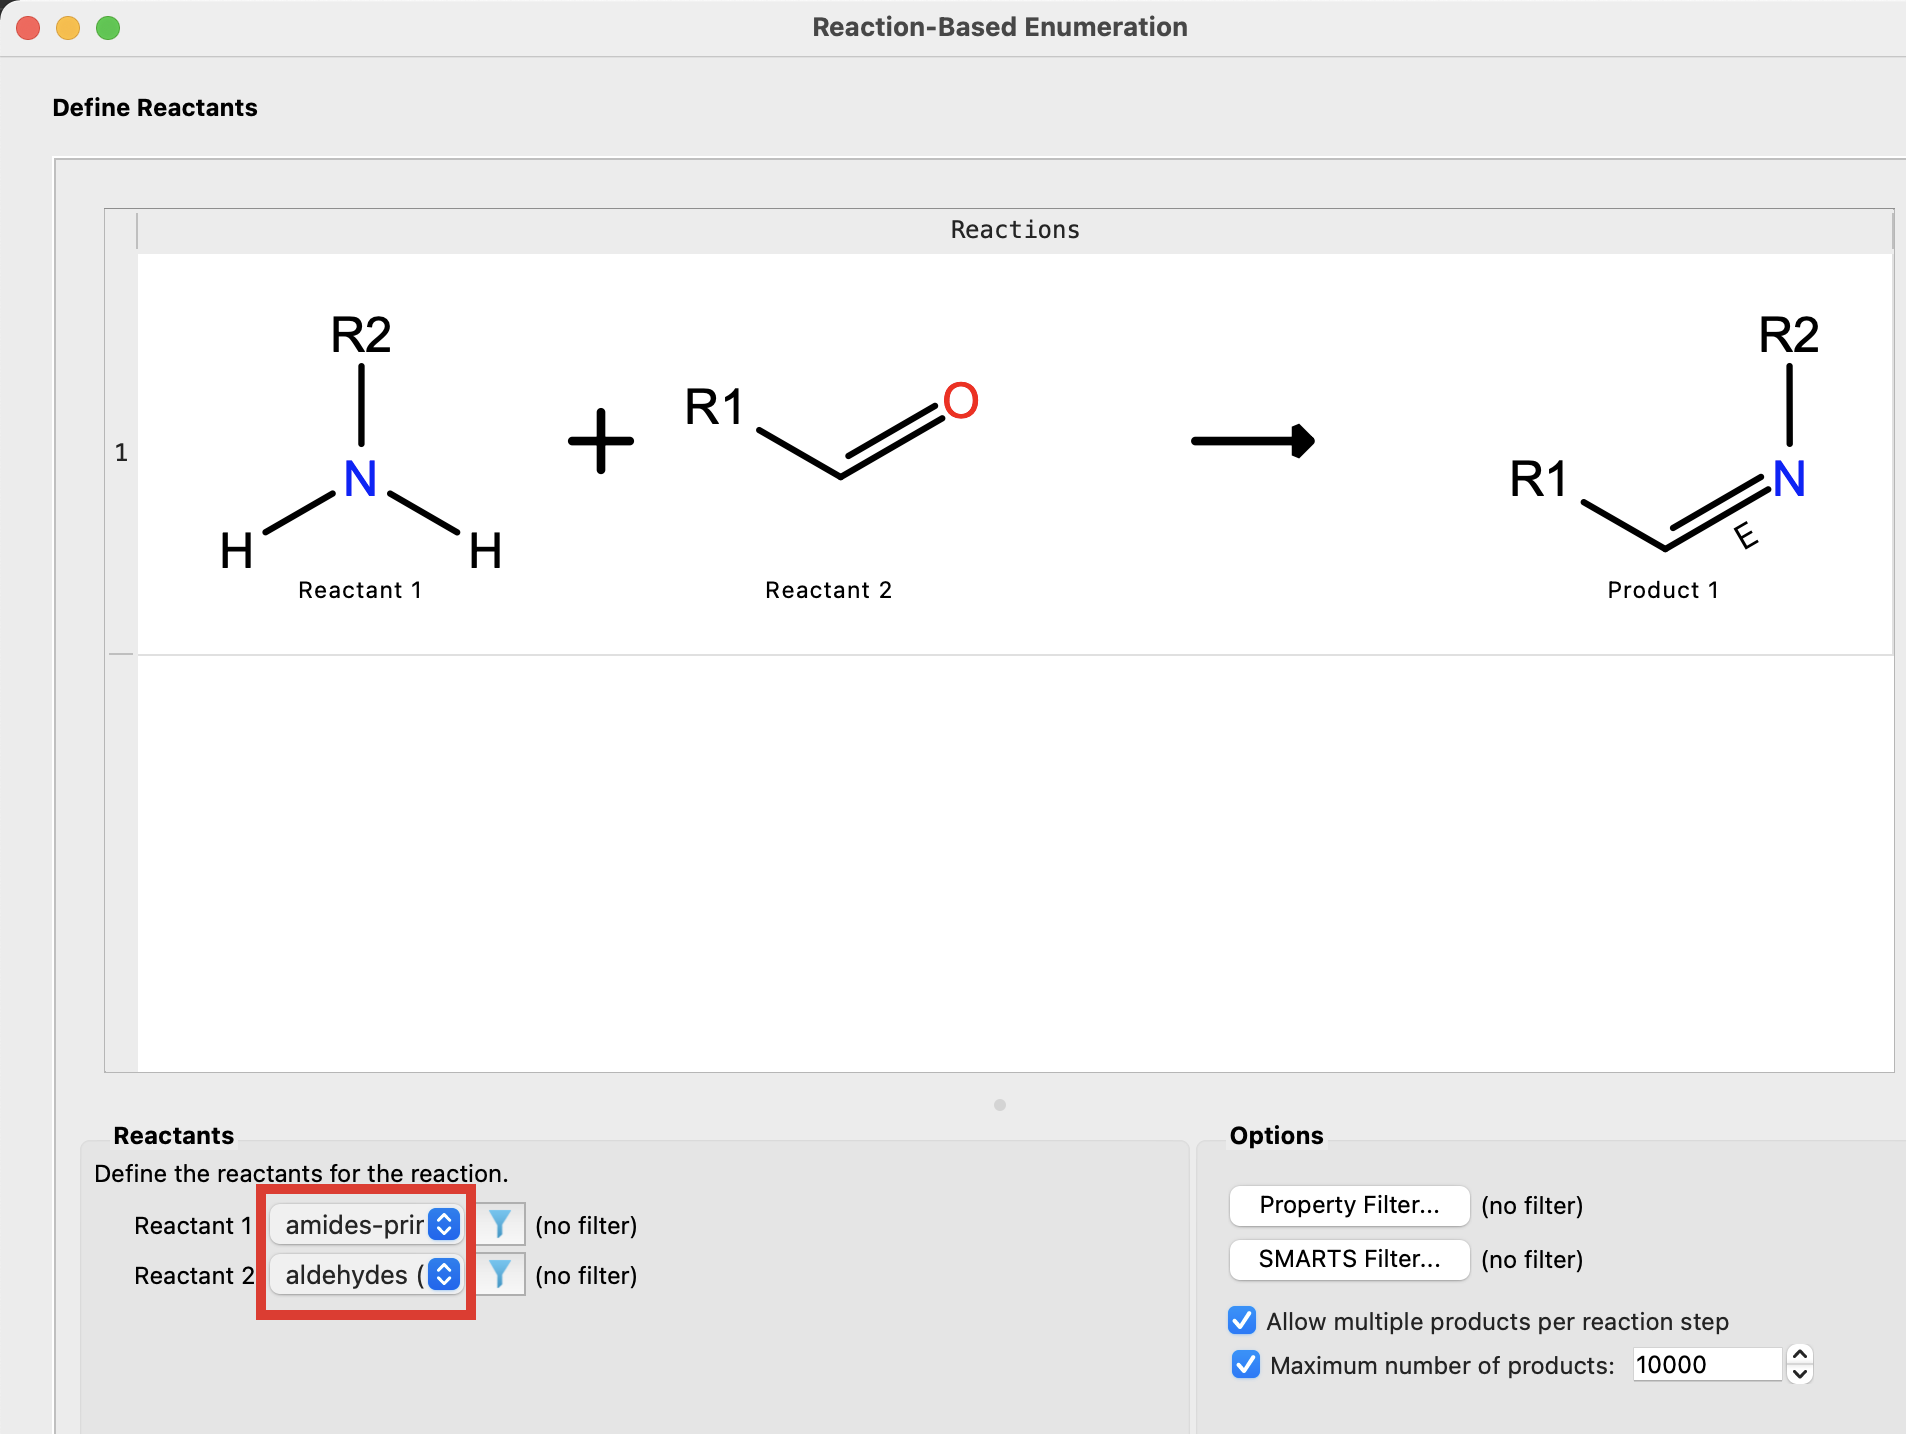
Figure 4-14. Choose reactants.
For Reactant 1, select Reactant Library and choose amines-prim and click OK
For Reactant 2, select Reactant Library and choose aldehydes and click OK
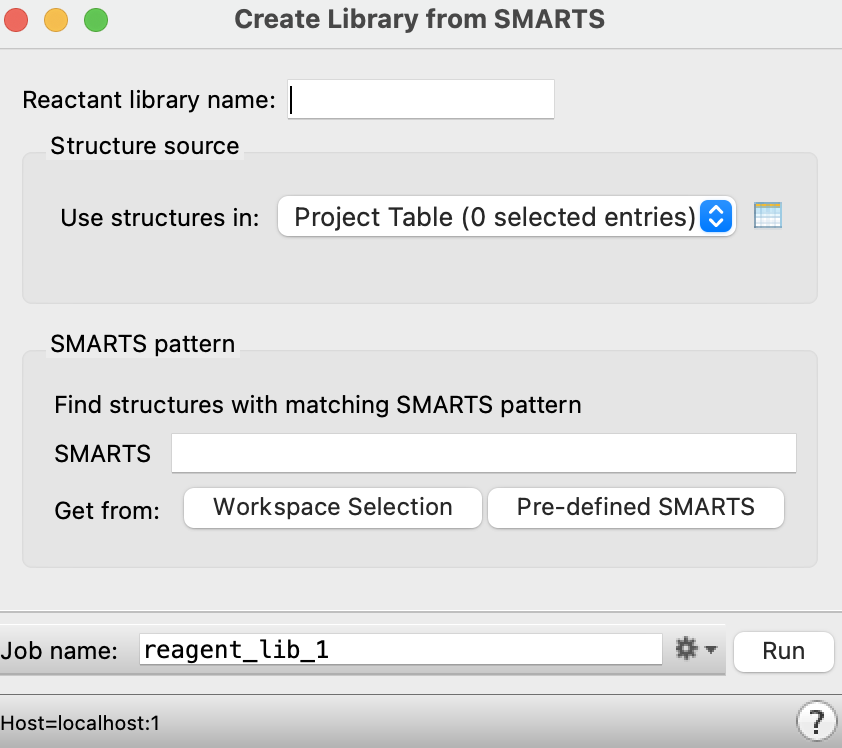
Figure 4-15. Create Library from SMARTS panel.
Note: To generate new reactant libraries from the Project Table or a file, select Reactant Library and click +New to open the Create Library from SMARTS panel.
Note: The Create Reactant Library from SMARTS panel can also be accessed by going to Tasks > Browse > Enumeration and Ideation > Create Reactant Library.
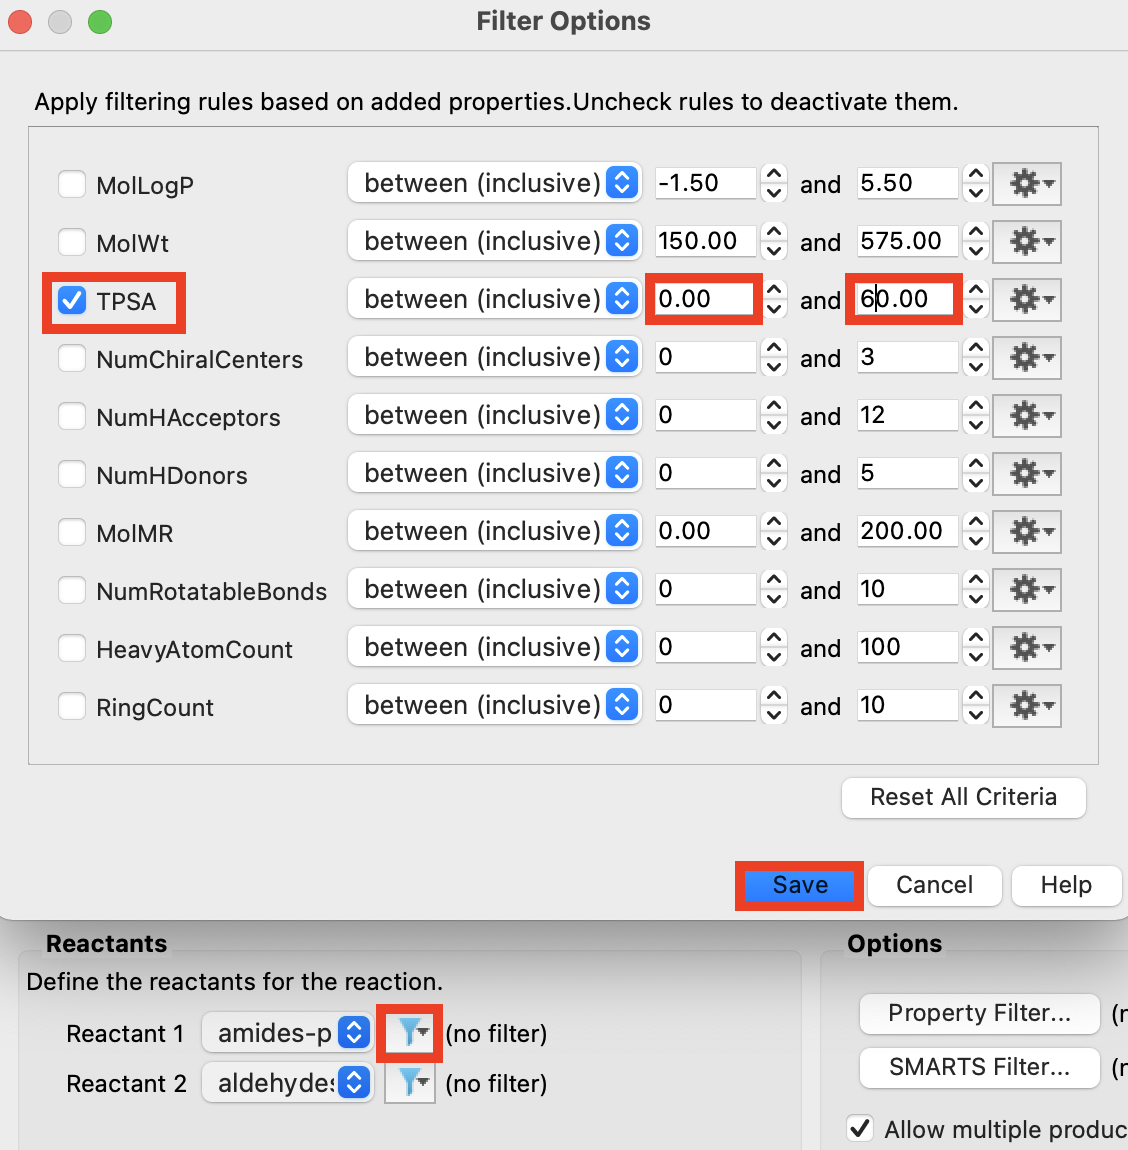
Figure 4-16. Choose filter properties.
Click the filter icon next to Reactant 1
Choose Property filter
In the Reactants Tab, check TPSA
For TPSA, set the bounds to 0 and 60
Click Save
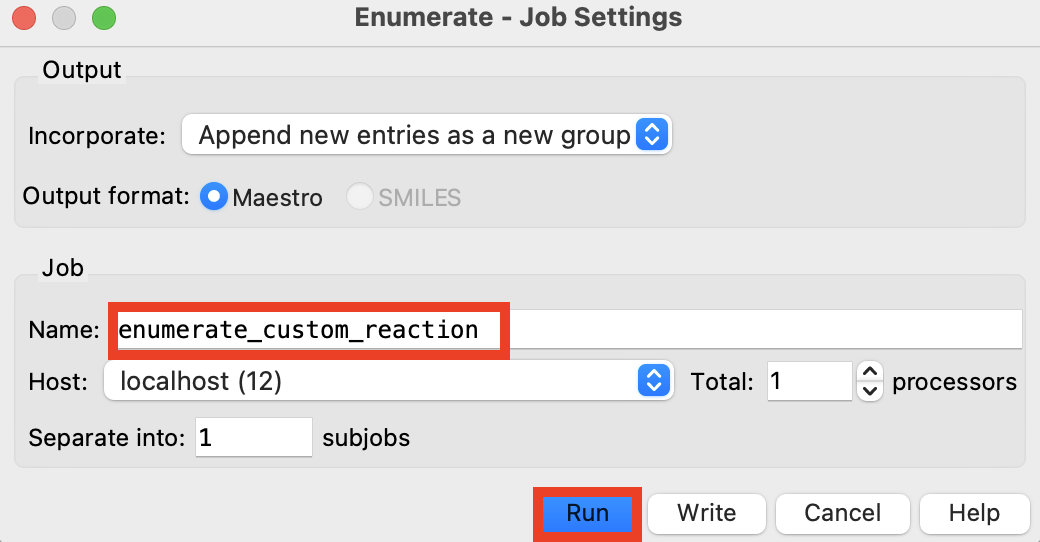
Figure 4-17. Run enumeration job.
Click Enumerate
Rename the job enumeration_custom_reaction
Click Run
The job takes 10-15 minutes on 1 CPU
A new group with 10,000 imine-containing compounds is added to the Entry List
- Close the panel
Enumeration jobs with a reactant filter are expected to take longer, as the reactants will need to be pre-filtered before the enumeration can proceed
5 Creating and Managing Custom R-Group Library
In addition to using the 13 pre-packaged R-groups libraries, you can generate or import your own custom R-group libraries. R-groups can be added using a sketcher or they can be defined from a Maximum Common Substructure analysis of a set of ligands. These libraries can then be used in the Custom R-Group Enumeration panel, as shown in Section 2.
5.1 Add R-groups from a set of ligands
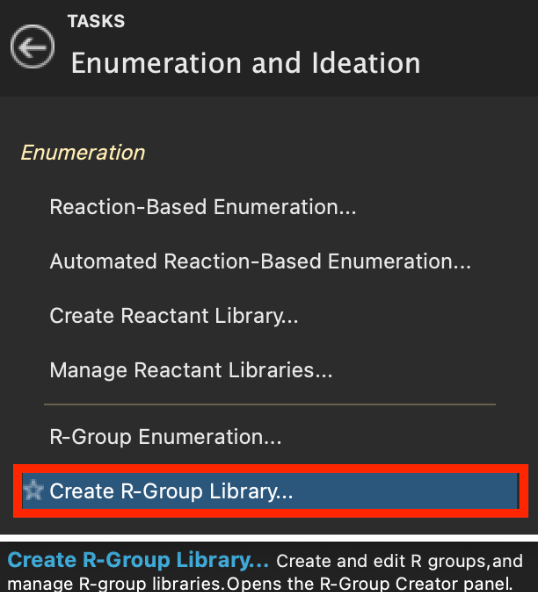
Figure 5-1. R-Group Creator in Enumeration and Ideation.
- Go to Tasks > Browse > Enumeration and Ideation > Create R-Group Library
- The R-Group Creator panel opens
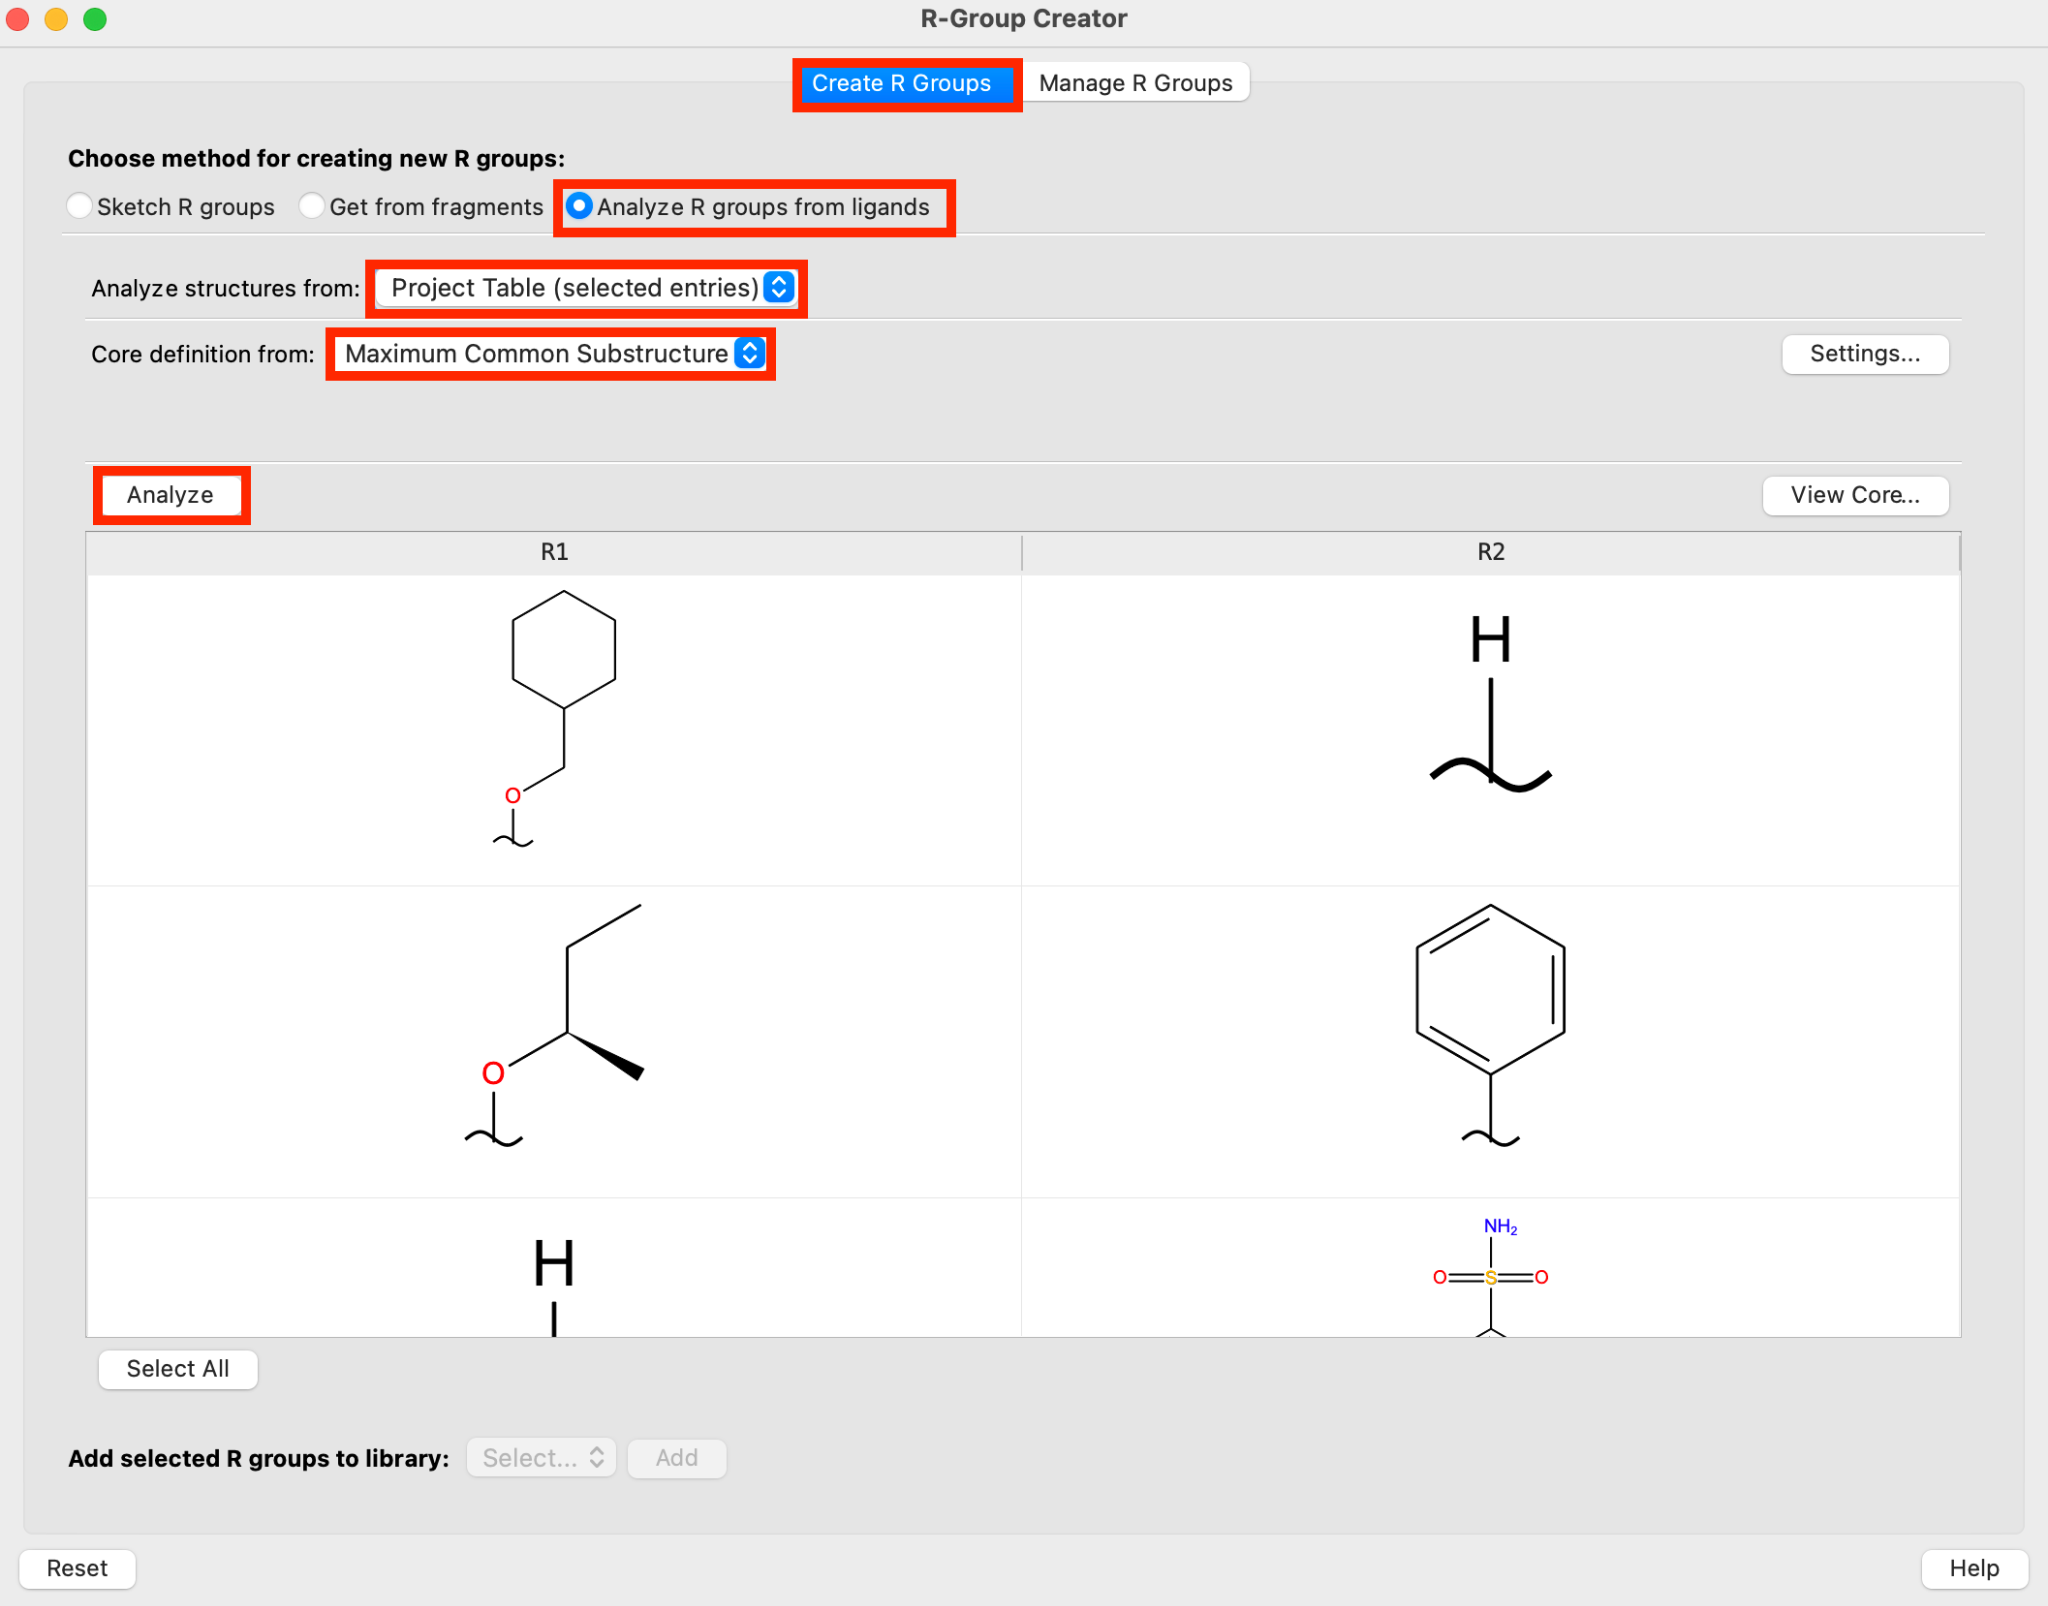
Figure 5-2. Generate R-groups from a set of congeneric ligands.
In the Create R Groups tab, select Analyze R groups from ligands
Select the Ligands group in the Entry List
For Analyze structures from, choose Project Table (selected entries)
For Core definition from, choose Maximum Common Substructure
Click Analyze
- The R-groups for the set of ligands has been defined
The Maximum Common Substructure criteria can be set by clicking Settings. Click View Core to see how the core has been defined by the Maximum Common Substructure
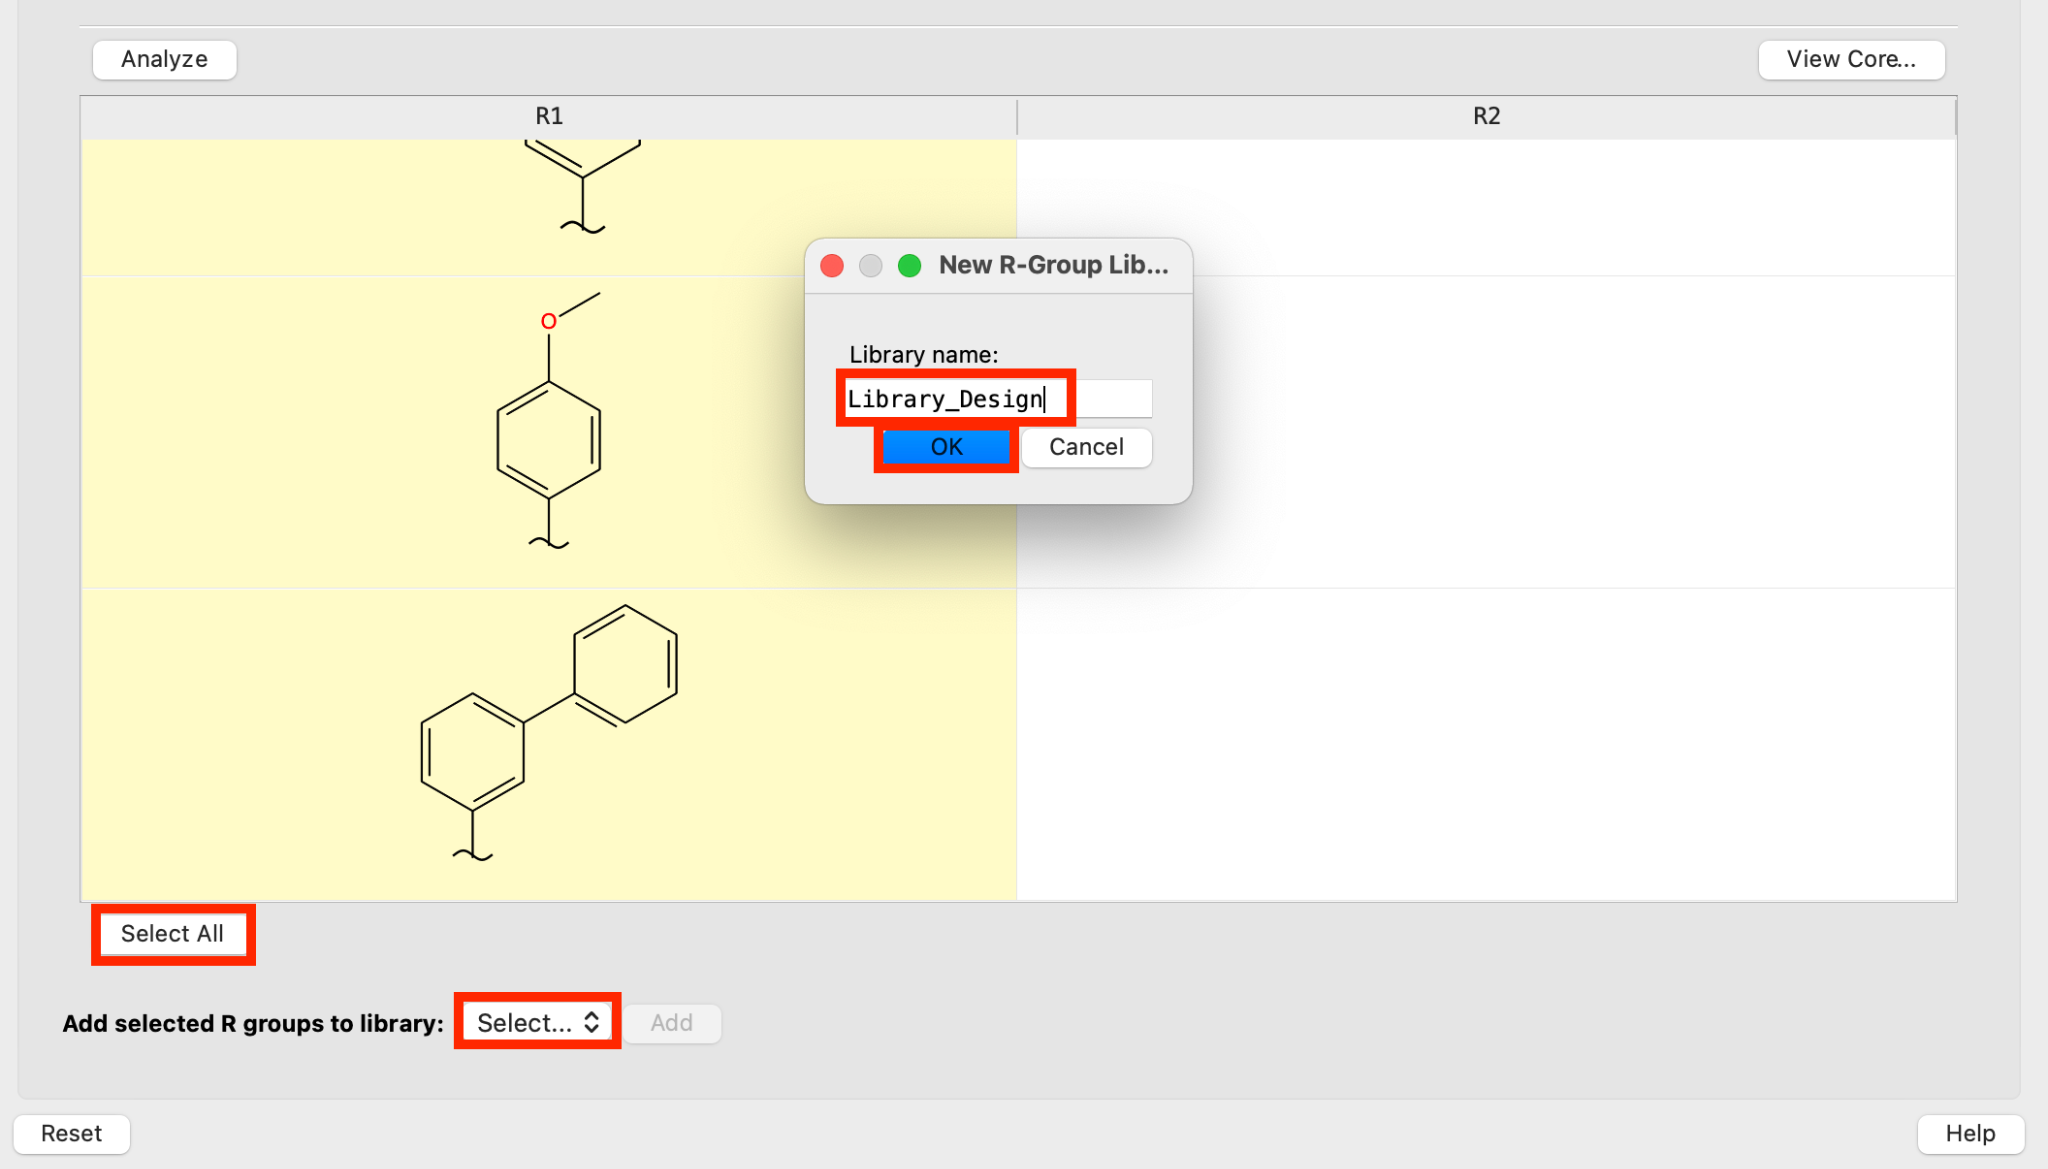
Figure 5-3. Add R groups to new library.
Click Select All
For Add selected R groups to library, choose New
- The Library name panel opens
- For New R-Group Library, write Library_Design and click OK
Note: New libraries can also be created in the Manage R Groups tab
- Click Add
- The R-groups have been added to a new library titled Library_Design
5.2 Sketch custom R-groups
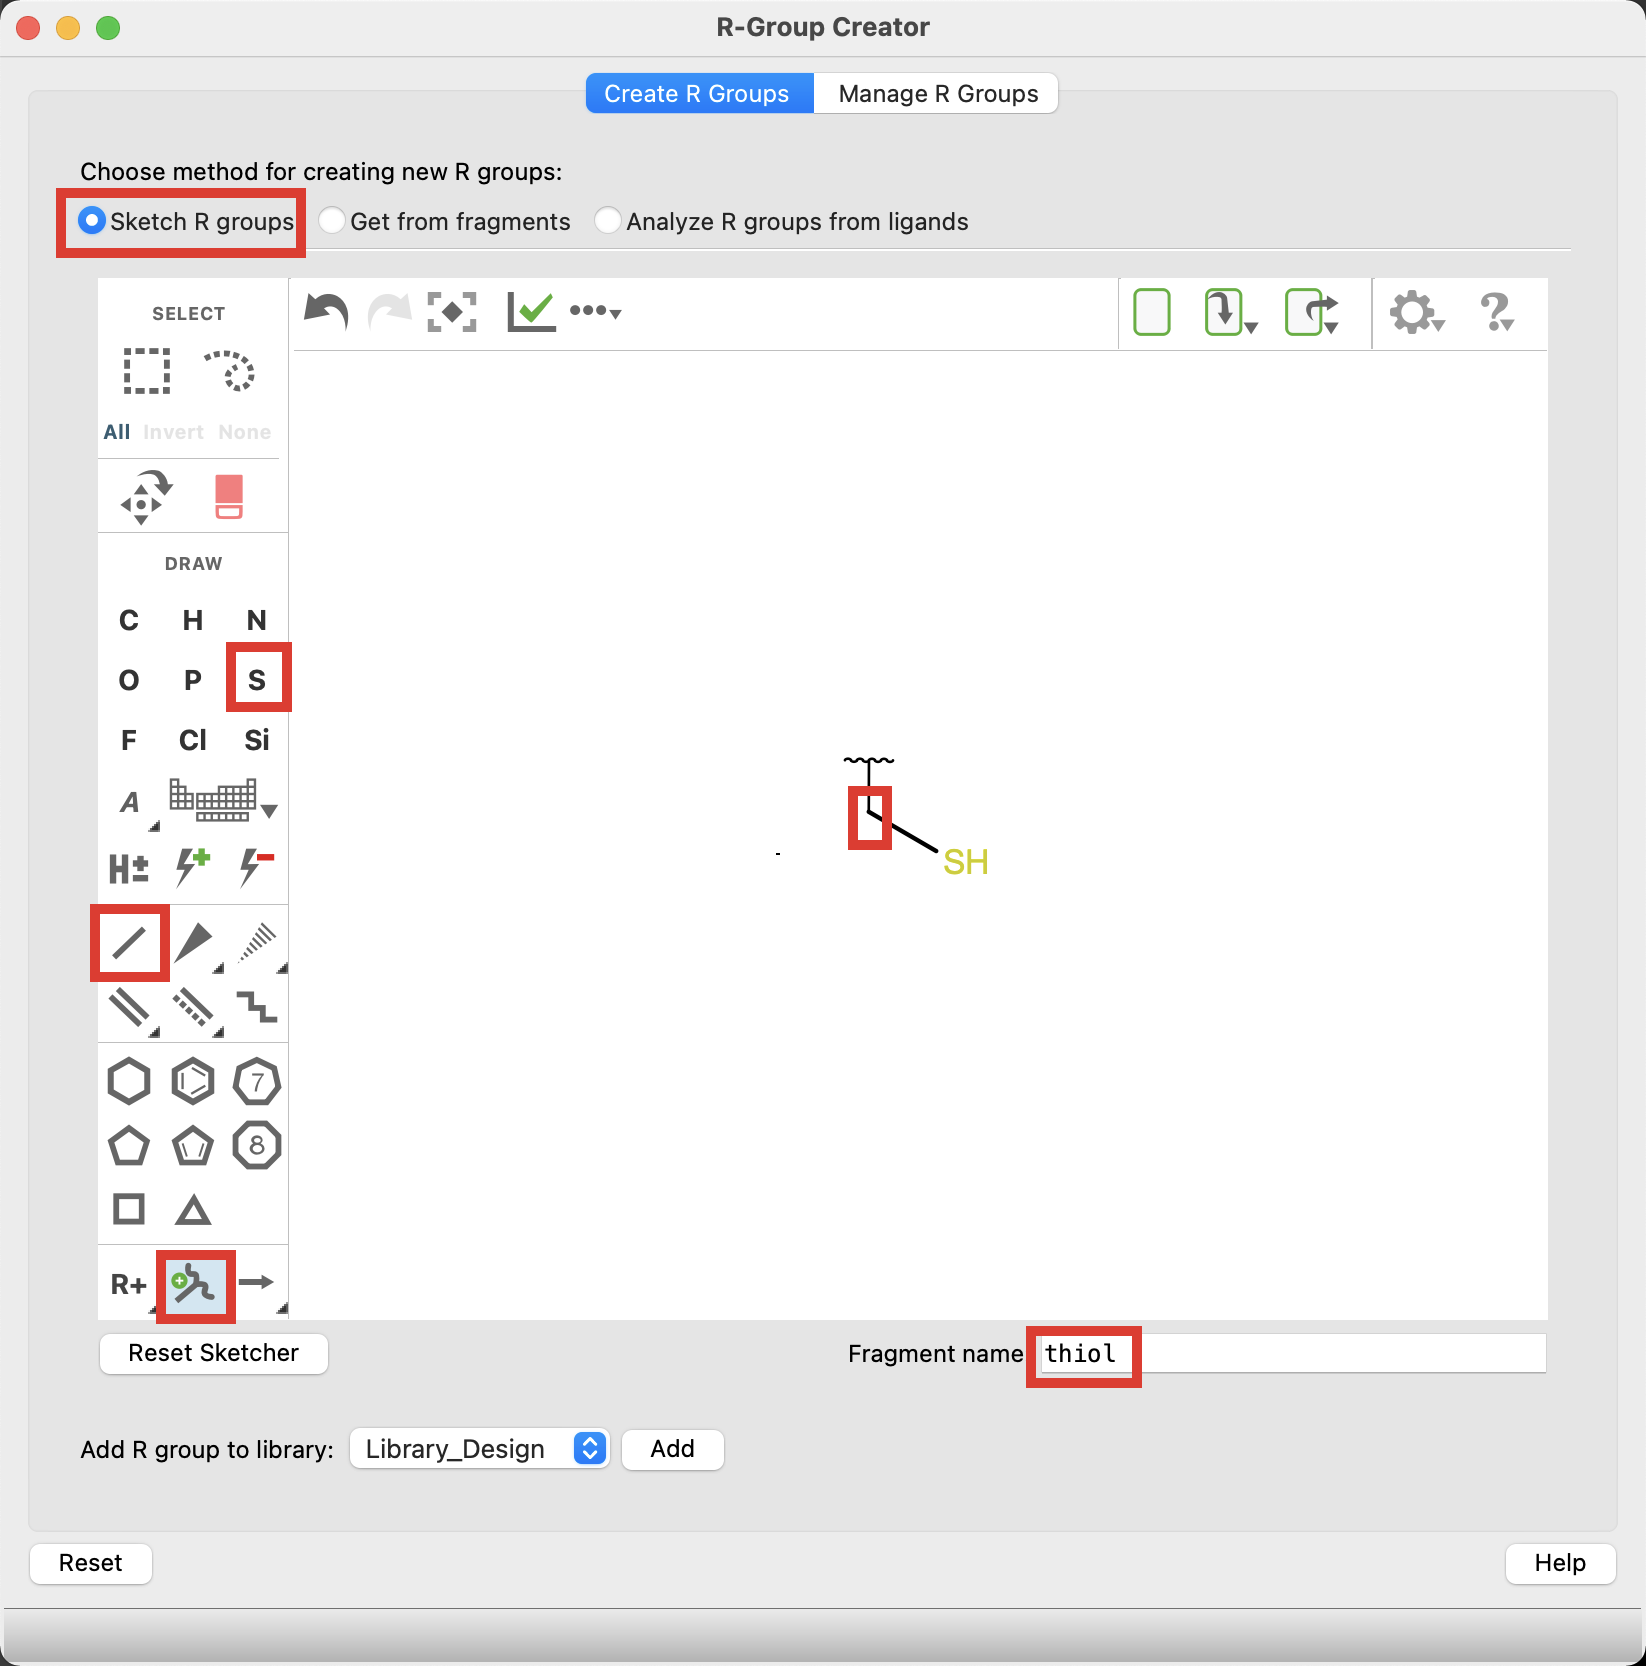
Figure 5-4. Sketch R-group.
Click the Sketch R Groups method
Sketch a thiol
Select the attachment point tool and click on the carbon in your structure
- The R-group attachment point is now defined
- Name the Fragment thiol

Figure 5-5. Add R-group to library.
- For Add R group to library choose Library_Design and Click Add
- The thiol group has been added to the Library_Design R-group library
5.3 Manage R-group library
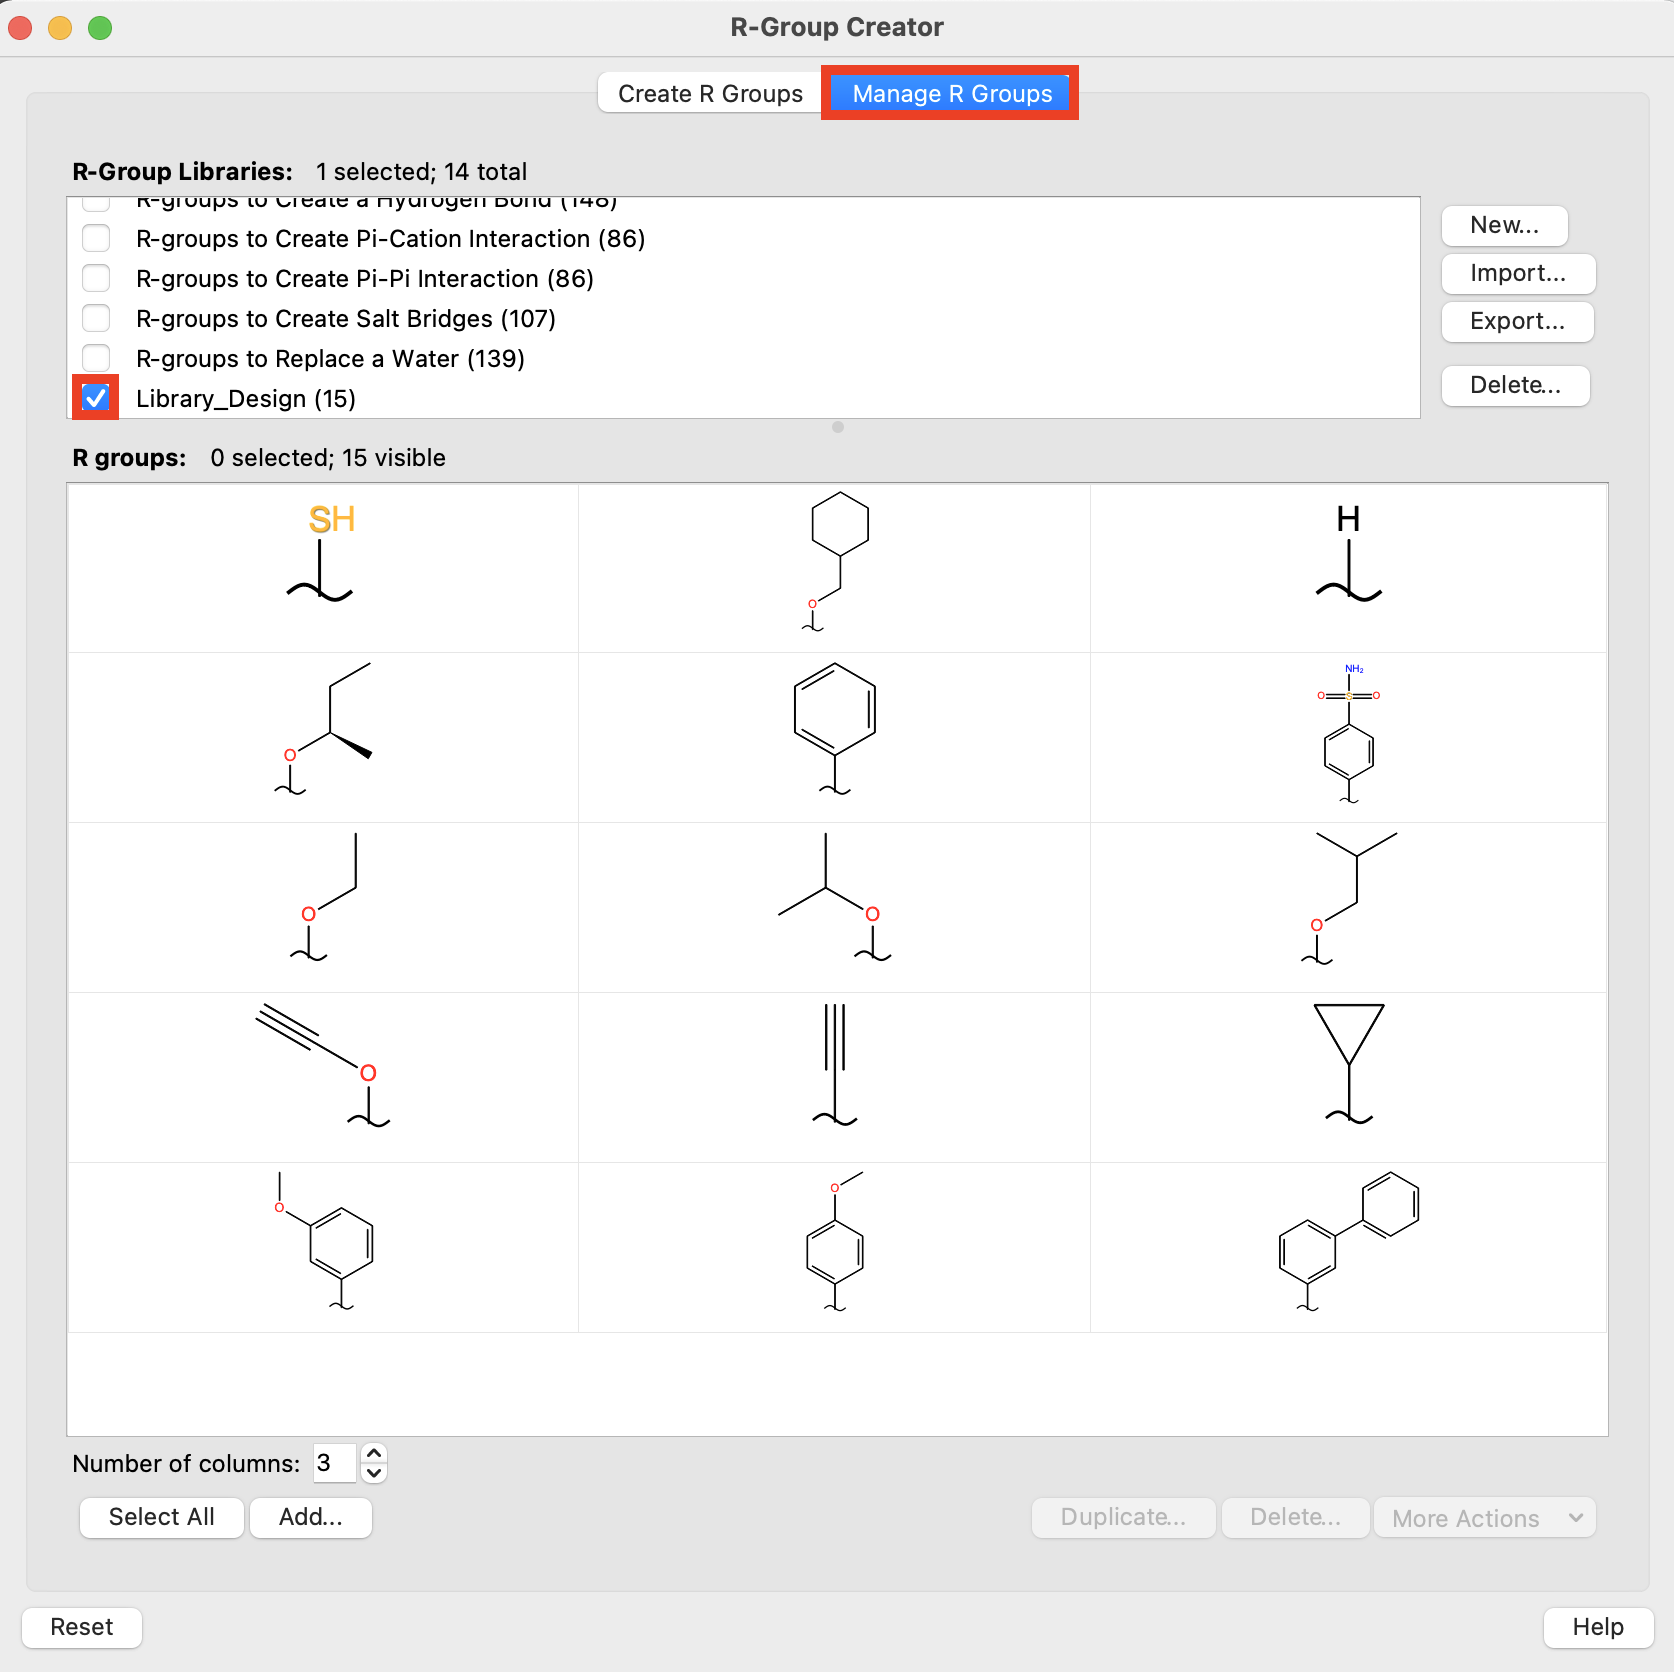
Figure 5-6. Manage R Groups tab.
Go to the Manage R Groups tab
Deselect All
For R-Group Libraries, select Library_Design
Note: In the Manage R Groups tab, you can import R-groups to a library (Import), export an R-group library (Export), create a new R-group library (New), or edit an R-group (More Actions > Edit)
6 Conclusion
In this tutorial, we used R-group Enumeration and Bioisostere Replacement to explore SAR and address potential AMDE issues. Then, working off the same input structure, we used Reaction-Based Enumeration with Pathfinder to perform three different enumerations that can be helpful during the lead optimization stage of a drug discovery project.
References
[1] https://www.schrodinger.com/sites/default/files/s3/release/current/Documentation/html/tutorials/library_design/library_design.htm